Add Conditions
|
Add Filter Components, for the recommended approach to filtering your data in most cases. |
You can filter the values displayed in a Data View component (Chart, Table, Crosstab) or Output component (Gauge, Text) to match specified criteria by setting a Condition on the component. For example, you can filter a Chart or a Table so that it displays only data for a particular sales employee or region.
| Condition-based filtering applies on the component level, and is different from filtering provided by Filter components such as Selection Lists and Range Sliders (see Add Filter Components.) Filter components filter the Dashboard’s underlying data block and therefore affect all Data View and Output elements in the Dashboard that use the same data block. In contrast, a Condition that you place on a particular component affects only that component. |
Apply a Condition
Watch Video: Filtering a Dashboard (Add Static Condition)
This video might show an earlier version of the feature or operation that differs in minor ways from the current version.
To apply a Condition to a Data View or Output component, follow these steps:
-
Right-click the element, and select ‘Conditions’ from the context menu. Note: You can also access menu options from the ‘More’ button (
 ) in the mini-toolbar. This opens the ‘Conditions’ dialog box.
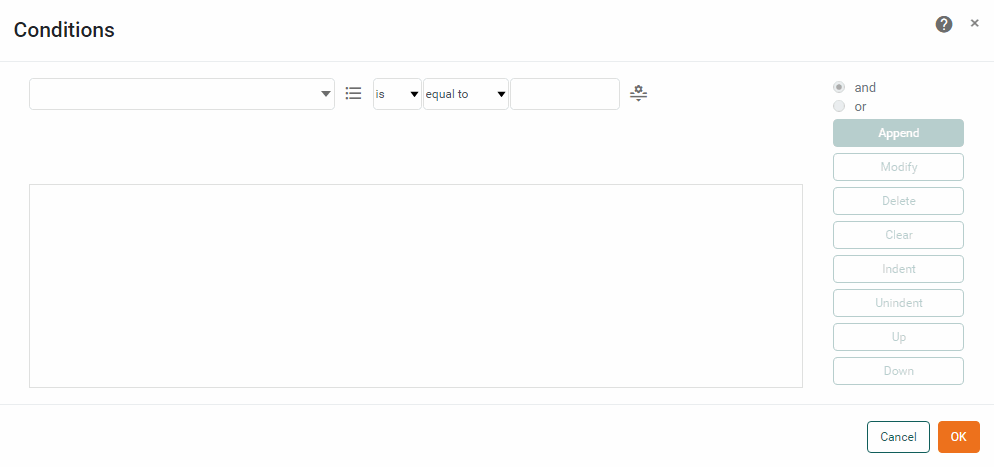
-
Select the operand and type of comparison from the menus at the top of the dialog box, for example,
[Company][is not][one of].Note: To filter out null values, you can use a condition such as [Company][is not][equal to][null]. -
Press the ‘Change Value Type’ button
 , and select ‘Value’, ‘Field’, ‘Expression’, ‘Variable’, or ‘Session Data’. See Value Type Options for more information about these options.
 -
When you have fully specified the condition, press Append.
-
To create a compound condition with multiple clauses, repeat Steps 2-4 above, using the
[and]and[or]operators to compose the condition clauses. See below: -
Press OK to exit the ‘Condition’ dialog box. The component will now only display data that satisfies the Condition.
Value Type Options
The ‘Value Type’ button  provides the following options. See Apply a Condition for information on how to access the button.
-
If you select the ‘Field’ option, in the adjoining menu, choose the column for comparison. (The two columns will be compared row by row; rows that satisfy the condition will be preserved.)
-
If you select the ‘Value’ option, either enter the comparison value into the provided text field, or select ‘Browse Data’ to choose the comparison value from a list. (For the
[one of]operator, Ctrl-click in the ‘Browse Data’ list to select multiple items.) -
If you select the ‘Variable’ option, select one of the Form components listed in the menu to provide the value at runtime. (See Dynamically Set Properties for further details.)
Watch Video: Filtering a Dashboard (Make Condition Dynamic)
This video might show an earlier version of the feature or operation that differs in minor ways from the current version.
If you are using the
[in range]operator for a date field condition, the value assigned to the variable should be one of the permissible range strings, such as ‘Last Year’, ‘This Year’, etc.Read more about the available date ranges…
The following predefined ranges are available for use with the in range operator. Others may also be provided. See the explanations below the table.
Last year
This January
Last November
This year
This February
Last December
Last quarter
This March
Last week
This quarter
This April
This week
Last quarter last year
This May
Week before last week
This quarter last year
This June
Last 7 days
1st Quarter this year
This July
Last 8-14 days
2nd Quarter this year
This August
Last 4 weeks
3rd Quarter this year
This September
Last 5-8 weeks
4th Quarter this year
This October
Last 30 days
1st Quarter last year
This November
Last 31-60 days
2nd Quarter last year
This December
Today
3rd Quarter last year
Last January
Tomorrow
4th Quarter last year
Last February
Yesterday
1st half of this year
Last March
Year to date
2nd half of this year
Last April
Year to date last year
1st half of last year
Last May
Quarter to date
2nd half of last year
Last June
Quarter to date last year
Last month
Last July
Quarter to date last quarter
This month
Last August
Month to date
Last month last year
Last September
Month to date last year
This month last year
Last October
Month to date last month
The explanation of the last five ranges is as follows:
- Year to date last year
-
The same date range provided by the ‘Year to date’ option (i.e., beginning of year to present date), but offset to the previous year. For example, if today is Nov. 8, 2011, the range selected by ‘Year to date last year’ is Jan. 1, 2010–Nov. 8, 2010.
- Month to date last month
-
The same date range provided by the ‘Month to date’ option (i.e., beginning of month to present date), but offset to the previous month. For example, if today is Nov. 8, 2011, the range selected by ‘Month to date last month’ is Oct. 1, 2011–Oct. 8, 2011.
- Quarter to date last quarter
-
The same date range provided by the ‘Quarter to date’ option (i.e., beginning of quarter to present date), but offset to the previous quarter. For example, if today is Nov. 8, 2011, the range selected by ‘Quarter to date last quarter’ is July. 1, 2011–Aug. 8, 2011.
- Month to date last year
-
The same date range provided by the ‘Month to date’ option (i.e., beginning of month to present date), but offset to the previous year. For example, if today is Nov. 8, 2011, the range selected by ‘Month to date last year’ is Nov. 1, 2010–Nov. 8, 2010.
- Quarter to date last year
-
The same date range provided by the ‘Quarter to date’ option (i.e., beginning of quarter to present date), but offset to the previous year. For example, if today is Nov. 8, 2011, the range selected by ‘Quarter to date last quarter’ is Oct. 1, 2010–Nov. 8, 2010.
You can also enter an arbitrary variable name (one which does not correspond to an existing Form component). In this case, the user will be prompted at runtime to enter a value for the parameter. See Control User Prompting below for more information about prompting.
If no value is provided for a variable (parameter), it will have a null value. This will cause the condition to be ignored, which generally results in all records being returned. If this is not the desired behavior, you can either test for null parameter values using isNull(object) in onRefresh script (see Add Dashboard Script) and substitute a non-null value, or you can add an
[is not][equal to][null]condition clause, as shown below:
Use the ‘Expression’ option as described below to enter a right-hand side expression such as
null. -
If you select the ‘Expression’ option, press the JS/SQL button to select JavaScript or SQL syntax, and then press the ‘Edit Expression’ button
 . This opens the Script Editor where you can enter your expression. (See Create a New Data Field for details on using expressions.)
 -
If you select the ‘Session Data’ option, choose one of ‘User’, ‘Roles’, or ‘Groups’. These parameters return information about the user who is currently viewing the Dashboard; respectively, the username, the array of roles to which the user belongs, and the array of groups to which the user belongs.
The adjacent menu automatically chooses the [equal to]or[one of]operator to match your selection.
Control User Prompting
By default, a Dashboard will prompt the user for all parameters in the linked data source (Data Worksheet, etc.) that have not already been assigned a value. In some cases, you may want to suppress the prompting for some or all of these parameters.
Suppress Prompting for All Parameters
To suppress prompting for ALL parameters, follow these steps:
-
Press the ‘Options’ button
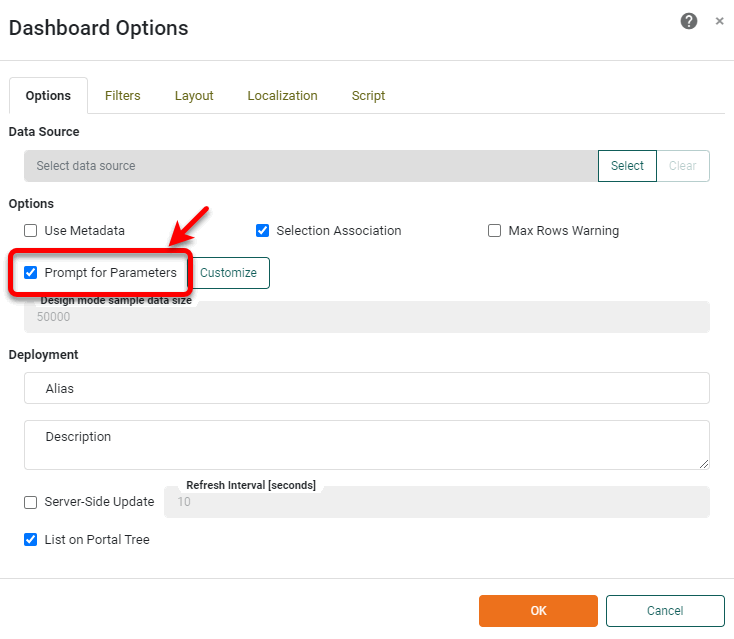
 in the toolbar to open the ‘Dashboard Options’ dialog box.
 -
Disable the ‘Prompt for Parameters’ option.
-
Press OK to close the dialog box.
Suppress Prompting for Some Paramaters
To suppress prompting SOME parameters, follow these steps:
-
Press the ‘Options’ button
in the toolbar to open the ‘Dashboard Options’ dialog box. -
Press the Customize button next to the ‘Prompt for Parameters’ option.
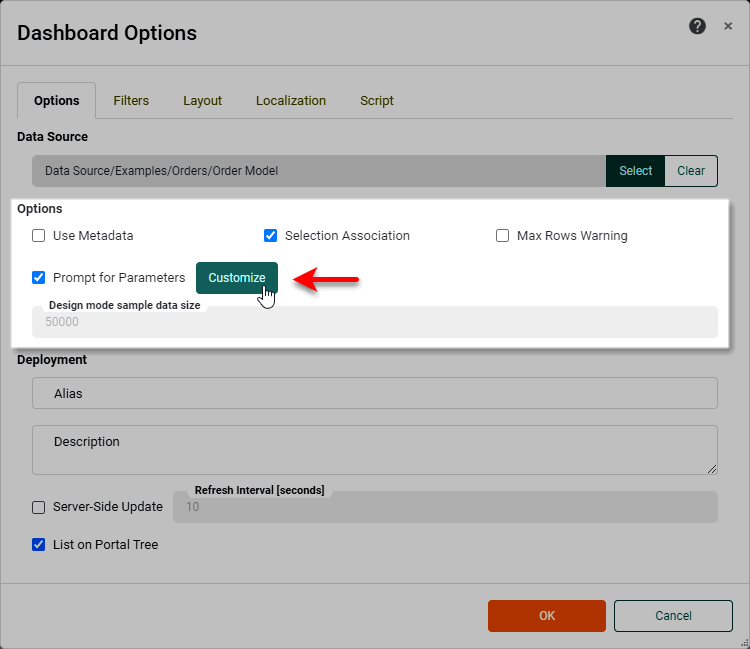
This opens the ‘Customize Parameters’ dialog box.
-
To disable one or more parameters, select the parameters you wish to disable in the ‘Enabled Parameters’ panel, and press the Add button. This moves the selected parameters to the ‘Disabled Parameters’ panel.
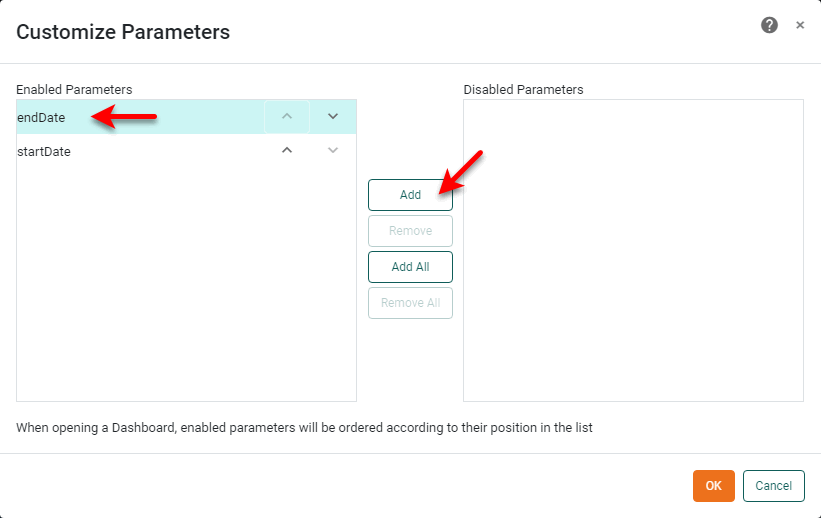
To re-enable one or more disabled parameters, select the parameters you wish to enable in the ‘Disabled Parameters’ panel, and press the Remove button. This moves the selected parameters to the ‘Enabled Parameters’ panel.
-
Press OK to close the ‘Customize Parameters’ dialog box.
-
Press OK to close the ‘Dashboard Options’ dialog box.