Configure Server Email
To specify how the server mails Dashboards and notifications to users (and how end users can contact an administrator in case an error is generated during Dashboard generation), follow the steps below:
-
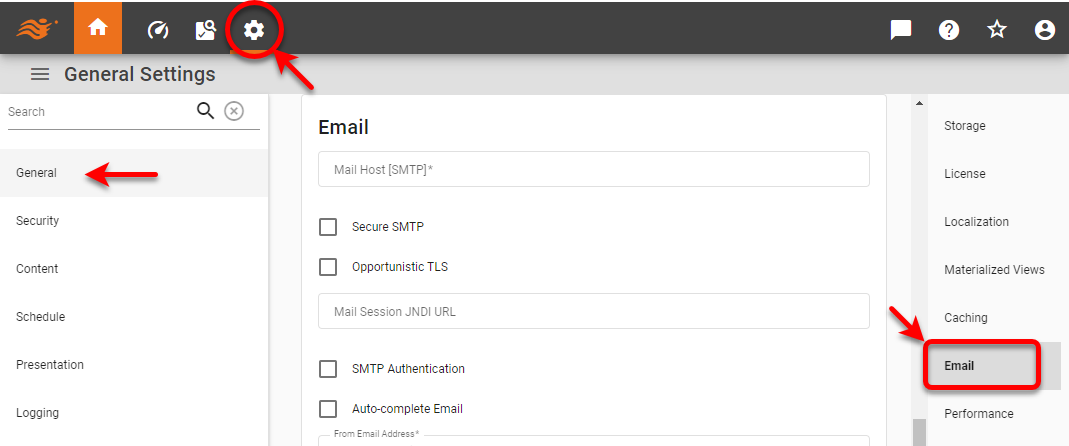
Press the ‘Settings’ button
 at the top of Enterprise Manager.
 -
Select the General page in the left panel, and select the Email page in the right panel.
In a multi-tenant environment, only the Site Administrator can access the General settings. See Enable Multi-Tenancy for more information about multi-tenancy. -
Make the desired settings and press Apply. See Email Properties below.
Email Template
You can use an email template for both scheduled emails (see Scheduler Actions) and emails sent from the User Portal. To do this, place a Mustache HTML template named email-template.html at the root of internal storage. (See Manage Stored Assets for information about uploading assets to server storage.)
This template contains a single key, message, whose value is the HTML body of the email message. It should be injected in the template using a triple-mustache, as shown below:
<div>
   {{{message}}}
</div>
The template will be applied to all email message bodies. For more information about the Mustache HTML template, see the Mustache project site.
Email Properties
- Mail Host (Required)
-
Specifies one or more valid SMTP servers, separated by commas. The SMTP servers must be able to accept connections on the specified ports. The SMTP port can be configured with the
mail.smtp.portproperty. (See Mail Properties.) If the servers require secure protocol, enable the ‘Secure SMTP’ option. - From Email Address
-
Specifies the fixed email address from which all emails are sent.
- Opportunistic TLS
-
Enable Opportunistic TLS encryption.
- SMTP Authentication Type
-
Select the desired authentication type:
-
None
-
SMTP Authentication: Enter username and password.
-
SASL XOAuth2: Use for Microsoft 365.
-
Google OAuth2 SMTP: Use for Google. See Configure Google SMTP Authentication below for more information.
-
- Mail Session JNDI URL
-
If a JNDI URL is provided, the server will first try to obtain a session from the JNDI directory when sending emails. If this fails, it will create a new session based on the setting provided for the ‘Mail Host’ property.
The Scheduler cannot access this ‘Mail Session JNDI URL’ property, since the Scheduler runs as a separate application independent of the application server. (See Schedule for more details about the Scheduler.) - Auto-complete Email
-
Specifies that the user email address (stored from previously entered email) should be automatically populated for scheduled mail tasks. When disabled, the email address is not automatically populated.
- Emails Subject Format
-
The ‘Delivery Emails Subject Format’ and ‘Notification Emails Subject Format’ use java.text.MessageFormat syntax with two parameters, the first (index 0) being the Dashboard alias, and the second (index 1) being the date and time of Dashboard generation. You can specify a format for the date parameter using date format symbols.
See a list of available date format symbols…
For examples of how to construct dates using these symbols, see Date Format in Visualize Your Data.
Symbol Description Example G
Era
AD
y, yyyy
Year
18, 2018
Q, QQQ
Quarter in year
2, 2nd
M, MM, MMM, MMMM
Month in year
2, 02, Feb, February
w
Week number in year
34
W
Week number in month
3
D
Day number in year
200
d, dd
Day number in month
5, 05
u, uu
Day number in week (Monday = 1)
4, 04
F
Day of week in month
2 (i.e., second Tuesday in month)
E, EEEE
Day of week
Wed, Wednesday
a
AM/PM
PM
H
Hour in day (24-hour; midnight is 0)
23, if time is 11:01PM
0, if time is 12:01AM
1, if time is 1:01AMk
Hour in day (24-hour; midnight is 24)
23, if time is 11:01PM
24, if time is 12:01AM
1, if time is 1:01AMh
Hour in day (12-hour; midnight is 12)
11, if time is 11:01PM
12, if time is 12:01AM
1, if time is 1:01AMK
Hour in day (12-hour; midnight is 0)
11, if time is 11:01PM
0, if time is 12:01AM
1, if time is 1:01AMm, mm
Minute in hour
3, 03
s, ss
Second in minute
9, 09
S, SSS
Millisecond
27, 027
z, zzzz
Time zone
EST, Eastern Standard Time
Z
RFC 822 time zone
-0500
X, XX, XXX
ISO 8601 time zone
-05, -0500, -05:00
If no alias is specified for the Dashboard in the ‘Alias’ field, then parameter
{0}defaults to the Dashboard name. The global ‘Delivery Emails Subject Format’ setting is overridden by the ‘Subject’ specified (if any) under a Scheduled task Action tab of Enterprise Manager or the User Portal.Example 1. Subject formatConsider the following Subject Format specification provided for a Dashboard with alias ‘testReport’:
Dashboard named {0}, generated at {1,time} on {1,date}This will produce an email subject line such as the following:
Dashboard named testReport, generated at 10:34:54 AM on Nov 5, 2024
The time and date will be the actual time and date of Dashboard generation.
Configure Google SMTP Authentication
To use OAuth SMTP Authentication for Google, follow the steps below:
-
Use the email associated with the user GMail account to create a new Google Cloud project. See Create a Google Cloud project for full details.
-
Navigate to and enable the ‘GMail API’.
-
Press Create credentials. For ‘Credential Type’, select ‘User Data’ and press Next.
-
Enter the requested information for the OAuth Consent Screen. See Configure the OAuth consent screen and choose scopes for full details.
-
For OAuth Client ID, select ‘Web application’ as the ‘Application type’.
-
For Authorized redirect URIs, set the redirect URI to https://data.inetsoft.com/oauth.
-
Press Create.
-
Press Done.
-
Navigate to the Credentials page and click on the client name to obtain your ‘Client ID’ and ‘Client Secret’.
-
In Enterprise Manager, change ‘SMTP Authentication Type’ to ‘Google OAuth2 SMTP’ and enter the credentials.
-
Enable ‘Opportunistic TLS’.
-
Press Sign in with Google and accept the permissions.
-
Press Apply.