Query Data
This section explains how to create a query by using the ‘Database Query’ dialog box.
When to Use
This approach may produce the most efficient queries in the following cases:
-
You are not using a data model
-
You are not mashing up data from multiple datasources
-
You have already created queries for other applications, and want to copy over the SQL strings intact
If you are using a data model, or need to mashup diverse datasources, it may be simpler to use the approach described in Mashup Data.
Basic Steps
To create a data set by defining a new query in the User Portal, follow the steps below. These instructions show how to do this for a generic relational database. For other data sources, see Query a Specific Data Source.
-
Log into the User Portal.
You may see the ‘Create Visualization’ dialog box. Press the ‘Close’ button
 to continue with the steps below (recommended), or press Create a Query to open the ‘New Data Worksheet’ dialog box described below.
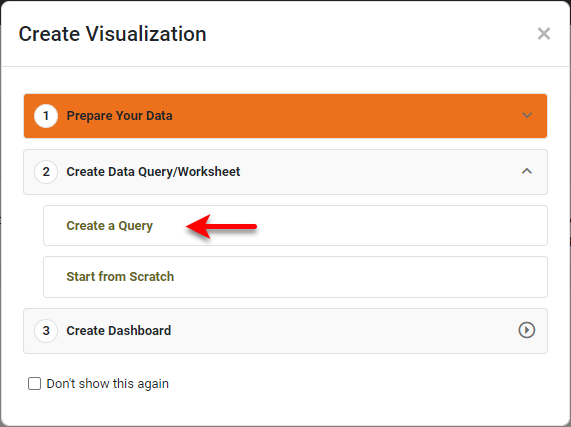
-
Press the ‘Create’ button
 at the top of the User Portal, and select the ‘Data Worksheet’
  option.
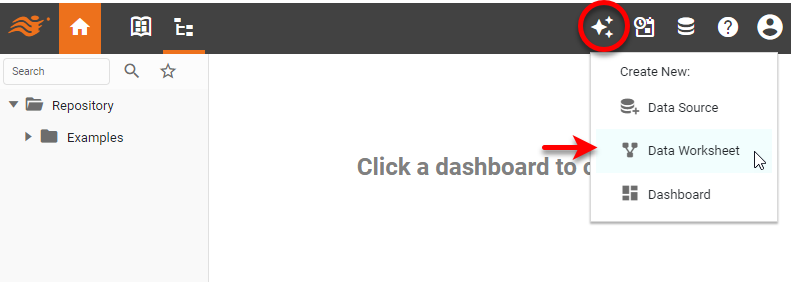
This opens Visual Composer in a separate browser tab and displays the ‘New Data Worksheet’ dialog box.
-
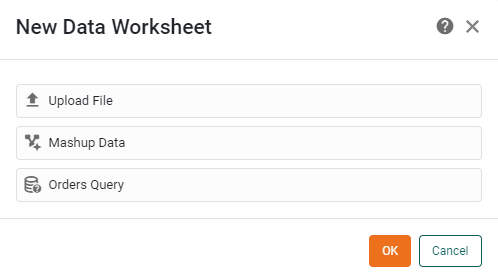
Choose the query option for the desired data source (e.g., ‘Orders Query’) and press OK. This creates a blank Data Worksheet named ‘Untitled’ and opens the ‘Database Query’ dialog box.
If a Data Worksheet is already open, you can add a query-based data block by pressing the ‘Add’ button
 in the toolbar and selecting ‘Database Query’. (The name ‘Database’ is the name of the particular data source.) This opens the ‘Database Query’ dialog box described above.
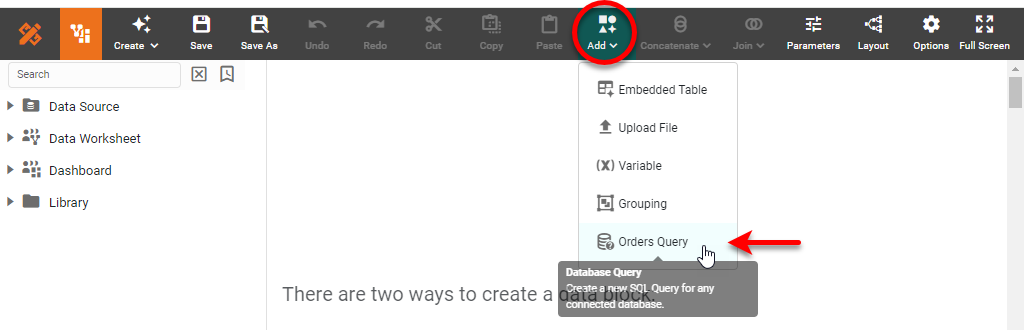
If you do not see the ‘Database Query’ option, this indicates that you do not have ‘Physical Table’ permissions. See Set Security Actions for more information.
-
Continue to construct the query with Basic Query or Advanced Query below.
-
Press OK to close the ‘Database Query’ dialog box. This creates a new data block based on the specified query.
-
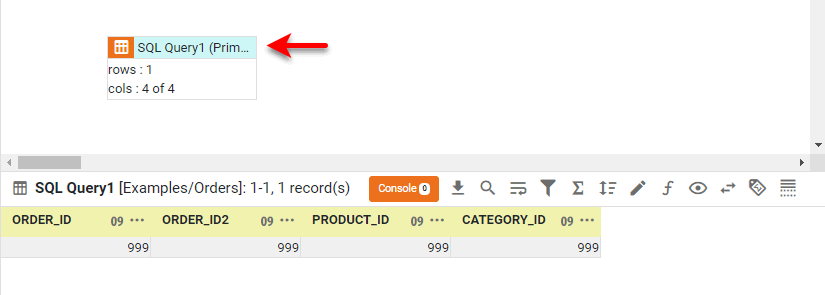
To edit the query further, press the ‘Edit’ button
 in the bottom panel. This reopens the ‘Database Query’ dialog box.
You can now do data pipeline operations on this data, such as Join Data, Group and Aggregate Data, and Sort Data, or you can proceed to create Dashboards based on this Data Worksheet. See Visualize Your Data for more details on building a Dashboard.
Basic Query
Follow the steps below to create a basic query:
-
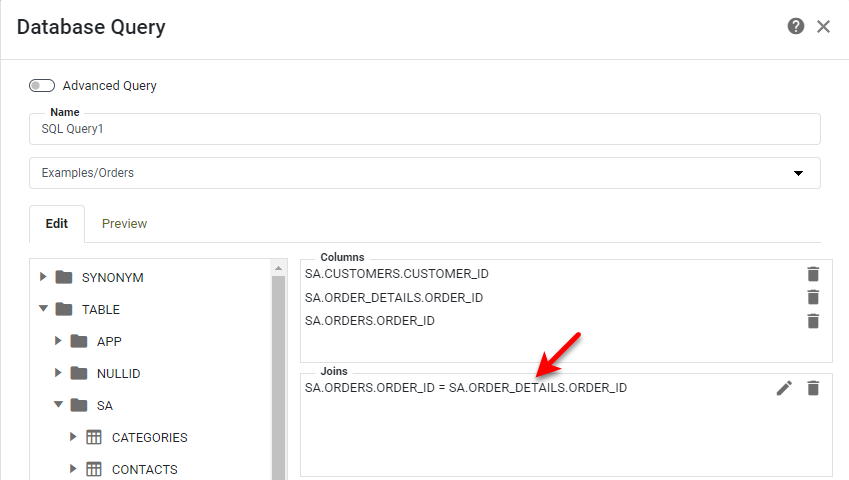
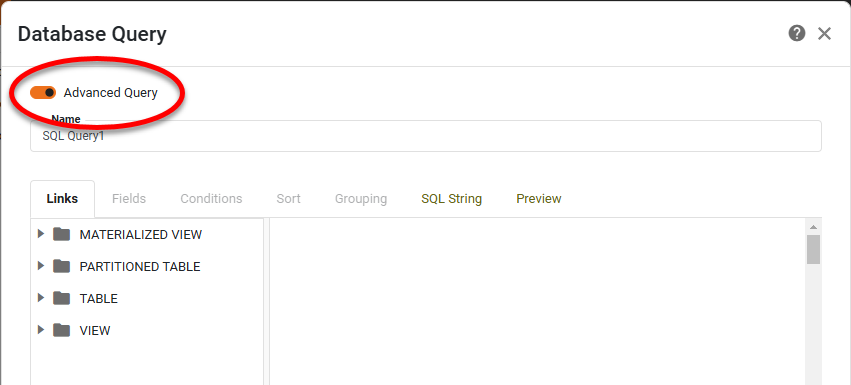
Verify that the ‘Advanced Query’ setting is off.
-
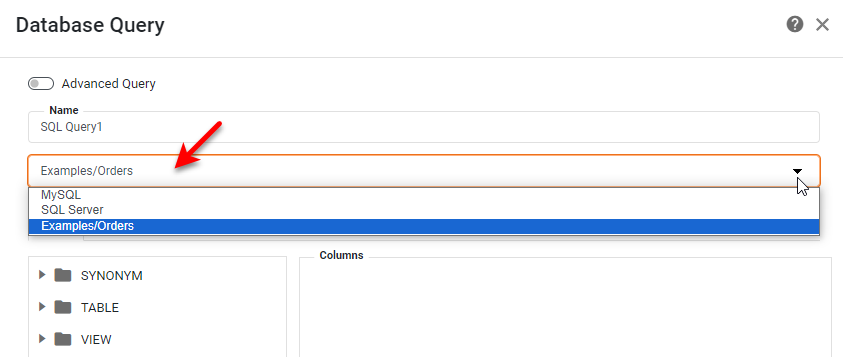
In the data source menu, choose the database that you want to supply data to the data set. (This menu is only available when there is more than one data source defined.)
-
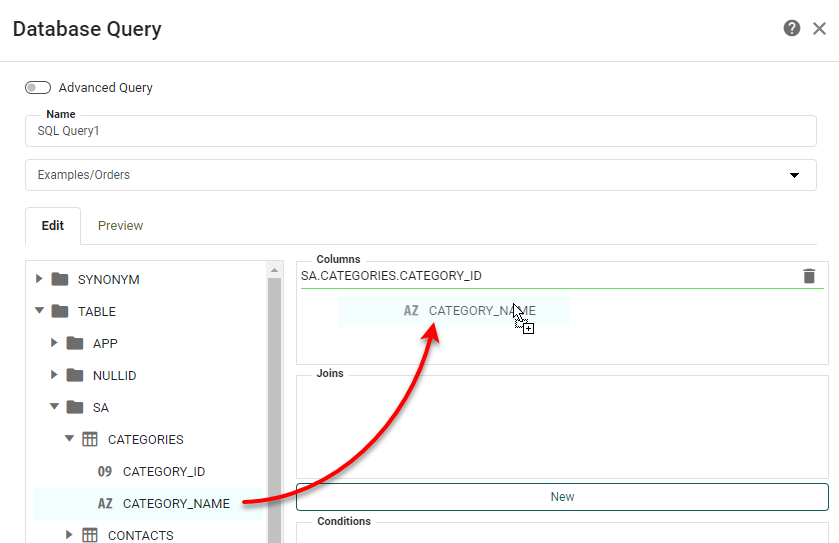
Select the database fields that you want to retrieve by dragging them from the left panel into the ‘Columns’ area.
-
Define any required joins. To do this, follow the steps below:
-
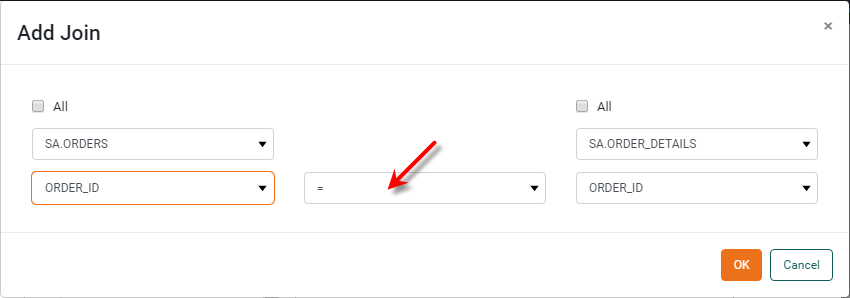
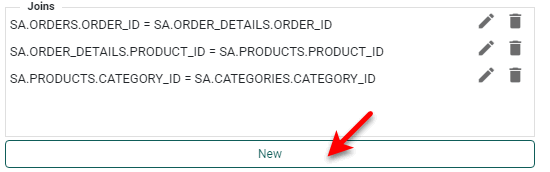
Press the New button next to the ‘Joins’ area to open the ‘Add Join’ dialog box.
-
Select a table from the top-left menu, and select the join field for that table from the bottom-left menu. Select a table from the top-right menu, and select the join field for that table from the bottom-right menu. From the center menu, select the join operator (equi-join or inequality join).
For full information about specifying joins, see Join Data. -
Optional: Select the ‘All’ option on the left side to retain all records from the left table, even those for which there is no match in the right table (left outer join). Select the ‘All’ option on the right side to retain all records from the right table, even those for which there is no match in the left table (right outer join). Select both ‘All’ options to retain all rows from both tables (full outer join).
-
Press OK to add the join. The join is now displayed in the ‘Joins’ area.
-
To add an additional join, press the New button again to open the ‘Add Join’ dialog box. Repeat as necessary to add all desired joins.
-
To change an existing join, press the ‘Edit’ button
next to the join.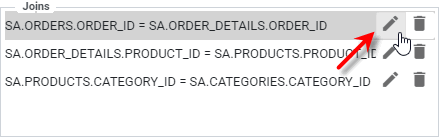
-
To delete an existing join, press the ‘Delete’ button
 button next to the join.
-
-
Optional: Press the Edit button next to the ‘Conditions’ area to open the ‘Conditions’ dialog box. Use the menus to enter a desired filter condition and press Insert. Then press OK.
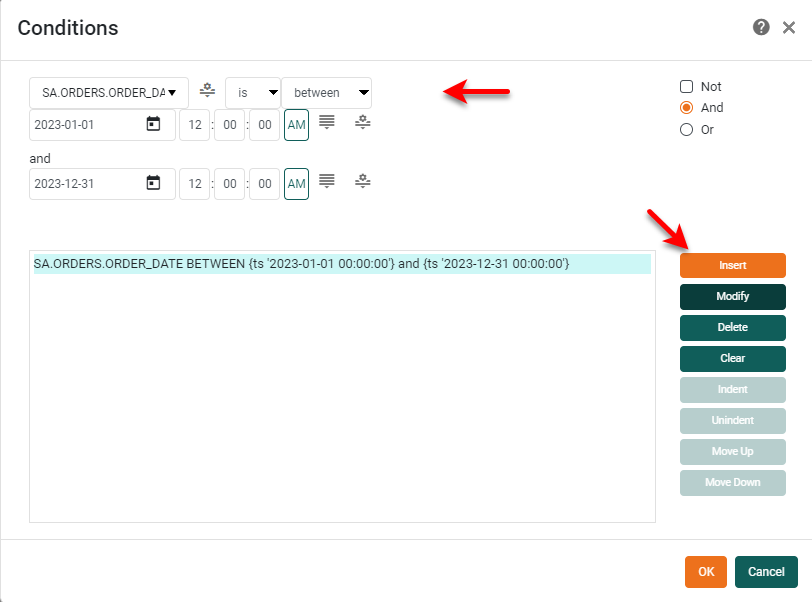
For full information about specifying conditions, see Filter Data. -
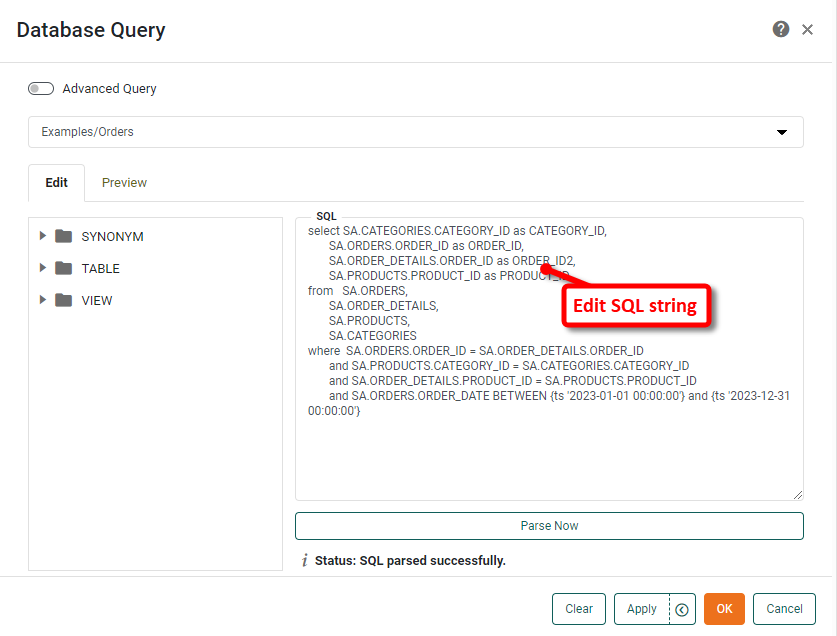
Optional: To make manual edits to the SQL string that will be sent to the database, press the Edit button next to the ‘SQL’ area to open the ‘SQL’ panel for editing. Make the desired edits.
-
If you make manual edits to the SQL string, you will no longer be able to modify the query using the ‘Columns’, ‘Joins’, and ‘Conditions’ panels.
-
If you add a condition to a manually-edited query, the condition will be applied in post-processing, after the dataset has been retrieved from the database.
To add variables into a query condition, see Add Variables to SQL String. To add a materialized view update codition, see Add MV Update Condition to SQL String.
-
-
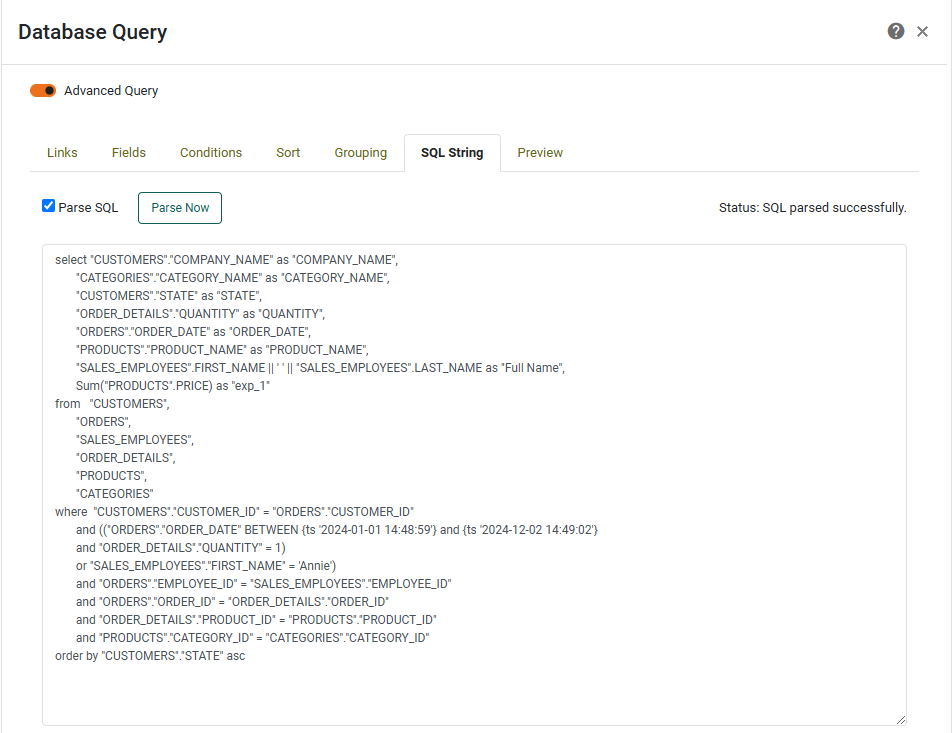
Press the Parse Now button to parse the SQL string. Note, however, that due to database variations, the parser may not be able to parse all valid SQL statements.
Add Variables to SQL String
You can add query variables to the SQL string using the $(var)construct, where var is an arbitrary variable name. This variable will be translated into a SQL variable and the value will be provided at runtime.
You can also specify a special string replacement variable (parameter) with the $(@var) construct. This allows you to dynamically construct the SQL string, through scripting, in order to satisfy complex business requirements. For example, you can dynamically determine the table from which to select data at runtime. To do this, define a partial SQL string, such as
select id from $(@var)Then create a runtime script to replace the variable var with a table name such as customers or prospects. You can place this script in the onInit handler (see Add Dashboard Script).
| Parameters in the query that have a null value may cause a SQL error. You should therefore check (for example, using Dashboard onLoad script) to ensure that all parameters referenced in the query have legitimate values. |
Add MV Update Condition to SQL String
In cases where you want to create an incremental update for a materialized view based on a non-mergeable query (e.g., non-relational database query or un-parsable query), you will need to add the update condition to the SQL string. To do this, follow the steps below:
-
Add the desired update condition to the query definition itself. For example:
SELECT ... FROM T1 WHERE (...) AND DATE_COL = $(MV.LastUpdateTime)The update condition can use the special variables
MV.LastUpdateTime,MV.{Column Name}.Min, andMV.{Column Name}.Max, where{Column Name}is the materialized view column name with non-alphanumeric characters replaced by underscores. For example, a materialized view column namedYear(Order Date)should use parameter namesMV.Year_Order_Date_.MinandMV.Year_Order_Date_.Max. (See Filter Data for more information about these parameters.) -
In the MV Update tab of the Data Worksheet data block, enable the ‘Always append updates’ option. (See Filter Data for more information about the MV Update tab.) This ensures that the results of the non-mergeable query will be appended to the existing materialized view. Note that this assumes that the tables being queried contain only new data to be appended to the existing materialized view.
Advanced Query
The ‘Advanced Query’ option provides some additional query design features such as sorting and grouping. Note that you can also perform these operations on the data block at a later time. See Sort Data and Group and Aggregate Data for more information.
| After you switch to ‘Advanced Query’, you cannot return to the ‘Basic Query’ interface. |
Create a New Query
To create a new query for a relational database, follow the steps below:
-
Enable the ‘Advanced Query’ option.
-
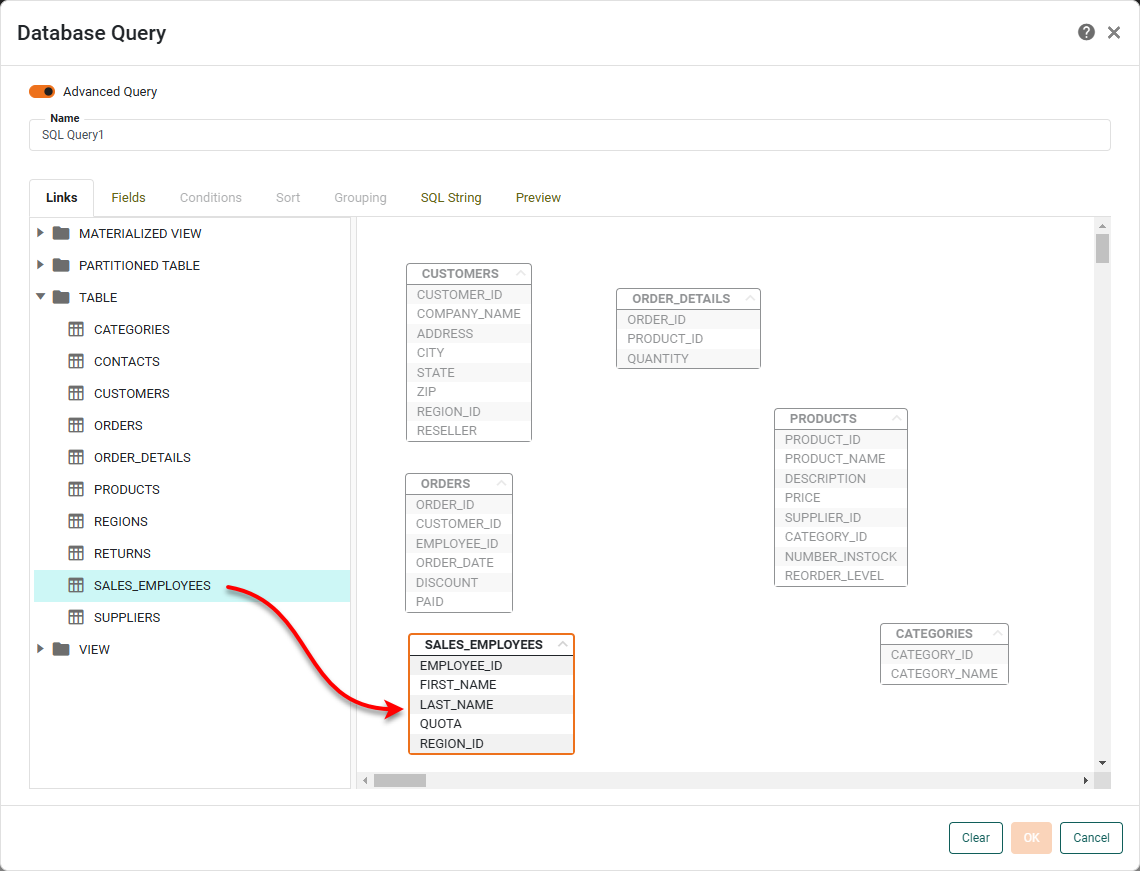
Enter a ‘Name’ for the query.
-
Under the Links tab, drag the desired database tables from the left panel to the right panel.
-
Expand the tables if desired by pressing the ‘Show Columns’ button
 in the title bar.
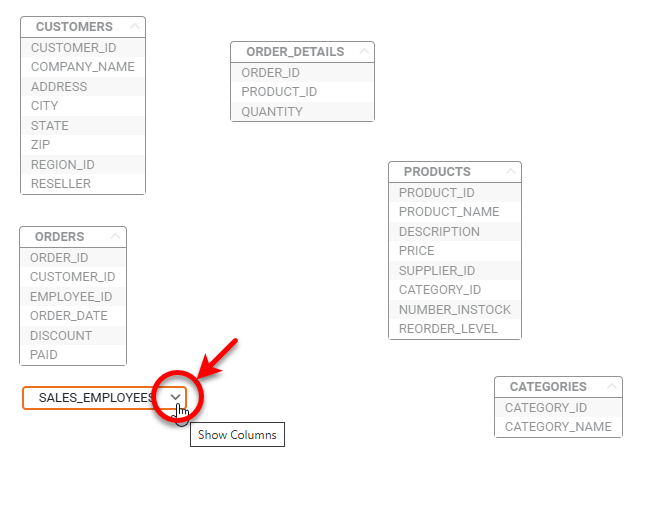
-
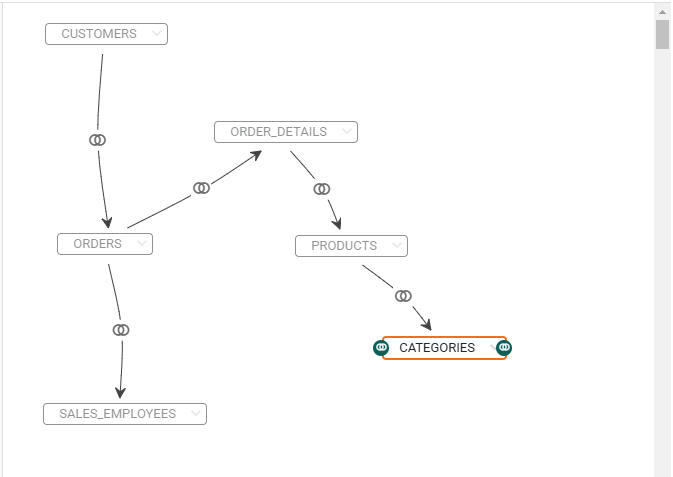
Define a set of joins to relate the tables. To do this, click a table title bar to activate the join handle
 . Drag the join handle to the join handle of the table you want to join.
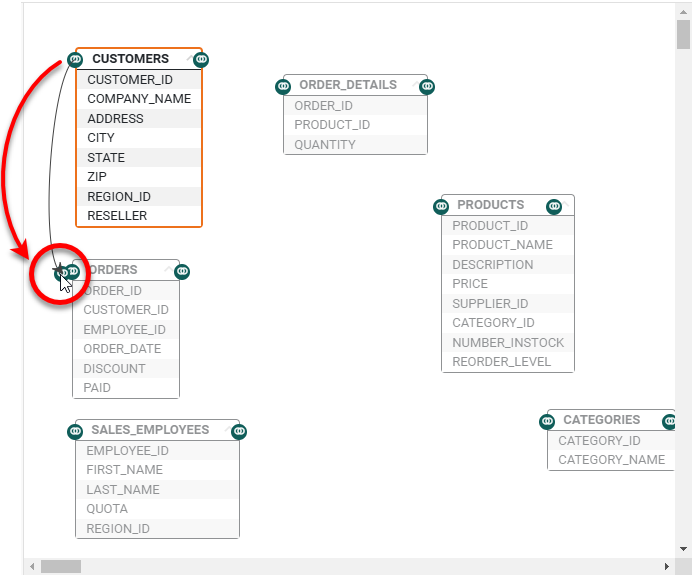
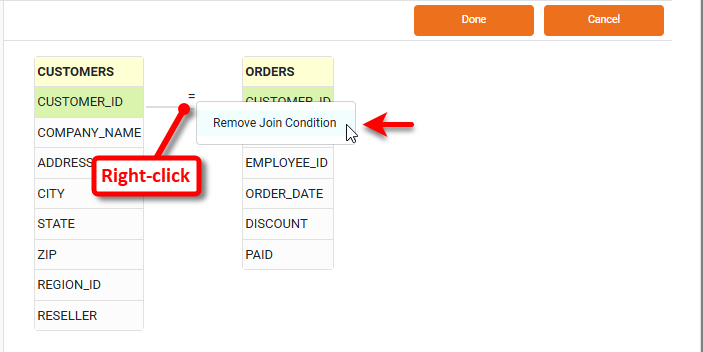
This opens the Join Editor. You may see a join that was automatically created, such as that below. You can keep the automatic join if it is correct. To delete it, right-click the join symbol and select ‘Remove Join Condition’ to delete it.
-
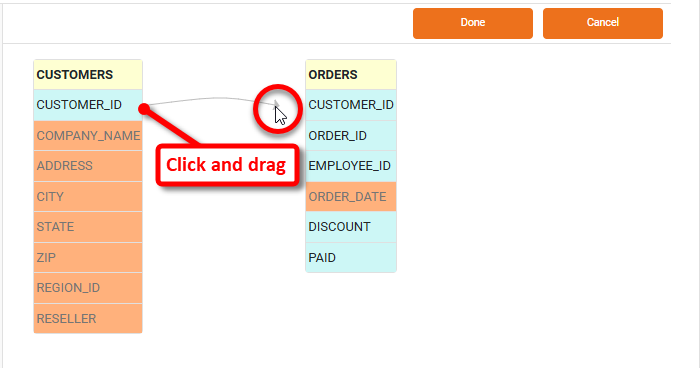
Specify a desired inner join condition by dragging a join field from one table onto the corresponding join field in the other table. By default, an “equality” join condition is used, producing the so-called inner join or “equi-join,” and is indicated by an “equals” (=) symbol. Repeat to create join conditions on as many fields as needed.
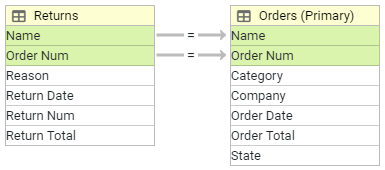
 Example: Multiple Joins
In the example below, the first join condition specifies that the values in the ‘Name’ column from the ‘Orders’ data block should be matched to the values in the ‘Name’ column from the ‘Returns’ data block. The second join condition specifies that the values in the ‘Order Num’ column from the ‘Orders’ data block should be matched to the values in the ‘Order Num’ column from the ‘Returns’ data block.
-
Optional: To change an inner join to an outer join, right-click on the join link and choose the desired outer join.
Example: Change Inner Join to Outer JoinIn the example below, the default inner join is changed to a right outer join.
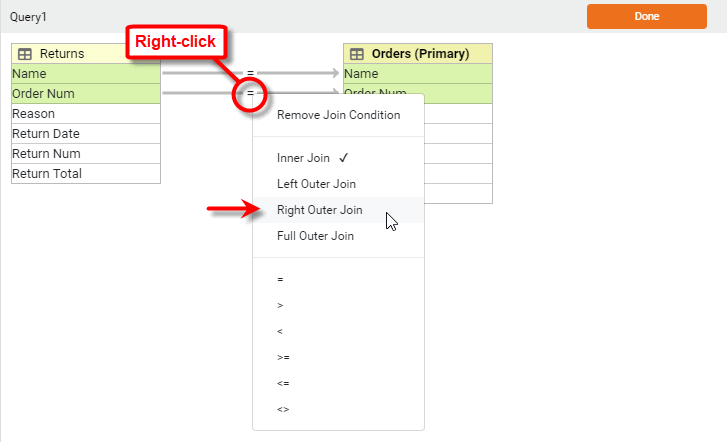
An outer join is a generalization of the inner join: In addition to the matching rows preserved by the equi-join, the left outer join returns all the rows in the left table, while the right outer join returns all the rows in the right table. The full outer join returns all the rows of both tables.
When you specify an outer join, the additional rows included from a table (beyond those selected by the equi-join) do not have matching rows in the other table. Therefore, outer-join tables generally exhibit empty cells corresponding to these unmatched rows. -
Optional: To change an inner join to an inequality join, right-click on the join link and choose the desired inequality (>, <, >=, <=, etc.)
-
Repeat the above steps to join all the tables as desired.
-
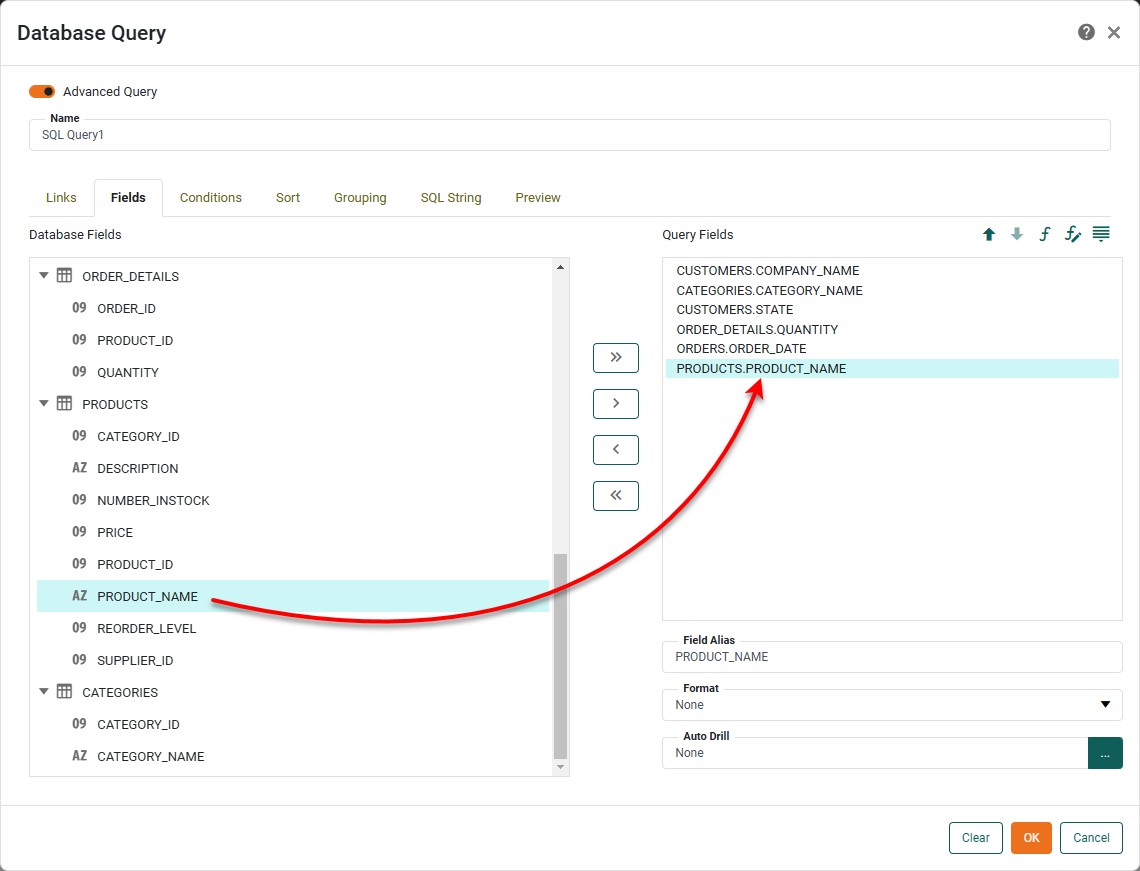
Select the Fields tab. Drag or double-click fields in the ‘Database Fields’ panel to add them to the ‘Query Fields’ panel, or use the arrow buttons.
-
Optional: To create a derived (expression) column, follow the steps below:
-
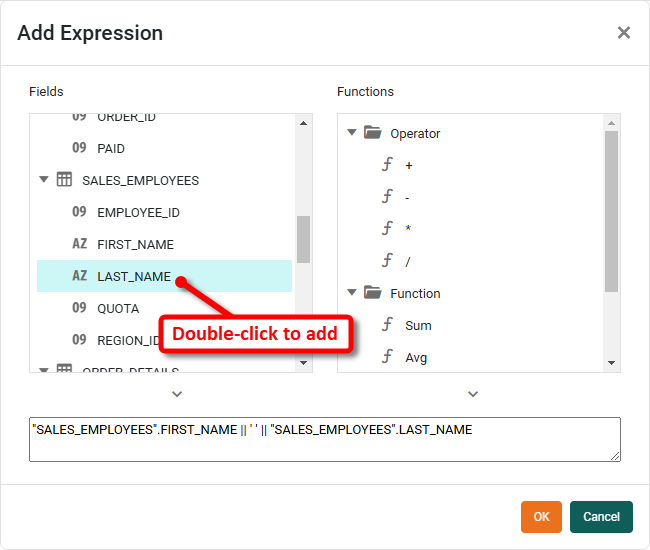
Press the ‘Formula’ button
 above the ‘Query Fields’ panel. This opens the ‘Add Expression’ dialog box.
 -
Enter an expression to define the new column. (The expression should use the appropriate SQL syntax for the underlying database. Double-click the field names to add them to the expression.)
-
Press OK.
-
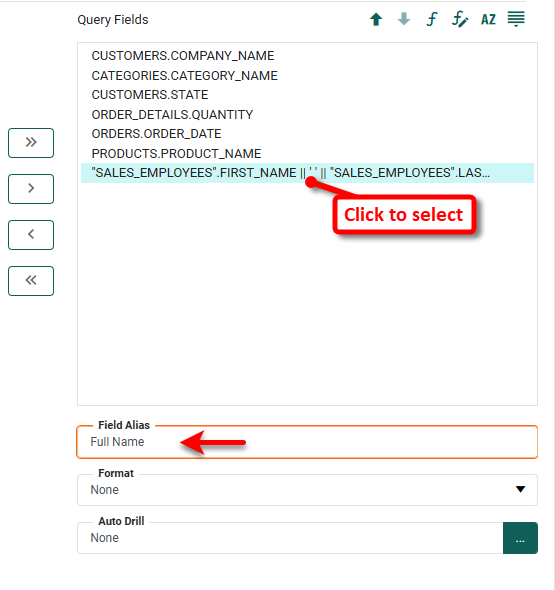
To create an alias for the expression column, select the expression column in the ‘Query Fields’ panel, and type a name into the ‘Field Alias’ box in the bottom panel.
-
-
Optional: Select the Conditions tab. Use the menus to specify a filtering condition. This condition will restrict the data returned by the query. Press the ‘Change Value Type’ button
 button on the right side to select a method of supplying the right-hand side of the condition.
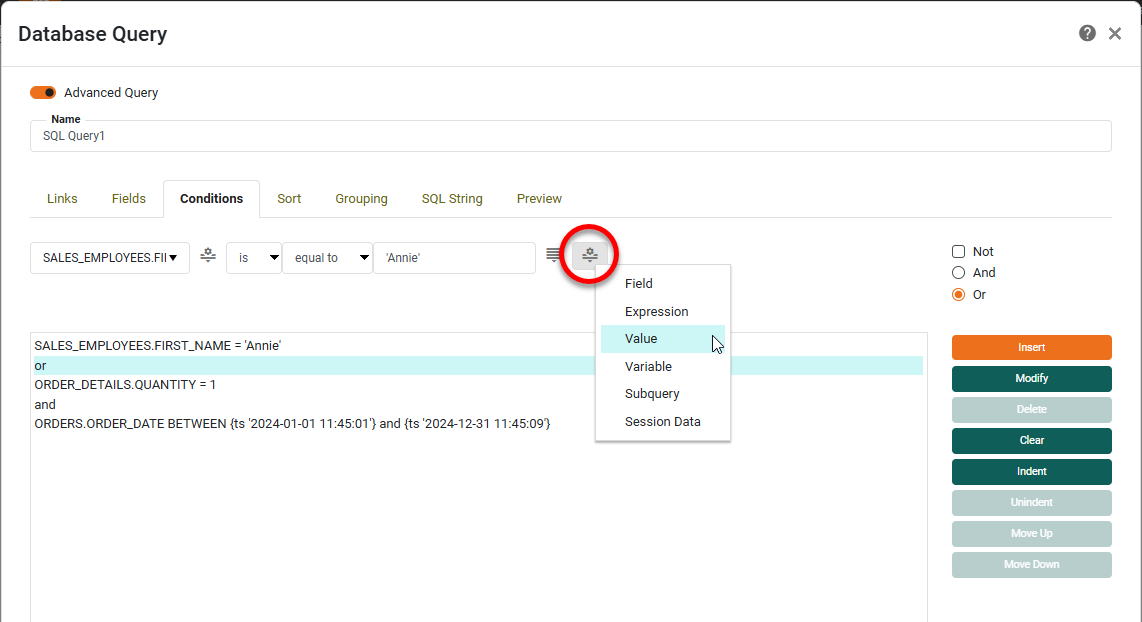
The options are described below:
- Field
-
Select a different column from the same result set.
- Expression
-
Enter a regular expression using Perl5 regex syntax.
- Value
-
Enter a fixed value. Use the ‘Browse Data’ button
 button to assist the selection.
 - Subquery
-
Specify a distinct query to return the right-side of the condition.
- Variable
-
Enter an arbitrary parameter name. The value of the variable will either be provided by the user, by script, or by another sub-query. Check the ‘Selection List’ box to prompt the user with a list of values read from the field.
-
Select the Sort tab. Drag or double-click the fields on which you wish to sort in the ‘Available Fields’ panel to move them to the ‘Sort Fields’ panel (or use the arrow buttons).
-
Select a field in the ‘Sort Fields’ panel, and press the ‘Sort’ button
 above the panel. Click once to sort in descending order. Click again to sort in ascending order. An arrow to the left of the field name indicates the current sort order.
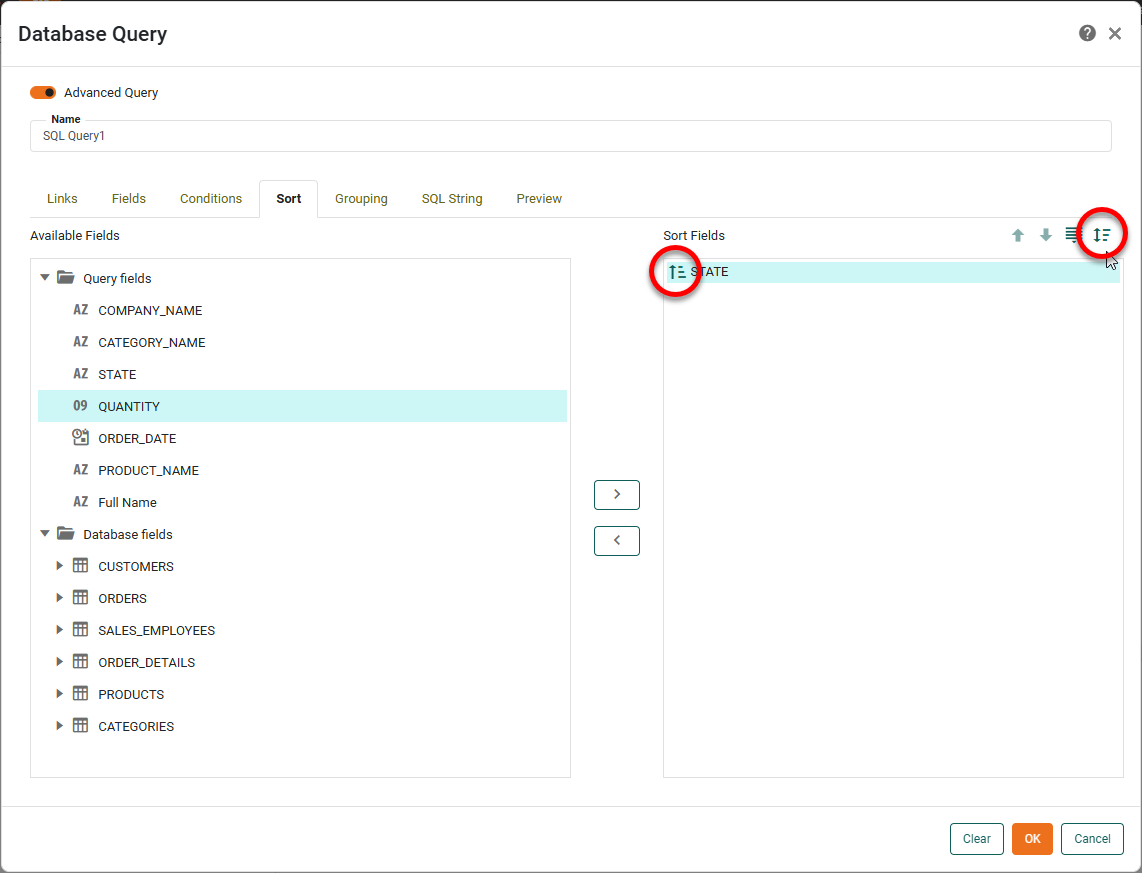
-
Select the Grouping tab. Drag or double-click the fields on which you wish to group in the ‘Available Fields’ panel to move them to the ‘Group Fields’ panel (or use the arrow buttons). Use the Having tab to apply a post-group condition.
If you are performing grouping, you must include all non-aggregate fields as grouping fields. Define any desired aggregate fields by using an expression column, described above. -
Select the SQL String tab to view and edit the SQL representing the query.
-
Select the Preview tab to view a preview of the result set.