Join Data
| Concatenate Data to create a vertical composition of two or more data blocks. |
Joins allow you to mash up data from different data blocks, which may represent different database tables, queries, or data models. A joined data block is a horizontal composition of two or more data blocks with a specified relationship (equality or inequality) between the rows of the base data blocks. The following sections explain how to create and edit joins.
Inner Join, Outer Join, Inequality Join
Watch Video: Create an Inner or Outer Join
This video might show an earlier version of the feature or operation that differs in minor ways from the current version.
A joined data block contains all the columns from the base data blocks, but retains only the rows that satisfy a set of join conditions. The join conditions are relations between pairs of columns from the base data blocks.
To join data blocks using an inner join, outer join, or inequality join, you can either Use the Join Handle or Use the Join Button. Then proceed to Use the Join Editor to specify the join fields and join types.
Use the Join Handle
To use the join handle  , follow the steps below:
-
Create the data blocks you want to join. (See Create a Data Worksheet for information on how to create a data block.)
-
Click on one of the data blocks that you want to join. This displays a join handle
on each side of the data block.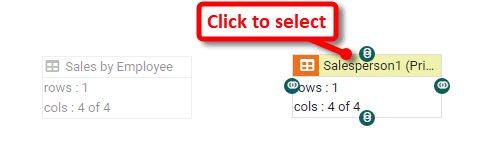
-
Click on one of the join handles (left or right) and drag it onto a join handle on the data block that you want to join.
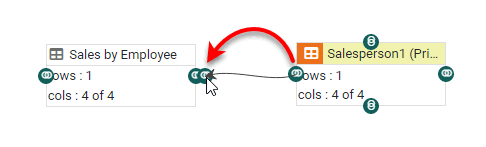
This creates a new joined data block and opens the Join Editor. Proceed to Use the Join Editor to define the joins.
Use the Join Button
To use the ‘Join’ button , follow the steps below:
-
Create the data blocks you want to join. (See Create a Data Worksheet for information on how to create a data block.)
-
Select the data blocks you want to join together. (You can hold the Shift or Ctrl key and click on the data blocks to select two or more, or drag with the mouse to “lasso” the data blocks.)
In general, you should avoid joining more than two data blocks at the same time. -
Press the ‘Join’ button
in the toolbar, and select ‘Inner/Outer Join’  .
.
This creates a new joined data block and opens the Join Editor. Proceed to Use the Join Editor to define the joins.
Use the Join Editor
To use the Join Editor to define joins, follow the steps below:
| Some joins may have been created by default. To delete a default join, click the join symbol in the link and select ‘Remove Join Condition’ from the context menu. |
-
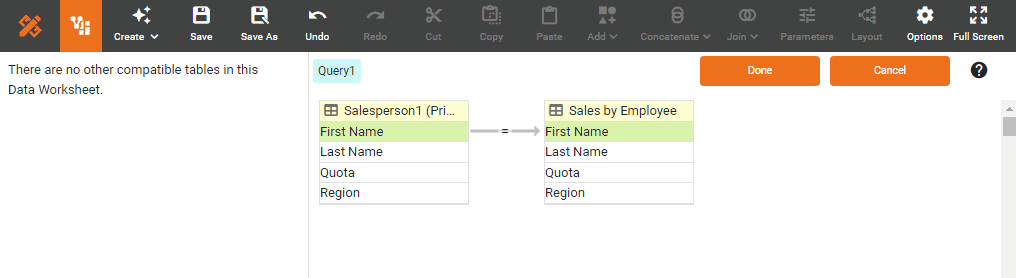
Specify an inner join condition by dragging a join field from one data block onto the corresponding join field in the other data block. Repeat to create join conditions on as many fields as needed.

Join columns must have the same data type (e.g., both Integer, both String, etc.). Otherwise, you may see a “join type is invalid” error. By default, an “equality” join condition is used, producing the so-called inner join or “equi-join,” and is indicated by an “equals” (=) symbol.
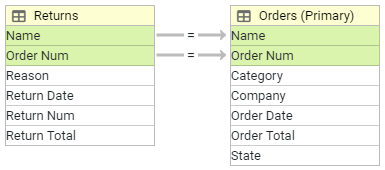
In the example below, the first join condition specifies that the values in the ‘Name’ column from the ‘Orders’ data block should be matched to the values in the ‘Name’ column from the ‘Returns’ data block. The second join condition specifies that the values in the ‘Order Num’ column from the ‘Orders’ data block should be matched to the values in the ‘Order Num’ column from the ‘Returns’ data block.
-
Optional: To change an inner join to an outer join, right-click on the join link and choose the desired outer join.
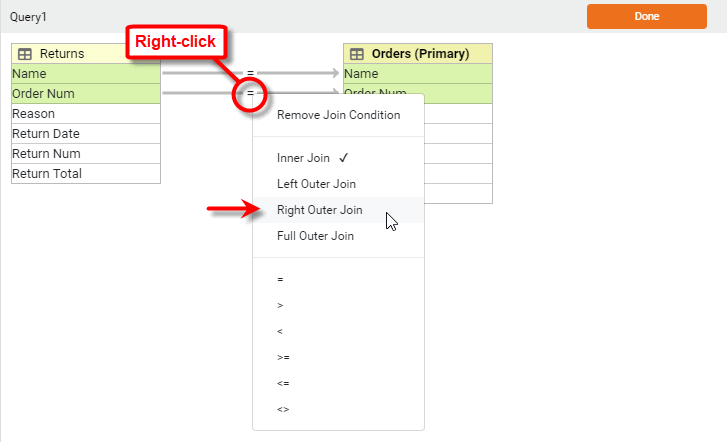
An outer join is a generalization of the inner join: In addition to the matching rows preserved by the equi-join, the left outer join returns all the rows in the left table, while the right outer join returns all the rows in the right table. The full outer join returns all the rows of both tables.
When you specify an outer join, the additional rows included from a data block (beyond those selected by the equi-join) do not have matching rows in the other data block. Therefore, outer-join data blocks generally exhibit empty cells corresponding to these unmatched rows. -
Optional: To change an inner join to an inequality join, right-click on the join link and choose the desired inequality (>, <, >=, <=, etc.)
-
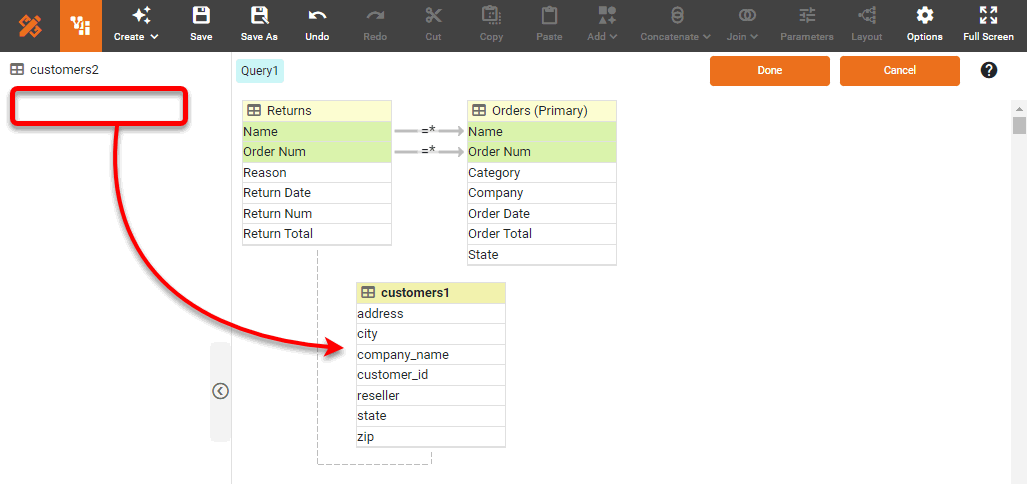
To add additional tables into the join, drag the tables from the left panel.
-
Press Done.
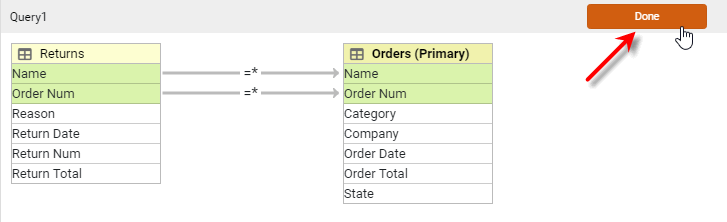
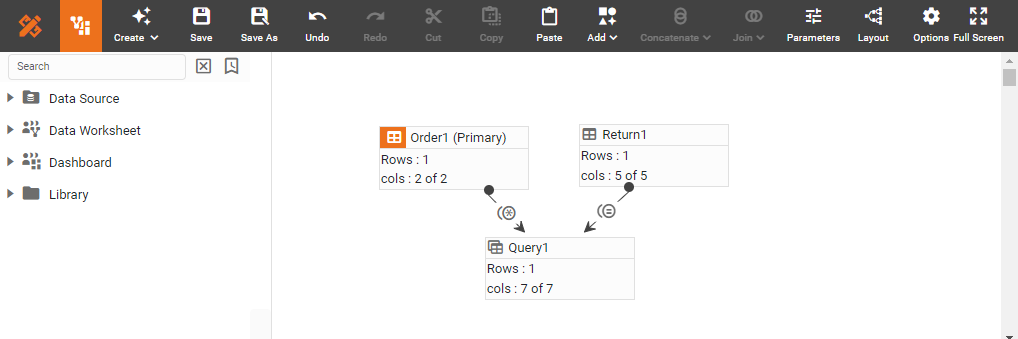
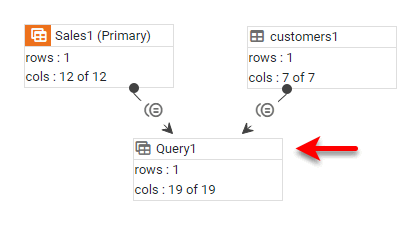
This creates the joined data block (‘Query1’).
-
Save the Data Worksheet by pressing the ‘Save’ button
 in the toolbar or Ctrl+S on the keyboard.
You can now use this Data Worksheet to supply the dataset for a Dashboard. See Visualize Your Data to create a Dashboard. To make further modifications to the new data block, see Edit a Joined Data Block below. You can also proceed to join this new data block to any other data blocks using the same procedure above.
The sample ‘Sales Explore’ Data Worksheet contains individual order information. If you want to add customer information such as addresses, you need to join this data block to the data set returned by the sample ‘customers’ Data Worksheet. Follow the steps below:
-
Create a new Data Worksheet. For information on how to create a new Data Worksheet, see Create a Data Worksheet.
-
From the left Asset panel, drag the ‘Sales Explore’ Data Worksheet onto an empty region in the right panel. This creates the data block ‘Sales1’.
The 'Sales Explore' Data Worksheet can be found in . You may need to download the examples.zip file from GitHub into your environment. (This requires access to Enterprise Manager.) See Import and Export Assets for instructions on how to import. 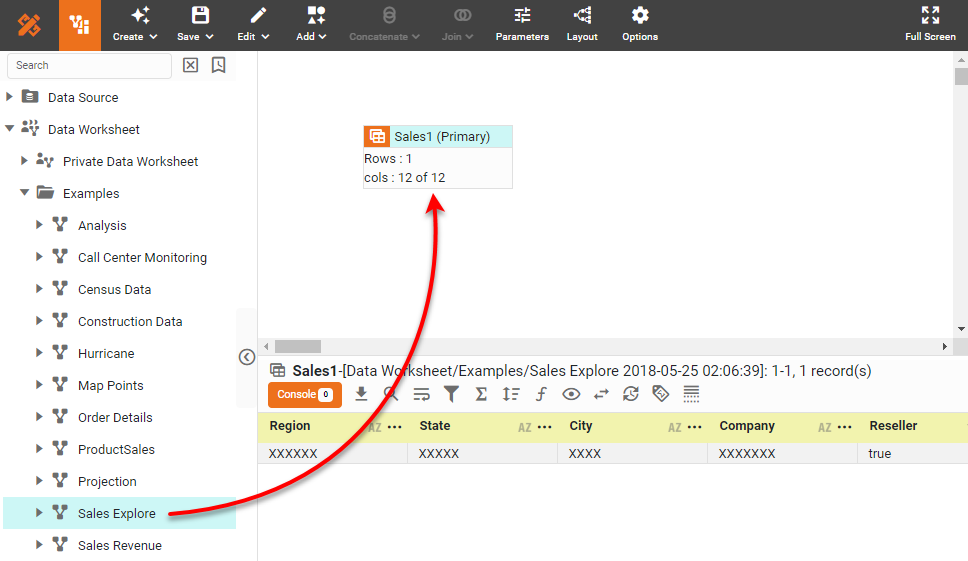
-
From the left panel, drag the ‘customers’ Data Worksheet into the right panel. This creates the data block ‘customers1’.
The ‘customers’ Data Worksheet can be found in . You may need to download the examples.zip file from GitHub into your environment. (This requires access to Enterprise Manager.) See Import and Export Assets for instructions on how to import. 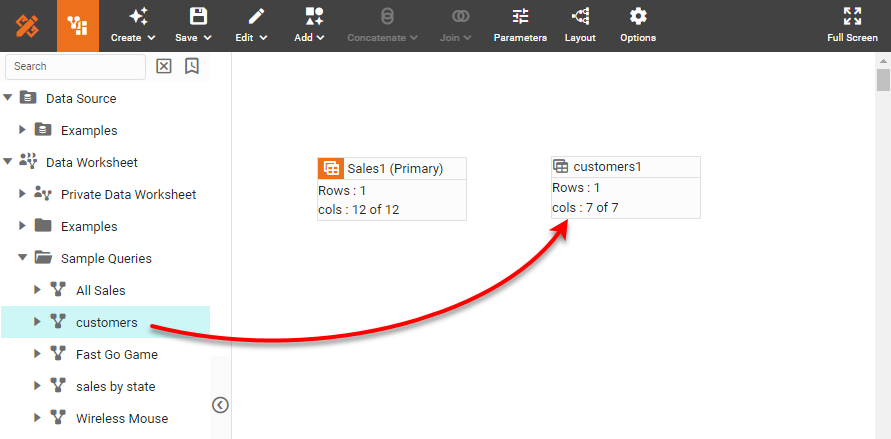
-
Click on the ‘customers1’ data block to select it and enable the join handles.
-
Drag a join handle from the ‘customers1’ data block onto a join handle of the ‘Sales1’ data block.
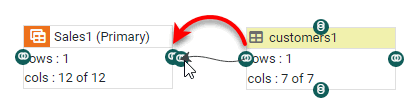
This opens the Join Editor.
-
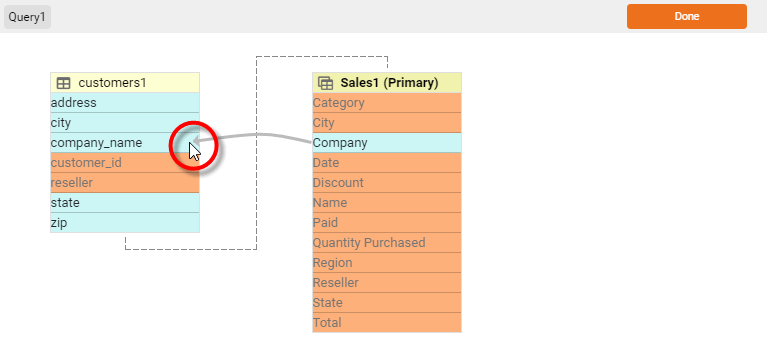
In the Join Editor, drag the ‘Company’ column from the ‘Sales1’ data block onto the ‘company_name’ column of the ‘customers1’ data block.
-
Press Done to close the Join Editor and create the new joined data block, ‘Query1’.
-
To preview the ‘Query1’ data block, click the data block to select it. Then press the ‘Change View’ button
 in the bottom panel and select ‘Live Data View’
  .
.
Cross Join
Watch Video: Create a Cross Join
This video might show an earlier version of the feature or operation that differs in minor ways from the current version.
Data blocks that do not share the same data model or database table can be joined together with a cross join. A cross-joined data block contains the cross-product (Cartesian product) of the data in the base tables. This means that every row in the first table is paired together with every row in the second table. The length of the new joined data block is the product of the two base data block lengths.
| You may see a warning when you create a cross join. This alerts you that a cross join is capable of producing a dataset large enough to significantly degrade performance. Use cross joins with extreme caution. |
To cross-join two data blocks in a Data Worksheet, follow these steps:
-
Create the data block you want to join. See Create a Data Worksheet for information on how to create a data block.
-
Select the data blocks you want to join together. (You can hold the Shift or Ctrl key and click on the data blocks to select both, or drag with the mouse to “lasso” the data blocks.)
-
Press the ‘Join’ button
in the toolbar and select ‘Cross Join’  .
.
The two data blocks are cross-joined to create a new data block. Filtering conditions from both base data blocks are applied to the cross-joined data block.
You can now use this Data Worksheet to supply the dataset for a Dashboard. See Visualize Your Data to create a Dashboard.
The ‘customers’ Data Worksheet returns information about different companies. Consider a case where you want to mash up this company information with salesperson information such that each row of company data is repeated for each of several different salespeople. This requires a cross-join, and will yield a result whose length is equal to the product of the rows of the two base tables.
-
Create a new Data Worksheet. For information on how to create a new Data Worksheet, see Create a Data Worksheet.
-
From the left Asset panel, drag the ‘customers’ Data Worksheet into the current Data Worksheet. This creates the data block ‘customers1’.
The ‘customers’ Data Worksheet can be found in . You may need to download the examples.zip file from GitHub into your environment. (This requires access to Enterprise Manager.) See Import and Export Assets for instructions on how to import. -
Create an Embedded Table containing the salesperson information. Follow the steps below:
-
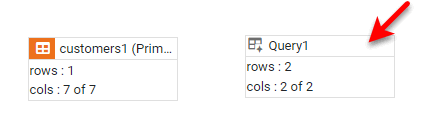
Create a new Embedded Table with two rows and two columns. (See Enter Data for more information.) The new Embedded Table is called ‘Query1’.
-
Click on the ‘Query1’ data block to select it.
-
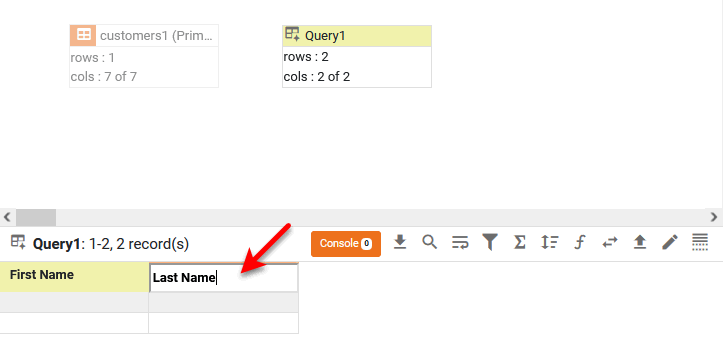
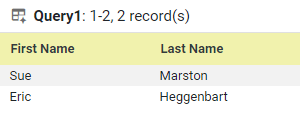
In the bottom panel, double-click on the ‘col0’ column header, and edit the column name to be ‘First Name’. Double-click on the ‘col1’ column header and edit the column name to be ‘Last Name’.
-
In the table cells below the columns headers, enter the following names:
-
-
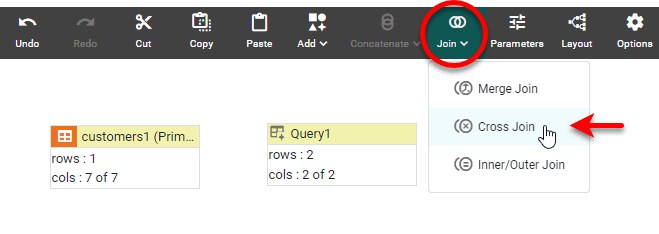
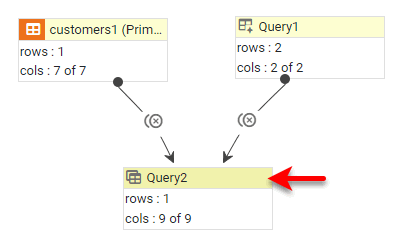
Join the two data blocks using a cross-join: Hold the Ctrl key and click both data blocks to select them. Then press the ‘Join’ button
in the toolbar and select ‘Cross Join’ .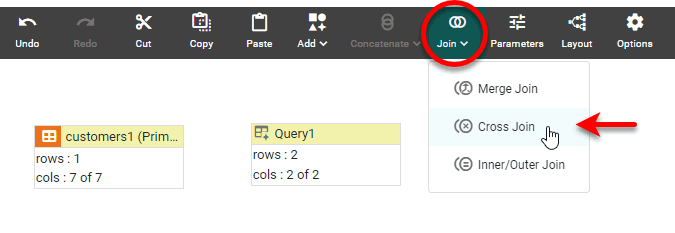
This creates a new joined data block, ‘Query2’.
-
To preview the ‘Query2’ data block, click the data block to select it. Then press the ‘Change View’ button
in the bottom panel, and select ‘Live Data View’ .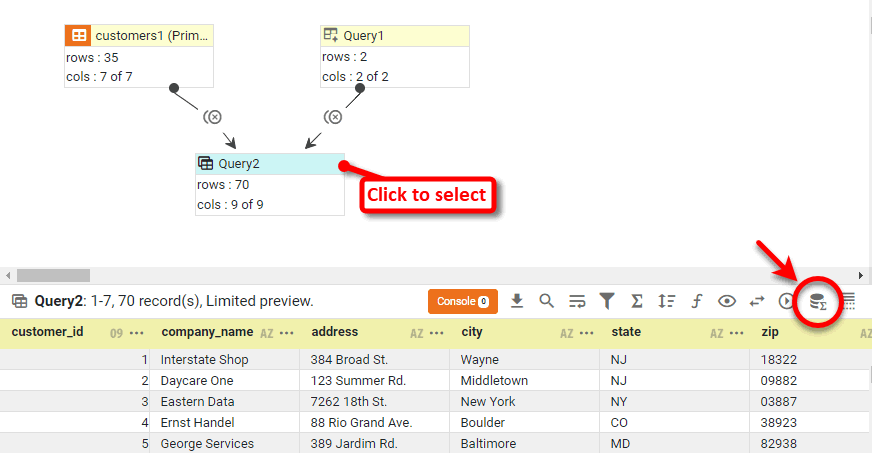
Note that the ‘Query2’ data block returns the cross-product of the ‘customers1’ and ‘Query1’ data blocks. That is, the result represents every row of ‘Query1’ paired with every row of ‘customers1’.
Merge Join
Watch Video: Create a Merge Join
This video might show an earlier version of the feature or operation that differs in minor ways from the current version.
A merge join is a special type of join that creates no logical relationship between the two base data blocks. The base data blocks are simply merged horizontally into a single data block by collecting their columns together and placing corresponding rows side by side.
To create a merge join, follow these steps:
-
Create the data block you want to join. See Create a Data Worksheet for information on how to create a data block.
-
Select the data blocks you want to join together. (You can hold the Shift or Ctrl key and click on the data blocks to select both, or drag with the mouse to “lasso” the data blocks.)
-
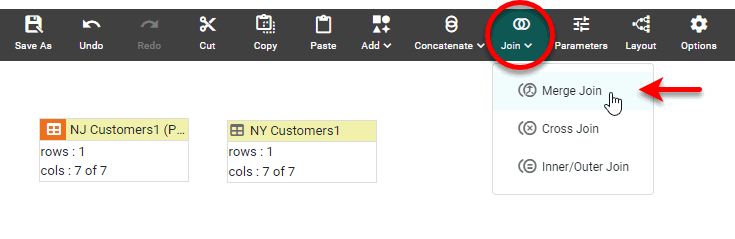
Press the ‘Join’ button
in the toolbar and select ‘Merge Join’  .
.
This creates the new merge-joined data block.
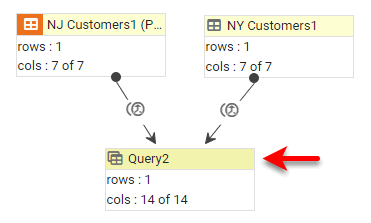
In the merge-joined data block, the columns of the shorter table are padded with empty rows to match the length of the longer table. The number of columns in the final merge-joined data block is the sum of the columns in the two base data blocks.
You can now use this Data Worksheet to supply the dataset for a Dashboard. See Visualize Your Data to create a Dashboard.
Place orders of Wireless Mouse and Fast Go Game side-by-side within a single data block by using a merge join.
-
Create a new Data Worksheet. For information on how to create a new Data Worksheet, see Create a Data Worksheet.
-
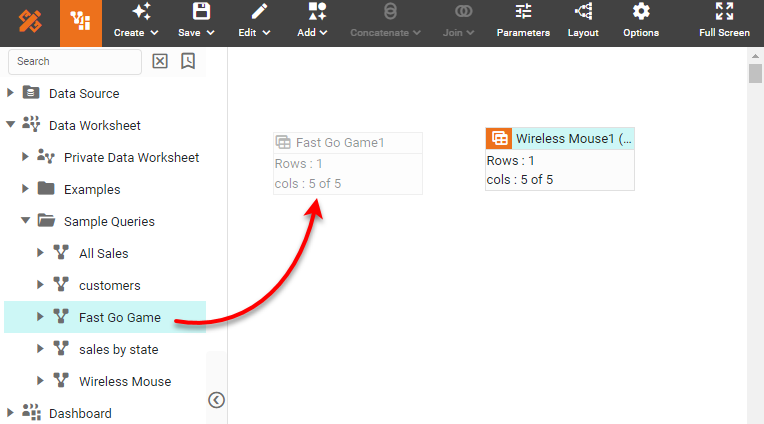
From the left Asset panel, Drag the ‘Wireless Mouse’ Data Worksheet into the right panel. This creates a new data block named ‘Wireless Mouse1’.
The ‘Fast Go Game’ and ‘Wireless Mouse’ Data Worksheets can be found in the folder. You may need to download the examples.zip file from GitHub into your environment. (This requires access to Enterprise Manager.) See Import and Export Assets for instructions on how to import. -
From the left Asset panel, drag the ‘Fast Go Game’ Data Worksheet into the right panel. This creates a new data block named ‘Fast Go Game1’.
-
Hold down the Ctrl key and click the data blocks to select both. (Alternatively, drag across the data blocks to “lasso” them.)
-
Press the ‘Join’ button
button on the toolbar and select ‘Merge Join’ .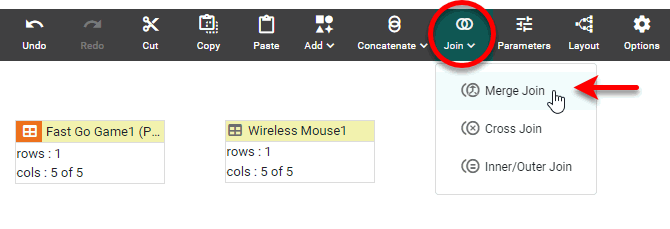
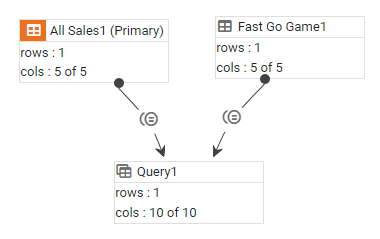
This creates a new data block, ‘Query1’.
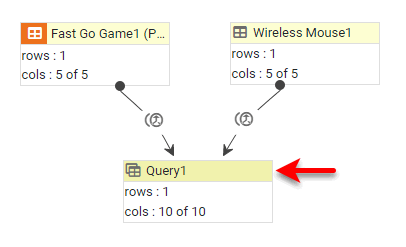
-
To preview ‘Query1’, first click the data block to select it. Then press the ‘Change View’ button
in the bottom panel and select ‘Live Data View’ .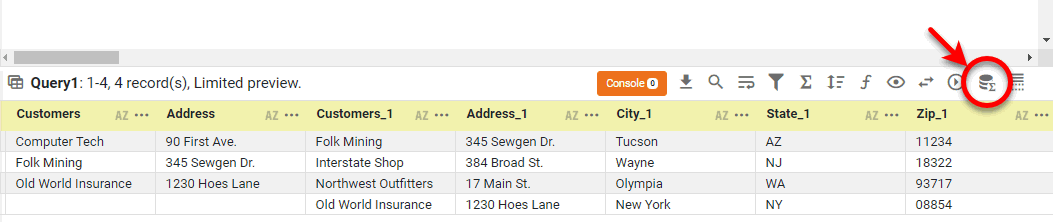
Notice that since the ‘Wireless Mouse1’ table has more rows than the ‘Fast Go Game1’ table, the number of rows of the ‘Query1’ table is equal to the number of rows of the ‘Wireless Mouse1’ table. The ‘Fast Go Game1’ data is padded with an empty row.
Edit a Joined Data Block
The sections below explain additional operations that you can perform on joined data blocks.
Open the Join Editor
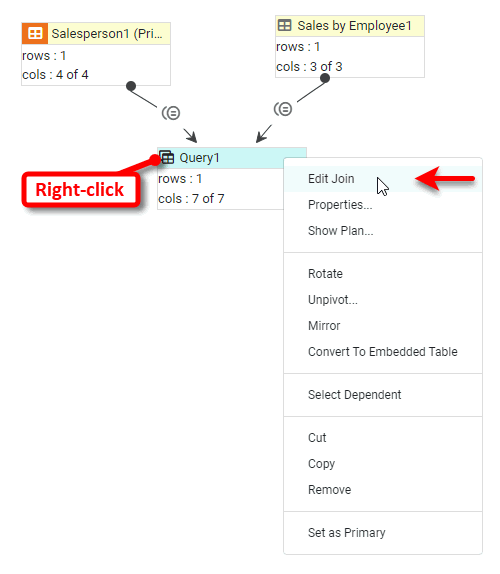
To reopen the Join Editor for a joined data block, right-click the joined data block (e.g., ‘Query1’), and select ‘Edit Join’ from the menu. Note: You can also access menu options from the ‘More’ button ( ) in the mini-toolbar.
Then proceed to Use the Join Editor as explained above, or see Change the Join Type, Change the Join Order, and Add Tables to a Join.
Change the Join Type
Watch Video: Change a Join
This video might show an earlier version of the feature or operation that differs in minor ways from the current version.
| You can change the join type for all joined data blocks except for merge-joins, because merge-joins do not define a relationship. |
To change the join type for a joined data block, open the Join Editor for the data block. (See Open the Join Editor.) In the Join Editor, right-click on a join link and select the desired type of join from the menu, and press Done.
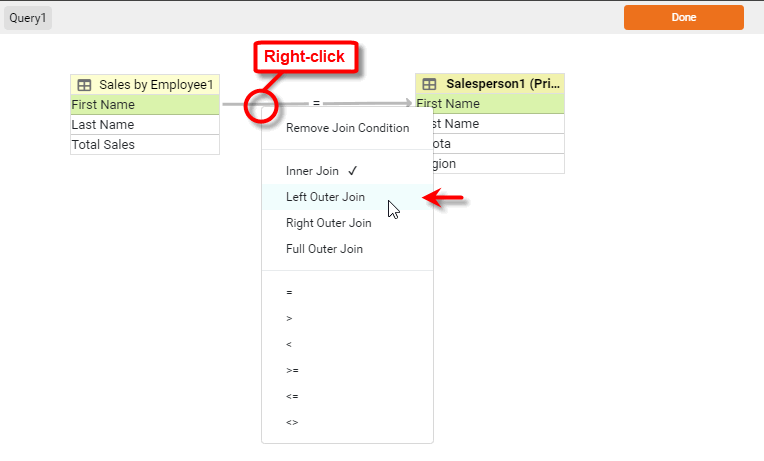
The Inner Join returns rows from the two data blocks that match based on the selected join column. The Left Outer Join additionally returns all rows in the left data block (including those without a match in the right data block), while the Right Outer Join additionally returns all the rows in the right data block (including those without a match in the left data block). The Full Outer Join returns all the rows of both data blocks (including those without matches).
When an outer join is specified, the additional rows included from a data block (in addition to those selected by the inner join) do not have matching rows in the other data block. Therefore, outer-join data blocks generally exhibit empty cells corresponding to the unmatched rows.
The ‘=’ operator produces the “equi-join,” which is the same as the ‘Inner Join’. The inequality operators (>, <, >=, <=, <>) produce their respective inequality joins.
Follow the steps below to change the join type of a joined table from inner join to left outer join.
-
Create a new Data Worksheet. For information on how to create a new Data Worksheet, see Create a Data Worksheet.
-
From the left Asset panel, drag the ‘All Sales’ Data Worksheet into the right panel. This creates a new data block named ‘All Sales1’.
The ‘All Sales’ Data Worksheet can be found in the folder. You may need to download the examples.zip file from GitHub into your environment. (This requires access to Enterprise Manager.) See Import and Export Assets for instructions on how to import. -
From the left Asset panel, drag the ‘Fast Go Game’ Data Worksheet into the right panel. This creates a new data block named ‘Fast Go Game1’.
The ‘Fast Go Game’ and ‘Wireless Mouse’ Data Worksheets can be found in the folder. You may need to download the examples.zip file from GitHub into your environment. (This requires access to Enterprise Manager.) See Import and Export Assets for instructions on how to import. -
Create an inner join between the two data blocks based on the ‘All Sales’ > ‘Company’ field and ‘Fast Go Game’ > ‘Customers’ field. (See Inner Join, Outer Join, Inequality Join above for instructions on how to create an inner join.)
-
Select the joined data block and preview the data. To do this, press the ‘Change View’ button
in the bottom panel and select ‘Live Data View’ .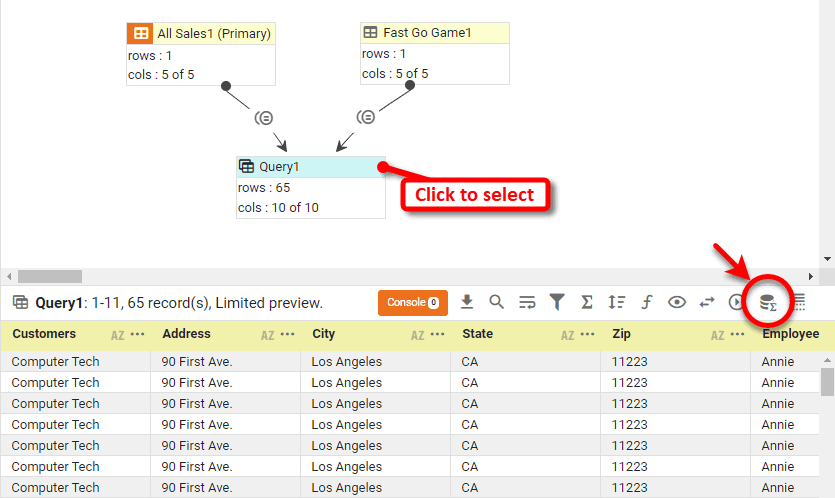
The result set contains only information about companies that bought Fast Go Game. This is because an inner join returns only records that have matches in both data blocks. Companies that do not appear in the ‘Fast Go Game’ data block are excluded.
-
Right-click the joined data block and select ‘Edit Join’ from the context menu. Note: You can also access menu options from the ‘More’ button (
) in the mini-toolbar. -
Click the join link and select ‘Right Outer Join’ from the context menu.
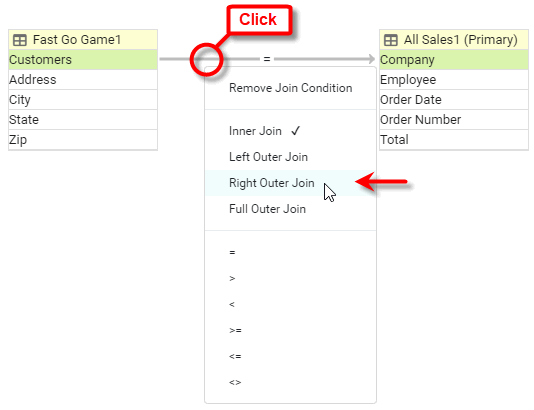
-
Press Done to close the Join Editor.
-
Preview the joined data block again.
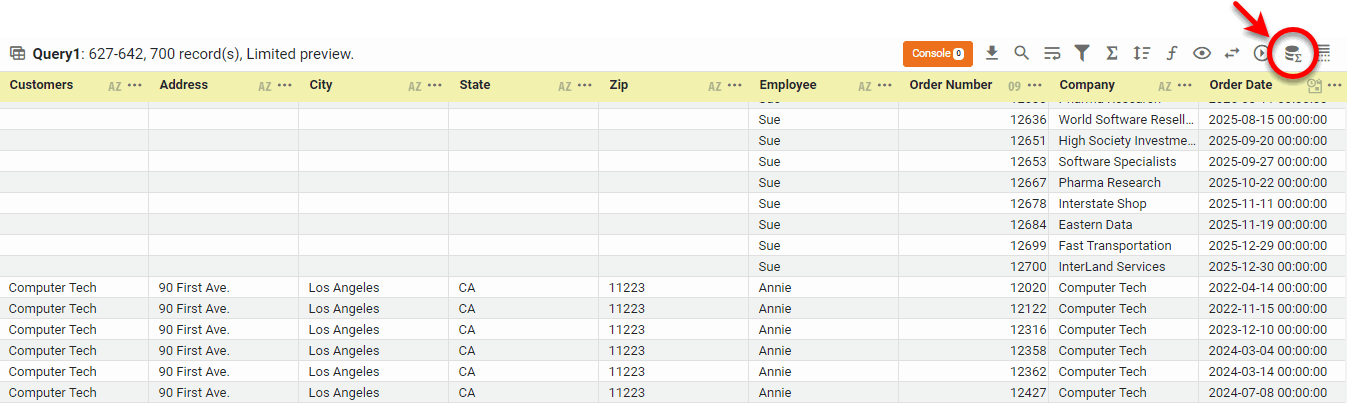
Note that the right outer join returns all of the records from the ‘All Sales1’ data block, even if they do not have a corresponding entry in the ‘Fast Go Game1’ data block.
Change the Join Order
To change the order in which the tables are joined (for example, which table is considered the “left” table in a “left outer join”), follow the steps below:
-
Open the Join Editor for the data block. (See Open the Join Editor.)
-
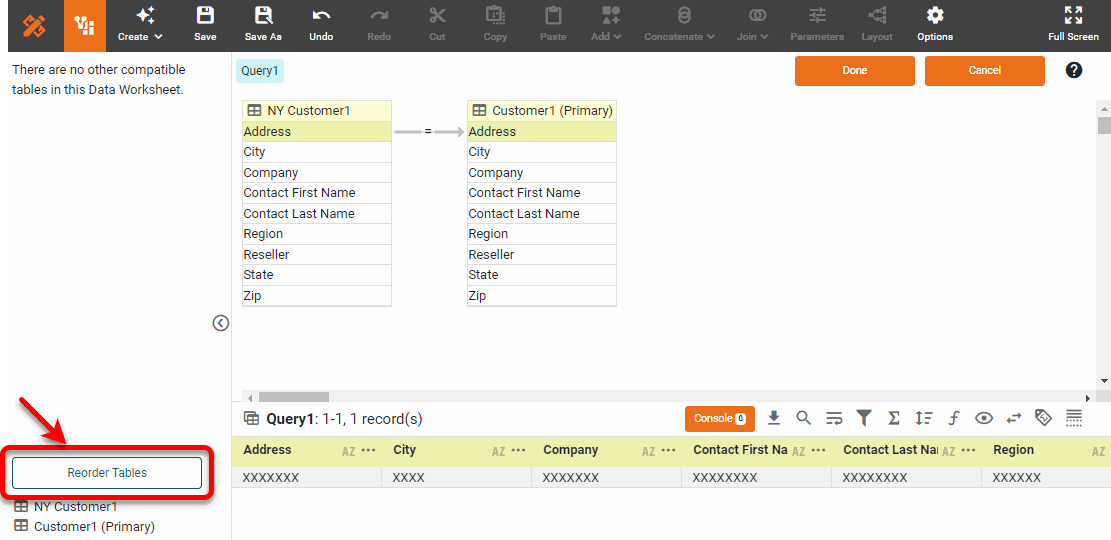
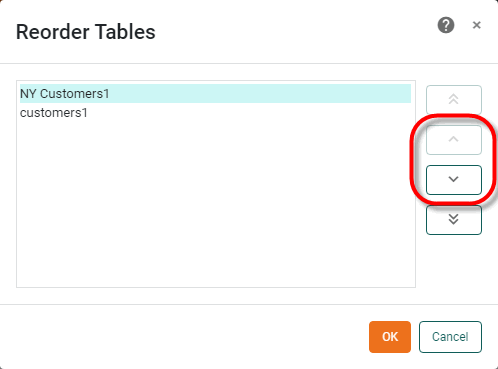
Press the Reorder Tables button at the bottom of the left panel. This opens the ‘Reorder Tables’ dialog box.
-
In the ‘Reorder Tables’ dialog box, click a table in the list and set the desired position for the table by using the arrow buttons. Then press OK.
-
Press Done to close the Editor.
Add Tables to a Join
To add additional data blocks to an existing join follow these steps:
-
Open the Join Editor for the data block. (See Open the Join Editor.)
-
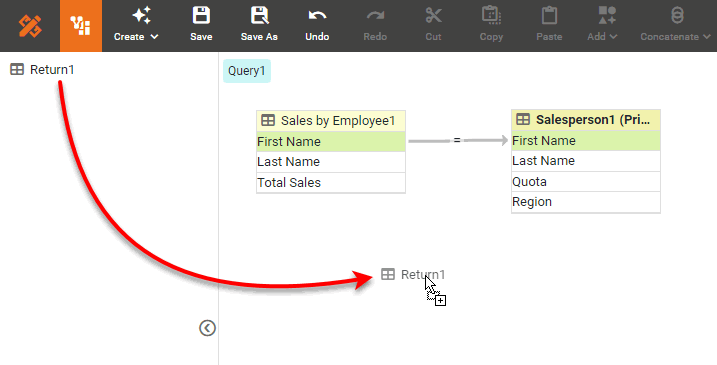
In the Join Editor, drag any additional tables from the left panel into the right panel.
-
Create the joins between the new table and the existing tables as described in Inner Join, Outer Join, Inequality Join above.
-
Press Done to close the Editor.
View the Joined Dataset
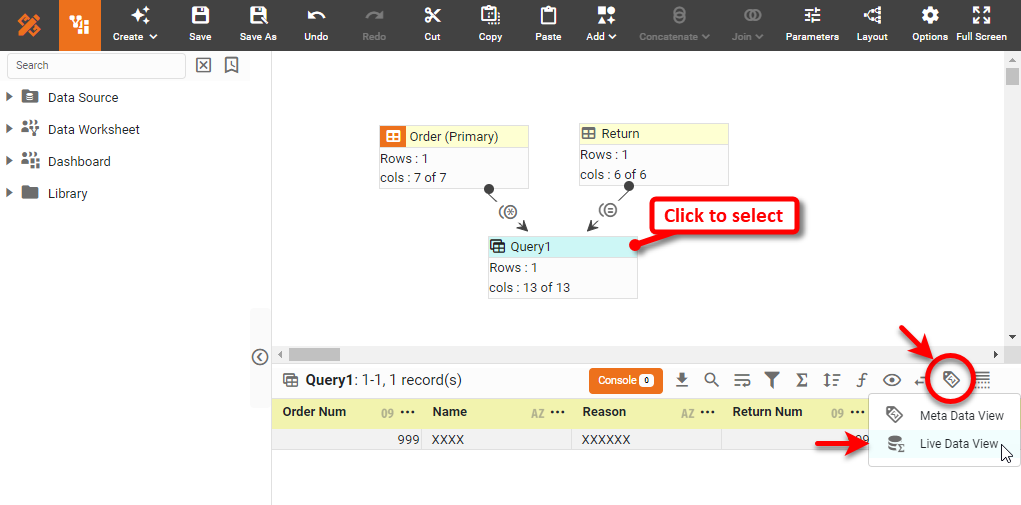
To view the data in the joined data block, click to select the joined data block (e.g., ‘Query1’) and press the ‘Change View’ button in the bottom panel. Select ‘Live Data View’ .
Remove Duplicate Columns
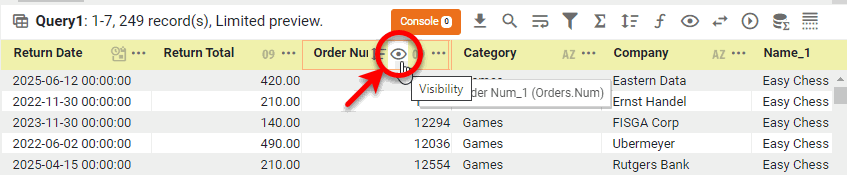
To remove duplicate columns (e.g., the join columns), press the ‘Show/Hide’ button  for the columns you wish to hide. (You can do this in either ‘Live Data View’ or ‘Meta Data View’ .)
Rename Columns
To change column names, double-click the column header and edit the text. See Modify a Column for more details.
| Names must be unique without respect to case (e.g., "num1" is the same name as "Num1"). |
Rename the Data Block
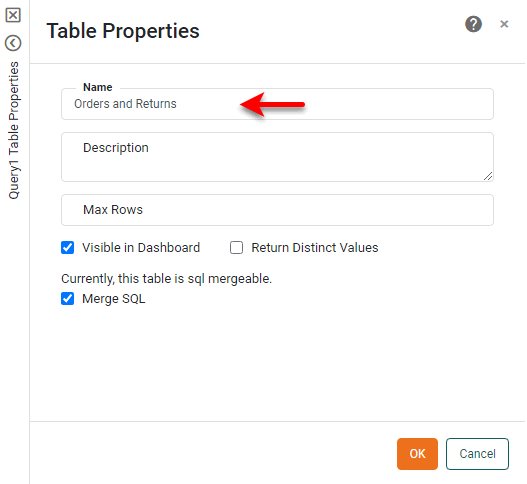
To rename the joined data block, double-click the title bar and type a new name, or right-click the title bar and select ‘Properties’ from the context menu. Note: You can also access menu options from the ‘More’ button () in the mini-toolbar. This opens the ‘Table Properties’ panel. Enter the desired name in the ‘Name’ field, and press OK.
Set as Primary Data Block
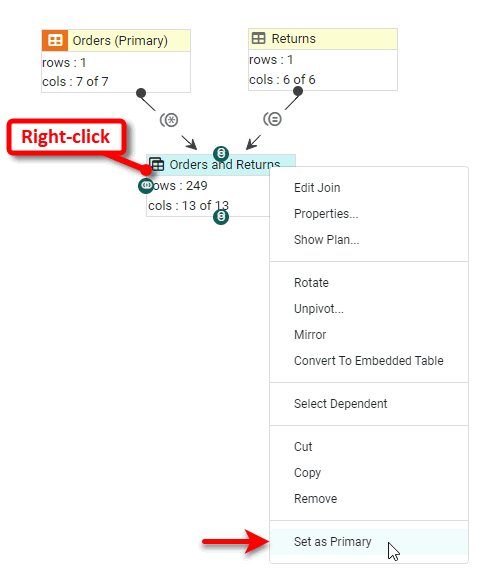
It is good practice to mark the final result of your Data Worksheet as the primary data block. This ensures that this data block will be listed first among the data blocks available to any Dashboard based on this Data Worksheet.
To do this, right-click the joined data block (e.g., ‘Orders and Returns’ below), and select ‘Set As Primary’ from the context menu. Note: You can also access menu options from the ‘More’ button () in the mini-toolbar.
Locate the Column Source
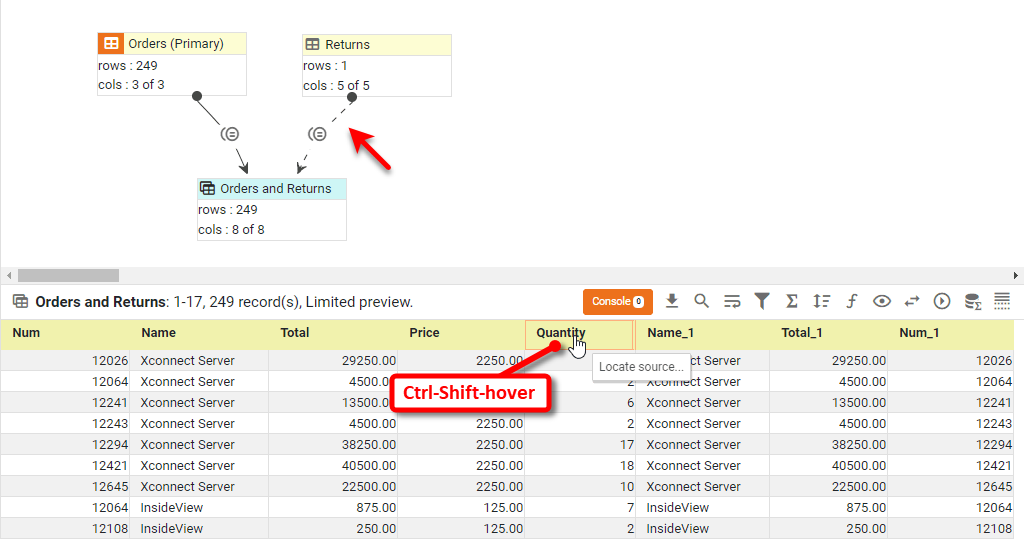
In a Data Worksheet that includes many joins, you may sometimes need help to find the original source data block of a particular column. To do this, follow the steps below:
-
Click to select the data block that contains the column that you want to trace. (Usually this data block is the result of one or more joins.)
-
Hold down the Shift and Ctrl keys and hover the mouse over the desired column in the bottom panel. This highlights the corresponding join with a dashed line to indicate the origin of the column.
-
To highlight the source data block(s), continue to hold down the Ctrl and Shift keys, and click the mouse on the desired column in the bottom panel.