Customize Server Update
To force a Dashboard to refresh its data at a specified interval, simply select the ‘Server-Side Update’ option in the ‘Dashboard Options’ dialog box. (See Dashboard Options in Visualize Your Data for more details.)
You can further customize the update behavior by configuring the Dashboard to refresh in response to a particular external event. For example, your database can issue a refresh command to a Dashboard in response to a database event such as a data update.
Custom Server-Side Update
To customize server-side update, follow the steps below:
-
Set the logging level to
Info. (See Logging.) -
Add the following property. See All Properties for information on how to set properties.
assetMonitor.enabled=true
-
Start the InetSoft server, and open Enterprise Manager.
-
View the server log (see Logging) and verify that the following lines (or equivalent) appear in the log:
Start RMI registry at: 1099
Rebind RMI Call thread.
DataChange server bound in RMI registry.
This indicates that the DataChange server (responsible for server-side updates) is correctly running.
-
If you do not see the above output in the log, this may indicate a port conflict. In this case, set the
dataChange.rmi.portproperty to a different port number. -
Open the desired Dashboard in Visual Composer. Open the ‘Dashboard Options’ dialog box, and select the ‘Server-Side Update’ option. (See Dashboard Options in Visualize Your Data.) In the ‘Refresh Interval’ field, enter the period (in seconds) at which the server should check for the external trigger event.
-
Create a
DataChangeClientclass that can be executed by an external program (for example, by the database) to trigger a particular Dashboard to update.See a sample DataChangeClient class…
import java.rmi.*; import inetsoft.report.composition.AssetMonitor; import inetsoft.uql.asset.AssetRepository; public class DataChangeClient { public DataChangeClient(String usr, String pwd, int scope, String vs, String rmi) { this.usr = usr; this.pwd = pwd; this.scope = scope; this.vs = vs; this.rmi = rmi; } private boolean dataChange() { AssetMonitor engine = null; try { engine = (AssetMonitor) Naming.lookup(rmi); } catch(Exception e) { System.err.println("Can't find the rmi server at: " + rmi); e.printStackTrace(); return false; } String ticket = null; try { ticket = engine.login(usr, pwd); } catch(RemoteException e) { System.err.println("Login failed with " + usr + "/" + pwd); e.printStackTrace(); return false; } try { engine.dataChanged(vs, scope, usr, ticket); } catch(RemoteException e) { System.err.println("fire data change failed"); e.printStackTrace(); return false; } try { engine.logout(ticket); } catch(RemoteException e) { } return true; } public static void main(String[] args) { if(args.length != 5) { System.err.println("Usage: java DataChangeClient usr pwd scope DashboardPath rmi"); System.err.println("@param user: the usr for login"); System.err.println("@param pwd: the password of the user"); System.err.println("@param scope: 1 - global scope, other - user scope"); System.err.println("@param DashboardPath: the path of the Dashboard"); System.err.println("@param rmi: the rmi data change server url"); System.exit(0); } int scope = AssetRepository.USER_SCOPE; if("1".equals(args[2])) { scope = AssetRepository.GLOBAL_SCOPE; } new DataChangeClient(args[0], args[1], scope, args[3], args[4]).dataChange(); } private String usr, pwd, vs, rmi; private int scope; } -
Compile the
DataChangeClientclass. (The classpath should include the StyleBI server files and inetsoft-core.jar.) -
Execute the
DataChangeClientclass to update the desired Dashboard. For example:java DataChangeClient admin admin 1 DashboardName "rmi://localhost:1099/DataChangeServer"
This will update the specified Dashboard after the interval specified by the ‘Refresh delay’ field in the ‘Dashboard Options’ dialog box.
Walkthrough: Custom Server-Side Update
In the following example, you will create a Dashboard that receives its data from an Embedded Table in a Data Worksheet. You will then configure the Dashboard to automatically update when the DataChangeClient is triggered.
Before beginning the example, compile the DataChangeClient class as described previously. Then follow the steps below:
-
Add the following property:
assetMonitor.enabled=true
-
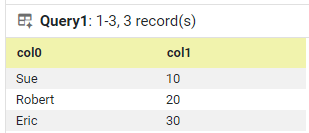
Create a new Data Worksheet, and add the following Embedded Table. (See Enter Data in Prepare Your Data for instructions on how to create an Embedded Table.)
-
Right-click the ‘col1’ header, and select ‘Column Type’ from the context menu. This opens the ‘Column Type’ dialog box.
-
Select ‘Double’ from the ‘Type’ menu, and press OK.
-
Save the Data Worksheet with the name ‘EmbeddedData’.
-
Create a new Dashboard based on the ‘EmbeddedData’ Data Worksheet.
-
Add a Chart to the Dashboard to display the data from the Data Worksheet as follows. (See Basic Charting Steps in Visualize Your Data.)
-
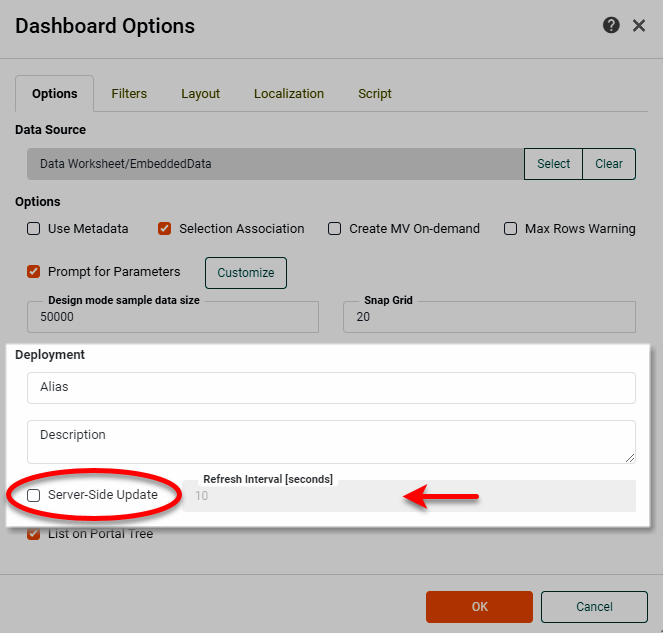
Press the ‘Options’ button
 in the Dashboard toolbar. This opens the ‘Dashboard Options’ dialog box.
 -
In the ‘Deployment’ panel at the bottom, enable the ‘Server-Side Update’ option, and set the ‘Refresh Interval’ to 10 seconds.
-
Press OK to close the dialog box.
-
Save the Dashboard with the name ‘UserDashboard’.
-
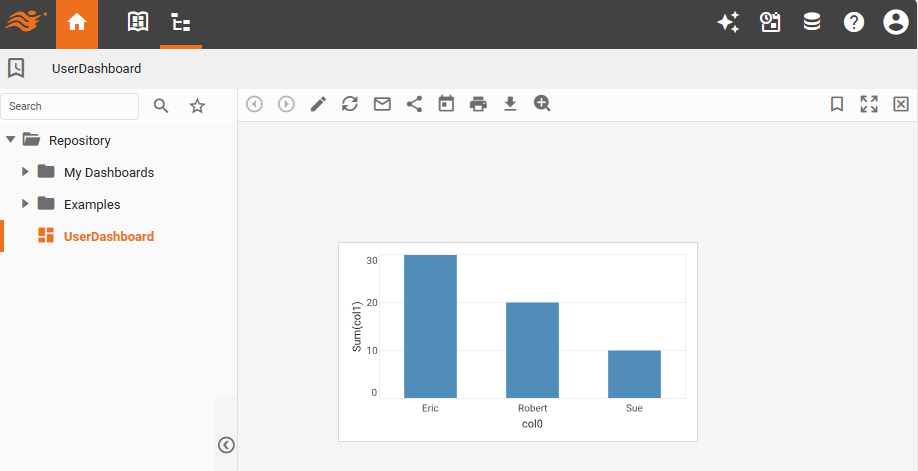
Launch the User Portal, and open ‘UserDashboard’ in the Portal.
-
Return to the ‘EmbeddedData’ Data Worksheet in Visual Composer.
-
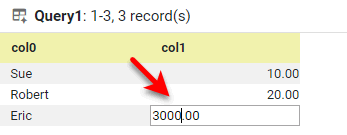
Make some changes to the data in the Embedded Table, and press the ‘Save’ button
 .
.
-
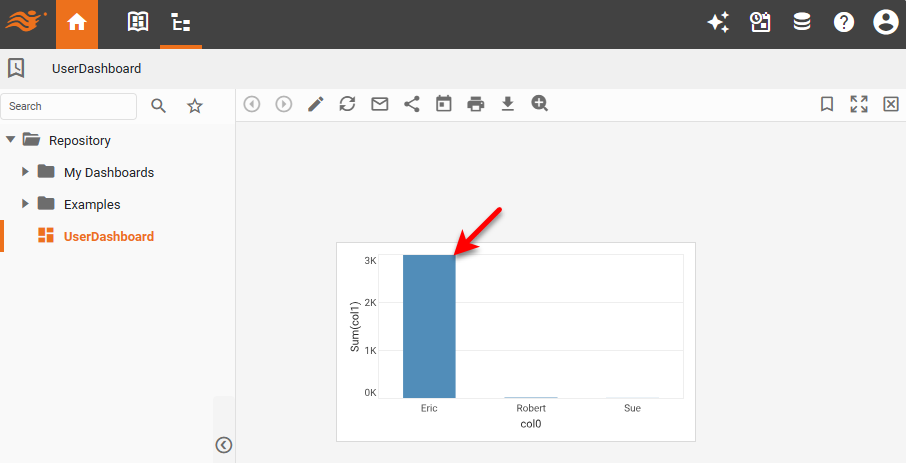
Return to the User Portal. (Do not reload the Dashboard.) Note that the Dashboard remains the same, even though the underlying data has changed.
-
Trigger an automatic Dashboard update by running the
DataChangeClientclass from the command line:java DataChangeClient admin admin 1 UserDashboard "rmi://localhost:1099/DataChangeServer"
-
Return to the User Portal. (Do not reload the Dashboard.) Observe that the Dashboard updates automatically after the specified delay.