Edit a Logical Model
|
If you see the ‘Create Visualization’ dialog box, press the ‘Close’ button
|


To modify an existing logical model, follow the steps below:
-
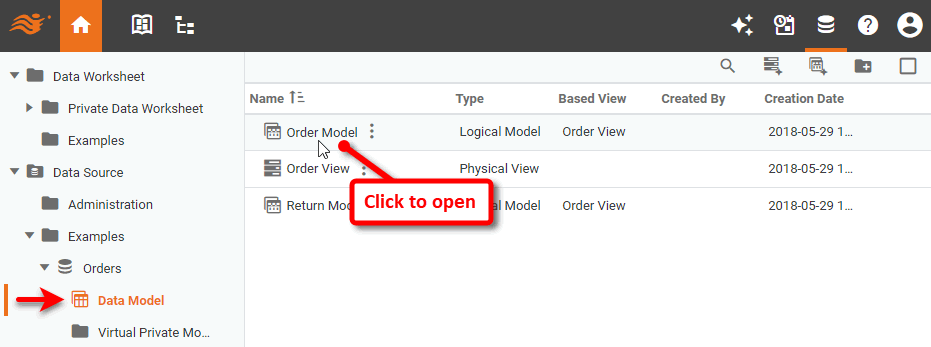
Press the top ‘Data’ button
 in the Portal.
 -
In the navigation tree in the left panel, expand the ‘Data Sources’ folder.
-
Expand the data source for which the logical model is defined, select the ‘Data Model’ node, and click on the logical model to open it for editing.
-
To make modifications, see the sections below.
Add New Entities and Attributes
To add new entities and attributes to the logical model, follow the appropriate steps in Create a Logical Model. Press the ‘Save’ button  to save the logical model.
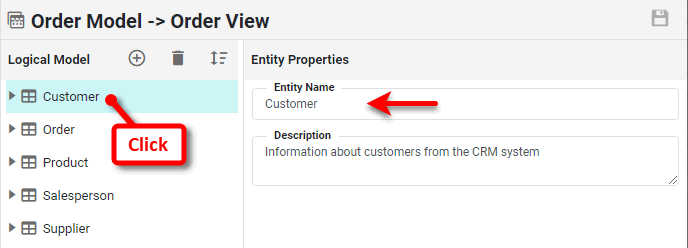
Change an Entity Name
To change the name of an entity, click on the entity. Enter a new name in the right panel.
|
An entity name can contain any characters. However, the following characters and character combinations have been observed to cause problems on certain databases in particular usages. If you use these characters in an entity name, thorough testing with your database is recommended. ! ? [ ] < > ^ ` \ ' = " {D {d {T {t ( : $()
|
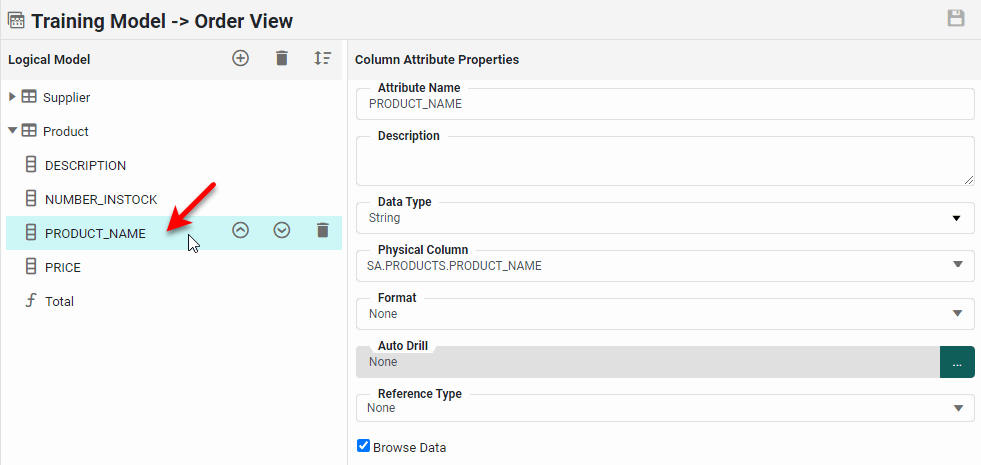
Modify Attribute Properties
To modify properties of an attribute in a logical model, follow the steps below:
-
Open the logical model for editing, as described above.
-
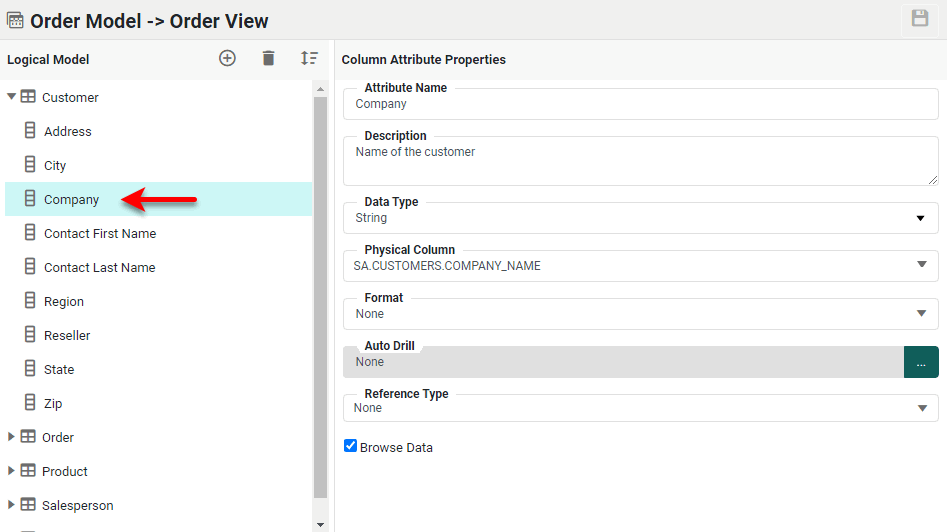
Expand an entity in the model, and click to select the attribute that you want to modify.
-
Adjust the desired properties:
Attribute Properties- Attribute Name
-
Change the attribute name by entering a name in the ‘Attribute Name’ field.
An attribute name can contain any characters except a period (“.”). However, the following characters and character combinations have been observed to cause problems on certain databases in particular usages. If you use these characters in an attribute name, thorough testing with your database is recommended.
! [ ] ? { & } : ^ ` \ ' " = / < > $() - Data Type
-
Assign a data type (‘Integer’, String’, etc.) from the ‘Data Type’ menu.
- Physical Column
-
To change the physical view field that is represented by the logical model attribute, select the desired field from the ‘Physical Column’ menu.
- Format
-
To add formatting to the data returned in an attribute, click the ‘Format’ menu and choose the desired format from the ‘Format Type’ menu.
-
For ‘Date’ format, you can select one of the automatic formats (‘Full’, ‘Long’, ‘Medium’, or ‘Short’), or select ‘Custom’ to specify an optional format pattern string.
See a list of available date format symbols…
For examples of how to construct dates using these symbols, see Date Format in Visualize Your Data.
Symbol Description Example G
Era
AD
y, yyyy
Year
18, 2018
Q, QQQ
Quarter in year
2, 2nd
M, MM, MMM, MMMM
Month in year
2, 02, Feb, February
w
Week number in year
34
W
Week number in month
3
D
Day number in year
200
d, dd
Day number in month
5, 05
u, uu
Day number in week (Monday = 1)
4, 04
F
Day of week in month
2 (i.e., second Tuesday in month)
E, EEEE
Day of week
Wed, Wednesday
a
AM/PM
PM
H
Hour in day (24-hour; midnight is 0)
23, if time is 11:01PM
0, if time is 12:01AM
1, if time is 1:01AMk
Hour in day (24-hour; midnight is 24)
23, if time is 11:01PM
24, if time is 12:01AM
1, if time is 1:01AMh
Hour in day (12-hour; midnight is 12)
11, if time is 11:01PM
12, if time is 12:01AM
1, if time is 1:01AMK
Hour in day (12-hour; midnight is 0)
11, if time is 11:01PM
0, if time is 12:01AM
1, if time is 1:01AMm, mm
Minute in hour
3, 03
s, ss
Second in minute
9, 09
S, SSS
Millisecond
27, 027
z, zzzz
Time zone
EST, Eastern Standard Time
Z
RFC 822 time zone
-0500
X, XX, XXX
ISO 8601 time zone
-05, -0500, -05:00
For example, to format a date as ‘Jan 01, 2000’, use
MMM dd, yyyy. You can select a format from the menu, or type your own into the text field. -
For ‘Number’ format, the number format pattern must be constructed using the following symbols.
Symbol Description 0
Displays the digit at this location. Displays “0” if there is no value at this location.
#
Displays the digit at this location (rounded, if placed in least significant position to the right of the decimal point). Suppresses display if there is no value at this location.
.
Decimal point
-
Minus sign
,
Grouping separator
E
Separates mantissa and exponent in scientific notation
;
Separates positive and negative sub-patterns
%
Multiplies by 100 and displays as percentage
$, ¥, €, etc.
Inserts the specified currency symbol
¤
Inserts the default currency symbol
For example, to add commas to a number, use
#, ###, ###. ##. Adding a%at the end of the format will multiply the value by 100 and display as a percentage. You can select a format from the menu, or type your own into the text field.Decimal formatting only applies if the value is a numeric type.
-
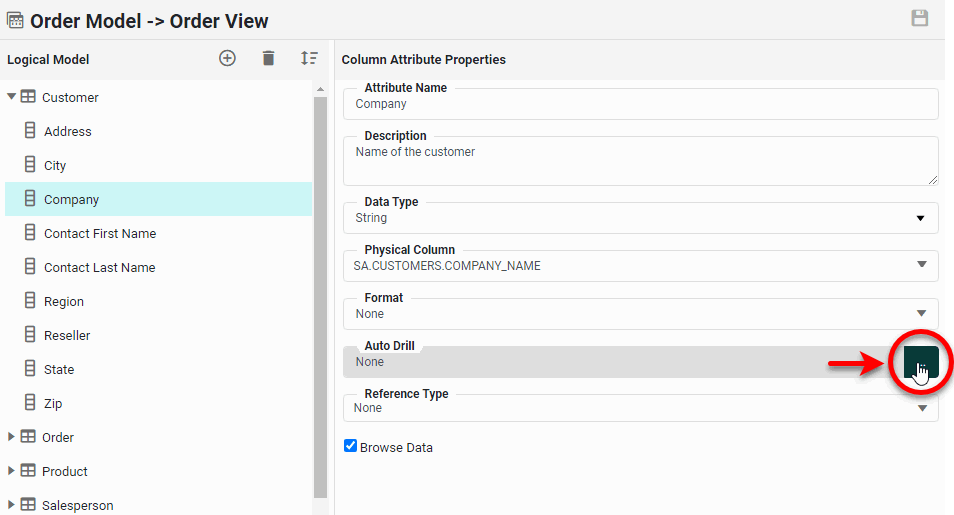
- Auto Drill
-
To add automatic hyperlinks to an attribute, press the ‘Edit Auto Drill’ button next to the ‘Auto Drill’ field. See Add Auto Drill below for more information.
- Reference Type
-
To specify that a field should be treated by default as a dimension, select ‘Dimension’ from the ‘Reference Type’ menu. To specify that a field should be treated by default as a measure, select the desired aggregation method from the ‘Measure’ list in the ‘Reference Type’ menu. The ‘Reference Type’ setting determines the attribute’s default behavior (as dimension or measure) in aggregation contexts such as dashboard charts and crosstabs, etc. (This behavior can be changed by the dashboard designer.)
What is a measure? What is a dimension?
A measure is generally used for aggregation, for example summation, averaging, correlation, etc., within a Crosstab, Chart, Text component, or Gauge. Adding a measure to the ‘Y’ region in a chart displays the computed aggregates by using locations on the Y-axis. Adding a measure to the ‘X’ region displays the computed aggregates by using locations on the X-axis. You can also display aggregates by using color, shape, size, or label.
A dimension is used to break-down the dataset into multiple groups, often within a Crosstab, Chart, or Selection List. Adding a dimension to the ‘X’ region of a Chart distinguishes the different dimension groups by location on the X-axis. Adding a dimension to the ‘Y’ region distinguishes the different dimension groups by location on the Y-axis. You can add multiple dimensions into the ‘X’ or ‘Y’ regions of a Chart, or into the ‘Rows’ or ‘Columns’ regions of a Crosstab, to create multiple grouping levels. You can also distinguish groups in a dimension by using color, shape, size, or label in a Chart.
- Browse Data
-
To allow designers and users to browse the attribute values using the ‘Browse Data’ button
 when they set a filtering condition on the attribute, enable the ‘Browse Data’ option for the attribute. By default, ‘Browse Data’ allows designers and users to select from a list of the distinct values contained in the first 1000 rows.
-
Press the ‘Save’ button
to save the logical model.
Add Auto Drill
The auto-drill feature allows you to add hyperlinks to an attribute in a logical model. The hyperlinks will then be present in any Dashboard that uses the attribute. For example, if you place an auto-drill on the ‘State’ attribute of a data model, then all tables and charts that display the ‘State’ attribute will have hyperlinks on the states. These hyperlinks can link to a web page or to another Dashboard.
Auto Drill Walkthrough
To add auto-drills to a data model, follow the steps below:
-
Open the logical model for editing. (See above.)
-
Expand an entity in the model, and click to select the attribute that you want to modify.
-
Press the ‘Edit Auto Drill’ … button next to the ‘Auto Drill’ field. This opens the ‘Edit Auto Drill’ dialog box.
-
In the ‘Edit Auto Drill’ dialog box, press the ‘Add Drill’ button
 to create a new auto-drill. The new drill is assigned a default name such as ‘drill0’, ‘drill1’, etc.
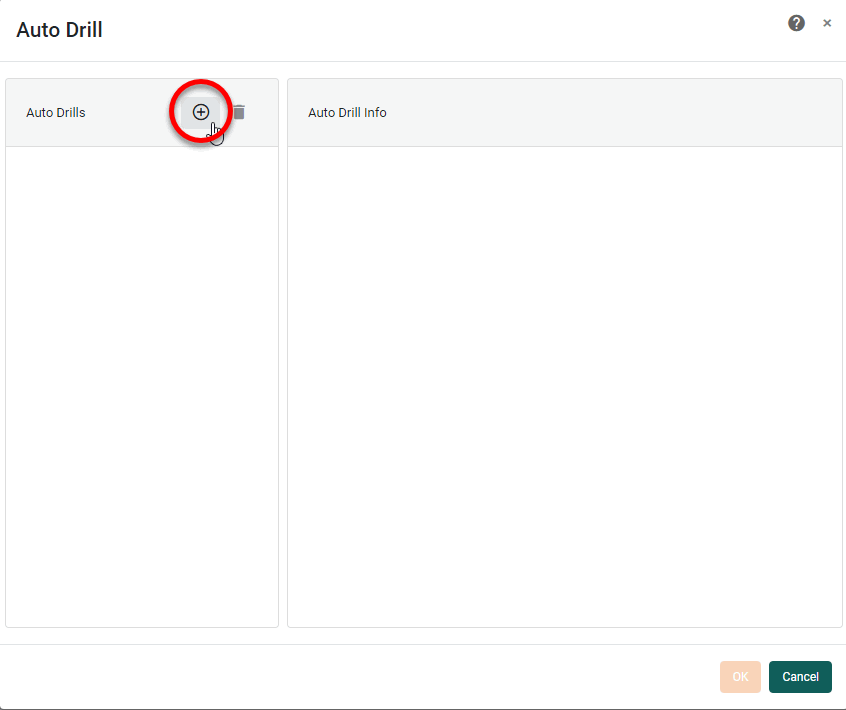
-
Rename the new drill by entering a name in the ‘Name’ field.
-
Enter a tooltip in the ‘Tooltip’ field. The tooltip is displayed when the user hovers the mouse over a hyperlink. If there are multiple hyperlinks for a given attribute, the tooltip of each hyperlink is displayed when the user hovers the mouse over the name of the drill in the menu of hyperlink options.
-
To add a hyperlink that targets a dashboard, select the ‘Asset Link’ option, and select the desired dashboard from the ‘Link’ menu.
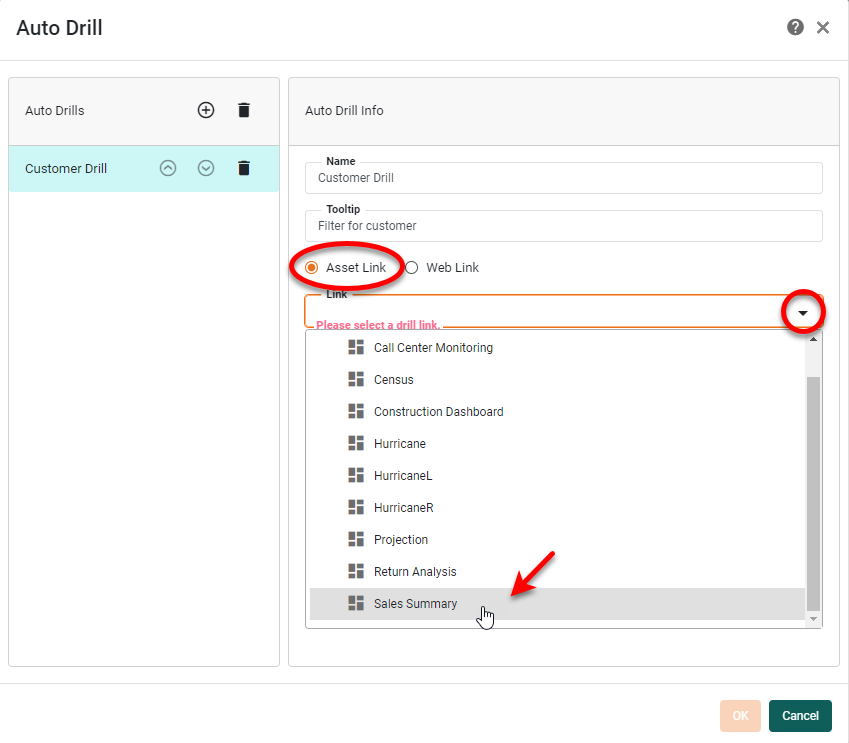
Typically, the dashboard that the drill targets will contain a condition that filters the data based on the value passed in the drill hyperlink. For example, in this case the dashboard might contain a parameterized condition such as Company is equal to $(customer), where the value of variablecustomerwill be supplied by the auto-drill hyperlink. (See how to add a parameter below.) -
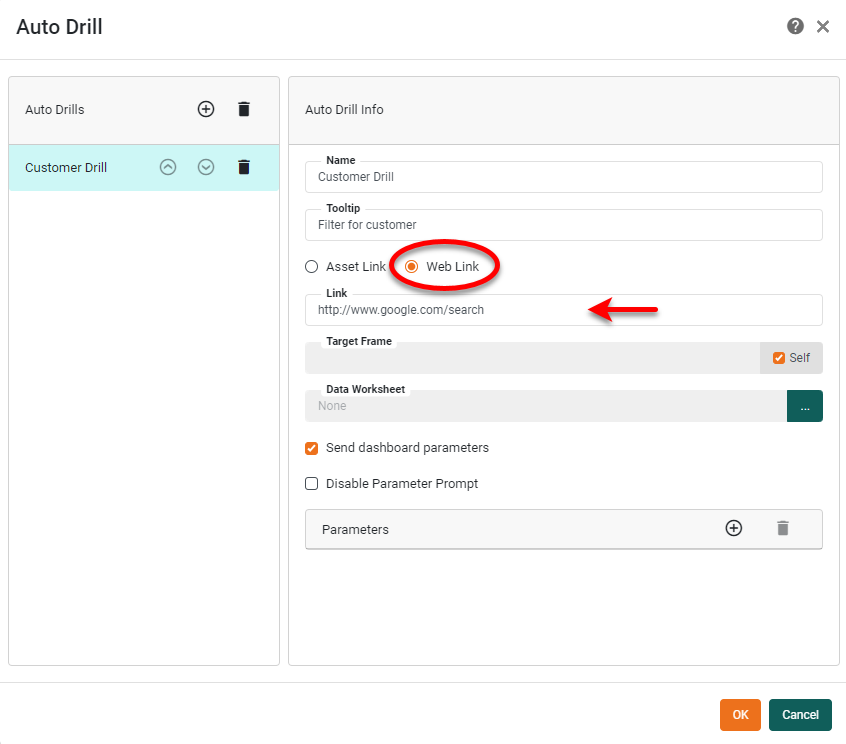
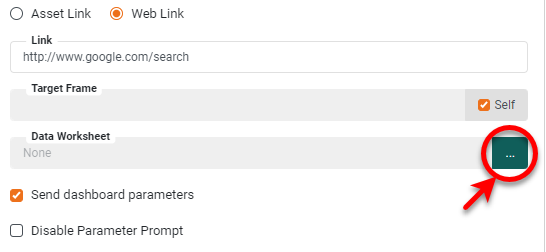
To add a hyperlink to a web page , select the ‘Web Link’ option, and enter the desired URL. See below for information about embedding parameters in the URL.
-
Optional: If you want the target dashboard or web page to be displayed in a particular browser window, deselect the ‘Self’ option, and enter the name of the desired window in the ‘Target Frame’ field. (The specified name becomes the DOM ‘name’ attribute.) Enter
_blankto open the dashboard or web page in a new browser window or tab. To specify that the target dashboard or web page should open in the User Portal frame, replacing the previous dashboard, select the ‘Self’ checkbox. -
Optional: If you have selected ‘Asset Link’, and the target dashboard is configured to display a parameter prompt when opened, you can bypass the prompt by selecting ‘Disable Parameter Prompt’.
-
Optional: If you want to use the hyperlinked text or value to retrieve a related value from a Data Worksheet, press the ‘Query Selection’ button … next to the ‘Data Worksheet’ field.
-
From the ‘Query Selection’ dialog box, select the Data Worksheet whose primary data block contains the values to retrieve. The primary data block should generally have a condition on it that filters the query to return a single value based on the link the user clicks. (See Query Data for information on how to create an independent query with a condition.)
Example 1. Query SelectionFor example, a Data Worksheet named ‘getProdID’ might return product IDs with the following condition,
SA.PRODUCTS.PRODUCT_NAME is equal to $(userProductChoice)where
userProductChoiceis the name of a variable. If you select this Data Worksheet in the ‘Query Selection’ dialog box, you can also select the field of the data model that should be passed into theuserProductChoicevariable when the user clicks the hyperlink.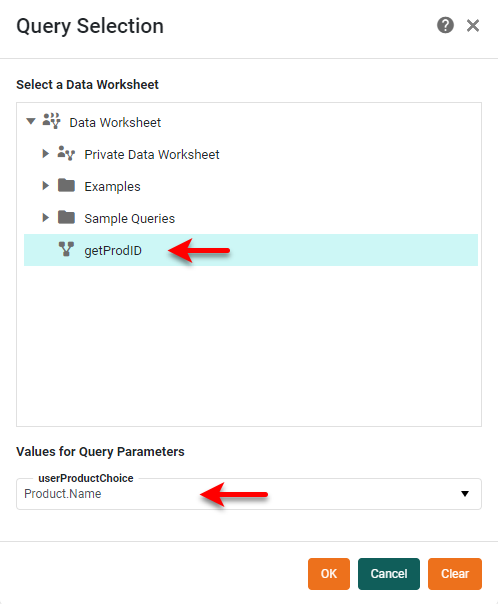
The Data Worksheet will apply the condition based on this value and return the related value (in this example, the corresponding product ID), which you can then pass as a parameter in the hyperlink. (See below.)
-
Parameters: If you intend to pass the hyperlinked text or value to the drill-down dashboard or web page when the user clicks the link, follow the steps below:
-
Press the ‘Add Parameter’ button
next to the ‘Parameters’ field. This opens the ‘Parameter’ dialog box. -
In the ‘Parameter Name’ field, enter the name of a dashboard or web page parameter that you want to receive the value passed in the hyperlink.
-
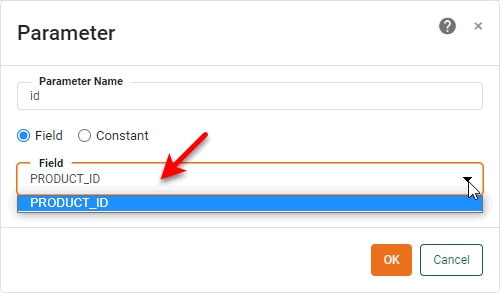
If you want the auto-drill hyperlink to pass the hyperlinked value to the drill-down dashboard or web page, select ‘Field’ under ‘Parameter Source’. In the ‘Parameter Value’ field, select
this.columnto indicate that the value passed in the hyperlink will be the hyperlinked text itself. For example, if the hyperlinked text is ‘Interstate Reseller’, the parameter value passed in the hyperlink when the user clicks will be ‘Interstate Reseller’.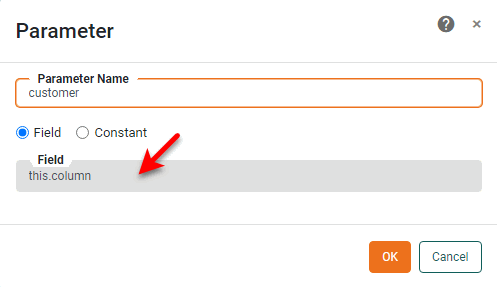
If you are using ‘Query’ look-up (see above), you can choose the value returned by the query to pass in the hyperlink.
By default, parameters are passed in the hyperlink URL as key-value pairs, e.g.,
?key=value.Example 2. Key-Value Pair ParameterIf the ‘Web Link’ URL for the auto-drill is https://www.google.com/search, and you specify a parameter namedqfor the ‘customer’ field, when the user clicks the hyperlinked customer value ‘Direct Sales’ (for example), the resulting hyperlink URL will be https://www.google.com/search?q=Direct%20Sales, incorporating the specified hyperlink parameter and value (or the value returned by query lookup) as a key-value pair.You can also embed parameters within the URL itself. To do this, use the
$(parameter)syntax.Example 3. Embedded ParameterIf the URL for ‘Web Link’ is https://www.inetsoft.com/$(param1), the value ofparam1will be substituted into the URL, yielding, for example, https://www.inetsoft.com/services if the value ofparam1is “services”. Parameters that are not referenced with the$(parameter)syntax in the URL are added as a key-value pairs instead, as described above. -
If you want the auto-drill hyperlink to pass a fixed value to the drill-down dashboard or web page, select ‘Constant’ under ‘Parameter Source’. In the ‘Type’ field, select the data type of the constant that the hyperlink will pass. In the ‘Parameter Value’ field, enter the fixed value that the hyperlink should pass.
-
Press OK to close the ‘Parameter’ dialog box.
-
-
To add additional parameters, repeat the above steps.
-
To delete a parameter from the hyperlink, press the ‘Delete Parameter’ button
 next to the parameter name. To delete all parameters, press the ‘Clean Parameters’ button button above the parameter list.
 -
Enable the ‘Send Dashboard Parameters’ option to pass dashboard-level parameters in the hyperlink (in addition to the auto-drill parameter specified above).
Dashboard parameters are parameters defined within the dashboard containing the hyperlinks. See Dynamically Set Properties in Visualize Your Data and parameter in Advanced Dashboard Scripting for more information about parameters. The drill-down dashboard or web-page should be designed to accept these parameter values, or they will be ignored. In the case of a drill-down dashboard (‘Asset Link’ option), the parameters are passed into parameters of the same name, if they exist, in the drill-down dashboard. In the case of a drill-down web page (‘Web Link’ option), the parameters are passed in the URL as key-value pairs.
Example 4. Send Dashboard ParametersConsider a dashboard that has the following dashboard parameters defined in the onInit script. (See Add Script to a Dashboard for information about how to add script.)
parameter.param1 = hello
parameter.param2 = goodbye
If ‘Send Dashboard Parameters’ is enabled, and the web link for the auto-drill is https://www.google.com/search, when the user clicks the hyperlinked value ‘Direct Sales’ (for example), the resulting hyperlink URL will be https://www.google.com/search?param1=hello¶m2=goodbye&q=Direct%20Sales, incorporating the dashboard parameters and the specified hyperlink parameter as key-value pairs.
-
Optional: Press the ‘Add Drill’ button
again and repeat the steps above to add additional hyperlinks to the attribute. If you add more than one drill to a given attribute, the end-user will be presented with a menu of hyperlink choices corresponding to the different drills you have assigned. -
Press OK to close the ‘Edit Auto Drill’ dialog box.
-
Press the ‘Save’ button
to save the logical model.