Add Script to a Dashboard
If you need to modify a Dashboard at runtime, or implement more complex business logic, you can add script to your Dashboard. There are three levels at which you can attach script in a Dashboard:
- Property level
-
Attach script as a property expression to dynamically modify property values (e.g., visibility, color, etc.) of the host component. See Add Property Expression Script.
- Component level
-
Attach script to an individual component (Chart, Gauge, etc.) to modify component properties, including properties that cannot be set by an expression, or to implement other logic. See Add Component Script.
- Dashboard level
-
Attach script in one of two global domains, the onInit handler or the onRefresh handler. See Add Dashboard-Level Script for more information.
The following sections explain how and where you can add script to your Dashboard.
|
Charts are unique among all components in that you can access many Chart properties via both simple script properties and low-level Chart API methods.
Note that scripted Charts are not good candidates for user-modification, so you should deselect ‘Enable Ad Hoc Editing’ in the Chart Properties dialog box for scripted Charts. |
Script Evaluation Order
Unlike conventional JavaScript on web pages, JavaScript that you embed in a Dashboard is executed as part of the Dashboard generation process on the server, not the client browser. However, scripts can control client-side interactions through event handlers and hyperlinks. The overall sequence of Dashboard script evaluation is as follows.
- 1: Execute the onInit handler
-
The onInit handler executes only once, when the Dashboard is first loaded. It can be used to initialize variables and define parameters. It cannot access user input or component data. See Add Dashboard-Level Script for more information.
- 2: Execute the onRefresh handler
-
The onRefresh handler re-executes each time the Dashboard is refreshed by a user operation. See Add Dashboard-Level Script for more information.
- 3: Execute all component-level scripts
-
Component scripts and property expressions are re-executed whenever the particular component is refreshed due to a user operation (on the component itself, or on a related component). See Add Property Expression Script Add Component Script and for more information. For a given component, property expressions are evaluated prior to the component script.
Because the order in which individual component scripts are initially executed is undetermined, you should avoid setting properties of one component from within a script attached to a different component. In general, components scripts are evaluated starting from the top of the Dashboard.
Access Java in Script
You can call both JavaScript and Java functions from within Dashboard scripts. However, scripts are executed in a restricted environment that provides access only to the following Java packages: java.awt, java.text, java.util, java.sql, inetsoft.graph.*, inetsoft.report, inetsoft.report.lens, inetsoft.report.filter, inetsoft.uql, and inetsoft.report.painter.
To permit scripts to access Java packages other than those listed, an administrator can set the javascript.java.packages property to specify additional packages. (See All Properties for information on how to set properties.) To add package contents to the current namespace, use importPackage('packageName'). For example, importPackage('java.lang') or importPackage(java.lang) allows scripts to refer to object names without full qualification (i.e., String rather than java.lang.String).
Add Property Expression Script
You can enter a script in any property field that provides the ‘Value Type’ button  with an ‘Expression’ option.
This is especially useful when you want to automatically and dynamically adjust a property based on some other option that the user selects. Example: If the user selects a particular measure for a Chart from a ComboBox (e.g., ‘Products Sold’), use the ‘Value Type’ button with ‘Expression’ option for measure’s ‘Aggregate’ property to add script to that returns an appropriate summarization method (e.g., ‘Count’) for the ‘Aggregate’ property.
To add a script to a component expression field, follow the steps below:
-
Right-click the component, and select ‘Properties’ from the context menu. This opens the ‘Properties’ panel. Note: You can also access menu options from the ‘More’ button (
 ) in the mini-toolbar.
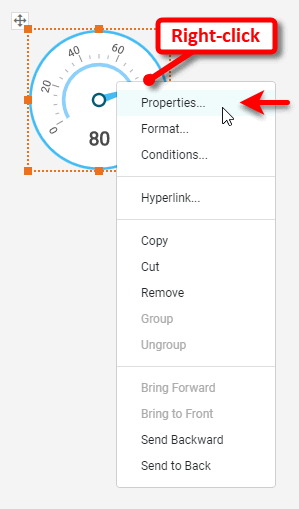
-
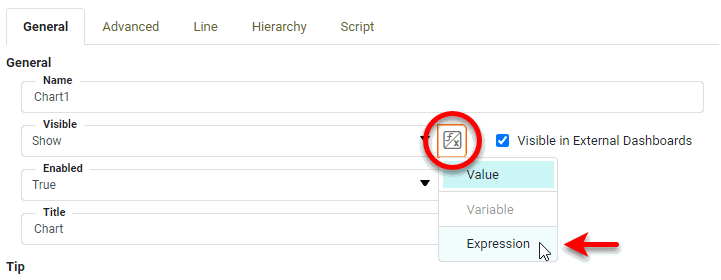
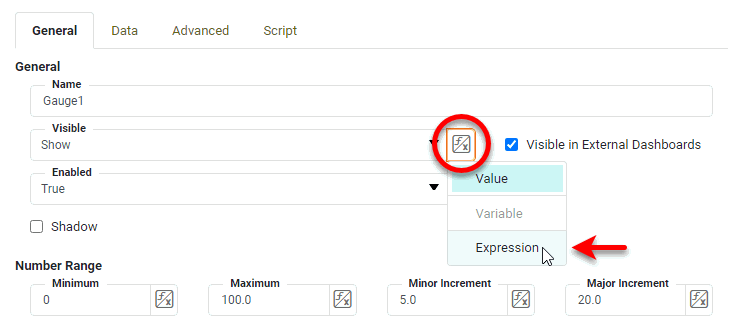
In the ‘Properties’ panel, find the property you want to dynamically change. (The ‘Visible’ property under the General tab in this example.)
-
Press the ‘Value Type’ button
next to the property you want to modify, and select ‘Expression’ from the menu. This enables the ‘Edit Formula’ button  .
.
-
Press the ‘Edit Formula’ button
to open the Formula Editor.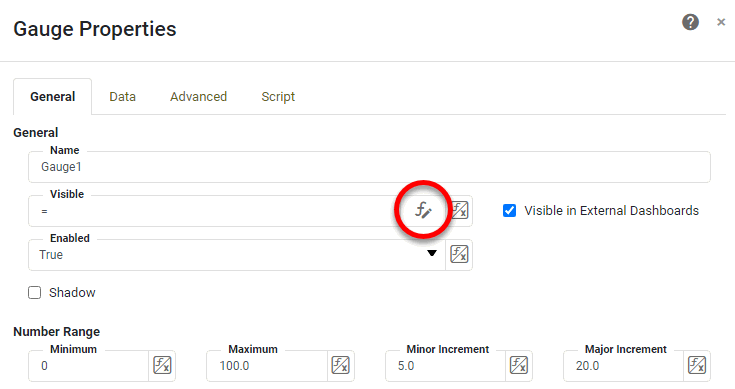
-
In the Formula Editor, enter the desired script. (Enter properties such as
RadioButton1.selectedObjectand parameters such asparameter._USER_by selecting them from the top panel of the Editor.) For example, the following script hides the component if the user has selected ‘Hide’ from a RadioButton control, and the current month is March (i.e., the third month).Example: Hide componentif ((RadioButton1.selectedObject=='Hide') && (CALC.today().getMonth() == 3)) { "Hide" } else { "Show" }The script must return one of the options in the property menu. For example, return values for the ‘Visible’ property must be one of "Show","Hide", or"Hide on Print and Export". (To achieve “Show on Print and Export” behavior, use the special expression"!visible".)Read more about basic aggregation methods that you may find useful in such scripts…
To automatically insert a function (such as
CALC.today()), click the corresponding option in the ‘Functions’ list above the edit area. (Search for functions by using the ‘Search’ box.) To automatically insert a reference to another component’s property, click the corresponding option in the ‘Component’ list above the edit area.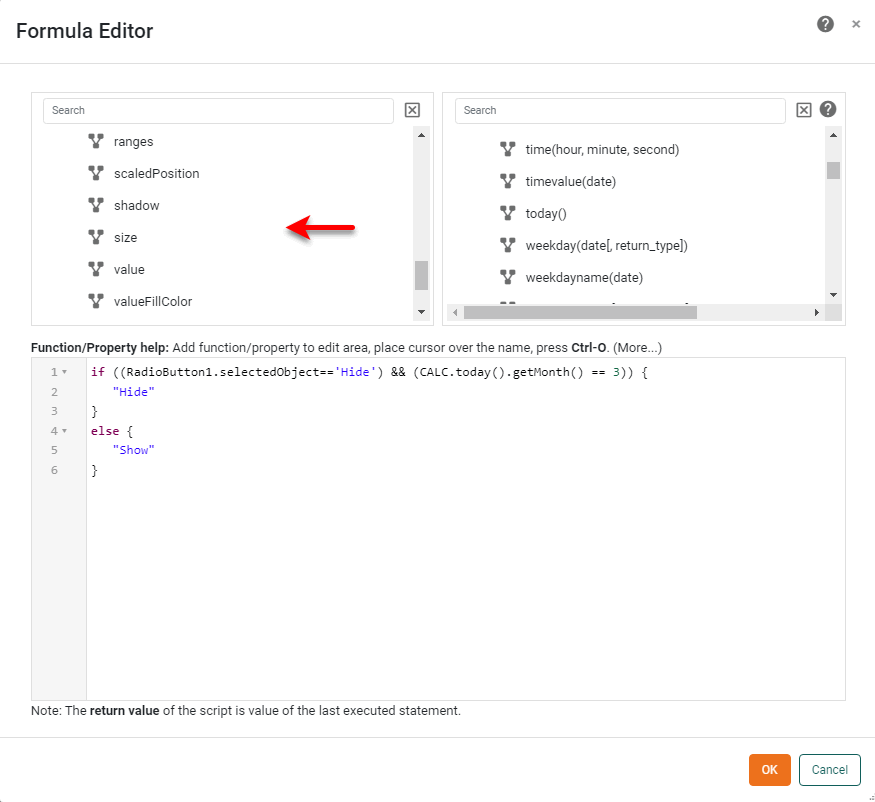
See Dashboard Object Reference and User Functions for a full description of available properties and functions.
-
Press OK to close the Formula Editor, and press OK to close the ‘Properties’ dialog box.
|
Add Component Script
A script attached to a Dashboard component is evaluated whenever the component is refreshed, such as upon Dashboard loading and user interactions. The script can change various properties of the component, including its visibility. Properties set in script override properties set (either statically or via expression script) in the component ‘Properties’ dialog box.
| A component’s script can access other components’ properties as well. However, it is not good practice to modify the properties of one component from within the script of another component, as the evaluation order is dependent on component positioning. |
The following sections explain how to add component script, and illustrate some common uses.
Attach Script to Component
To attach a script to a Dashboard component, follow the steps below.
-
Right-click the desired component, and select ‘Properties’ from the context menu. Note: You can also access menu options from the ‘More’ button (
) in the mini-toolbar. This opens the ‘Properties’ panel. -
Select the Script tab to open the Script Editor.
-
Select the Script or onClick button at the bottom of the dialog box.
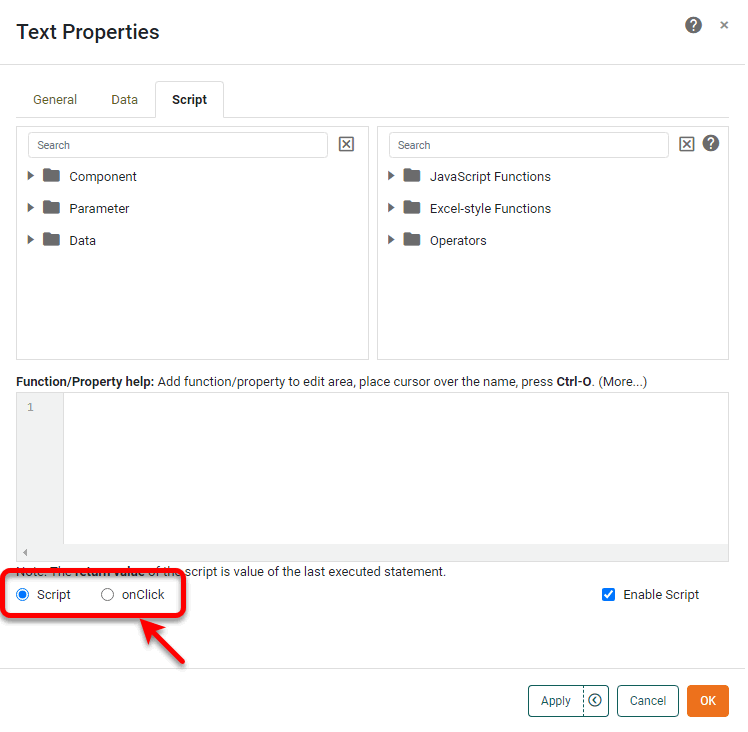
Code that you add with the Script option will execute when the component loads. Code that you add with the onClick option will execute when the user clicks on the component, which is especially useful for a Submit Button.
Do not attach an onClick script to a component that already has a hyperlink. -
Type the desired script in the text field, and press OK.
Select functions and operators from the top-right panel or use the ‘Search’ box. See Dashboard Object Reference and User Functions for available functions. To enter properties such as
RadioButton1.selectedObject, parameters such asparameter._USER_, or data such asdata['Count(Order Number)'], select these options in the top-left panel of the Editor, or use the ‘Search’ box.An expression script can reference properties of its hosting component without full qualification. For example, in a script placed on component Chart1, Chart1.selectedObjectandselectedObjectrefer to the same property.See the sections below for commonly scripted properties.
-
Optional: To disable a script (without deleting it entirely), uncheck the ‘Enable Script’ option at the bottom right corner of the Script Editor.
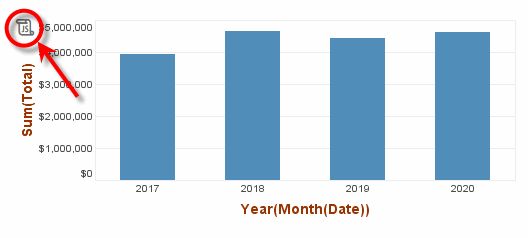
Components with script have a ‘JS’ button  in the top-left corner. Press the button to open the script in the Script Editor.
Color Property
Color properties (foreground/text and background/fill) are frequently used to highlight a Text or Textbox element. The simplest way to specify a color property is to assign a string containing one of the constants from the java.awt.Color class: black, blue, cyan, darkGray, gray, green, lightGray, magenta, orange, pink, red, white, and yellow.
foreground = 'red';You can also specify a color as java.awt.Color object, an integer (e.g., hexadecimal) representing the RGB value of a color, an array of RGB values, or a JSON object.
foreground = java.awt.Color.red; // class name must be fully qualified
background = 0xFF0000; // RRGGBB
foreground = [255, 0, 0];
foreground = {r:255,g:0,b:0};
Alternatively, you can create a color object by calling the constructor with the new operator.
foreground = new java.awt.Color(0.5, 1, 0);Note that the parameters to the color constructor have type float. Because JavaScript treats all numbers as float by default, you have to explicitly convert them to integer if you want to specify the RGB values in the range of 0-255. The default float parameters pass the RGB value in the range of 0-1, where 1 is equivalent to 255 in the integer version.
Font Property
| Style Constant for commonly-used constant values. |
You can specify the font property with a string containing the font name, style, and size, separated by dashes, or by creating a java.awt.Font object.
font = 'Verdana-BOLD-12';
font = new java.awt.Font('Verdana', java.awt.Font.BOLD, 12);
The name of the font can be a TrueType font name, or a logical font name. Logical font names are not recommended, however, because the logical font may be replaced by a different font in the runtime environment.
There are three font styles, Font.PLAIN, Font.BOLD and Font.ITALIC. The styles can be combined with a bitwise OR.
font = new java.awt.Font('Verdana', java.awt.Font.BOLD | java.awt.Font.ITALIC, 12);The final parameter specifies the size of the font. InetSoft provides an extended font that supports additional styles:
| Font Style | Description |
|---|---|
Underline |
Draw an underline below the text. The line style should be an available Line Style. |
Strikethrough |
Draw a line through the text in the middle. |
Superscript |
Draw the text at the upper corner of the previous text. |
Subscript |
Draw the text at the lower corner of the previous text. |
Smallcaps |
Draw all letters in capital letter, but draw the lowercase letters in a smaller size. |
Allcaps |
Convert all letters to uppercase. |
Shadow |
Draw the text with a shadow effect. |
To create an extended font, you must use the fully qualified name of inetsoft.report.StyleFont class.
font = new inetsoft.report.StyleFont('Verdana', java.awt.Font.BOLD | inetsoft.report.StyleFont.UNDERLINE, 12, StyleConstant.THIN_LINE);The final parameter specifies the line style used to draw the underline.
Visibility
You can dynamically hide or show a component using script. Typically, you would test a condition or user input at runtime, and then hide one or more components to present an appropriate view.
if(field['discount'] == 0) {
  Text8.visible = false;
}
As for all component properties, you should change the visibility of a component only from within a script attached to the same component , or from within the onRefresh Handler. (See Add Dashboard-Level Script for more information about this handler.) Otherwise, the position of the component in the Dashboard may influence the outcome.
Alignment
|
The Alignment property controls both the horizontal and vertical alignment of the component. The horizontal alignment is specified by the alignment constants H_LEFT, H_CENTER, and H_RIGHT. (See Alignment for more details.)
alignment = StyleConstant.H_CENTER;The vertical alignment property can be combined with the horizontal alignment property by using the bitwise OR.
alignment = StyleConstant.H_CENTER | StyleConstant.V_CENTER;The four vertical alignment options are V_TOP, V_CENTER, V_BOTTOM, and V_BASELINE.
Add User-Triggered Script
To execute scripted actions only upon user demand, you can add your code to the onClick script of an Image, Text, or Submit Button component. (See Add Component Script for instructions.) The onClick script executes only when the user clicks on the component.
For example, the following onClick script for a Submit Button will clear the selections from the specified Selection List filters when the user clicks the button:
SelectionList1.selectedObjects = []; (1)
SelectionList2.selectedObjects = [];
SelectionList3.selectedObjects = [];| 1 | See selectedObjects for more information about this property. |
Add Dashboard-Level Script
Dashboard-level script allows you to perform high-level Dashboard logic such as checking and setting parameters or validating user input. To create a Dashboard script, follow the steps below:
-
Press ‘Options’ button
 in the toolbar to open the ‘Dashboard Options’ panel.
 -
Select the Script tab. This opens the Script Editor.
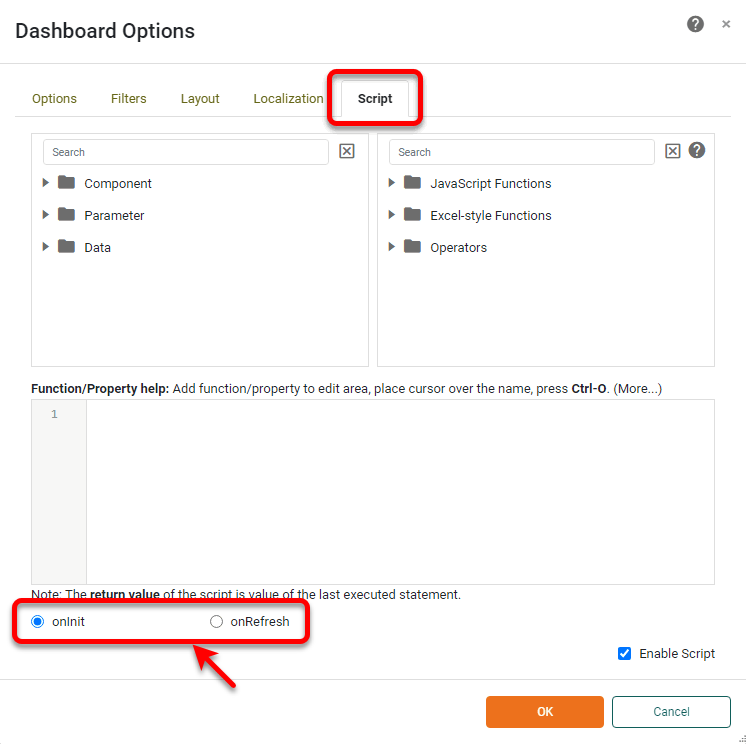
-
Use the radio buttons at the bottom to select either onInit or onRefresh.
- onInit
-
A Dashboard’s onInit script is executed only once, when the Dashboard it first loaded. It is ideal for one-time initialization tasks, such as defining Dashboard parameters and variables. A variable declared in onInit script will have global scope, and be accessible to all individual component scripts. To declare a local variable with the same name elsewhere, use the
varkeyword in the declaration to remove ambiguity. - onRefresh
-
The onRefresh handler is similar to the onInit handler, and is executed following onInit upon Dashboard loading. However, unlike onInit, an onRefresh script is executed every time the Dashboard is refreshed. Because the Dashboard is refreshed in response to most user interactions, including selections, the onRefresh handler gives you the ability to dynamically modify multiple elements from a central location. A variable declared in onRefresh script will have global scope, and will be accessible to individual component scripts. To declare a local variable with the same name elsewhere, use the
varkeyword in the declaration to remove ambiguity.The onRefresh script does not execute when you refresh a Preview by clicking the Preview tab. To run the onRefresh script, press the ‘Preview’ button  in the toolbar.
-
Enter the desired script, and press OK. (Enter properties such as
RadioButton1.selectedObjector parameters such asparameter._USER_by selecting these options in the top panel of the Editor or by using the ‘Search’ box.) -
To temporarily disable a script (without deleting it entirely), uncheck the ‘Enable Script’ option at the bottom right of the Script Editor.
Add Chart Script
Charts offer many properties that can be accessed in script. See Dashboard Object Reference for a list of available properties. Charts also provide an extensive API that allows you to modify an existing chart or create a new chart entirely through script. For more information on the Chart API, see Chart Script Tutorial and Chart Script Reference.