REST JSON Query
To create a new data set from an existing REST JSON connection, follow the steps below:
-
If you have not yet configured the database connection, see REST JSON. Then proceed with the steps below.
If you see the ‘Create Visualization’ dialog box, press the ‘Close’ button
 to continue with the steps below (recommended).
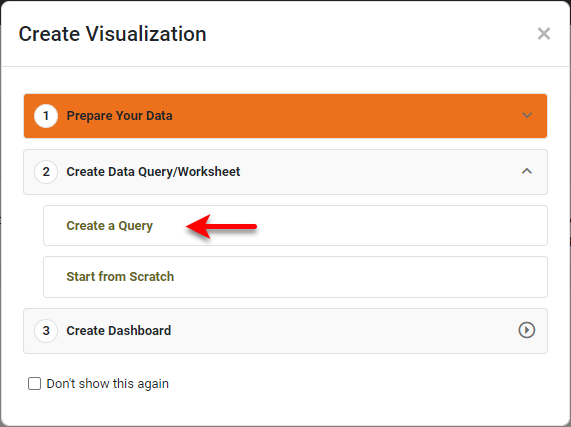
You can also press Create a Query to open the ‘New Data Worksheet’ dialog box, where you can select the query you wish to create. This allows you to skip the ‘Add’ button
 and proceed to the next steps.
 -
Open the Data Worksheet that will contain the data. (See Create a Data Worksheet or Edit a Data Worksheet.)
-
Press the ‘Add’ button
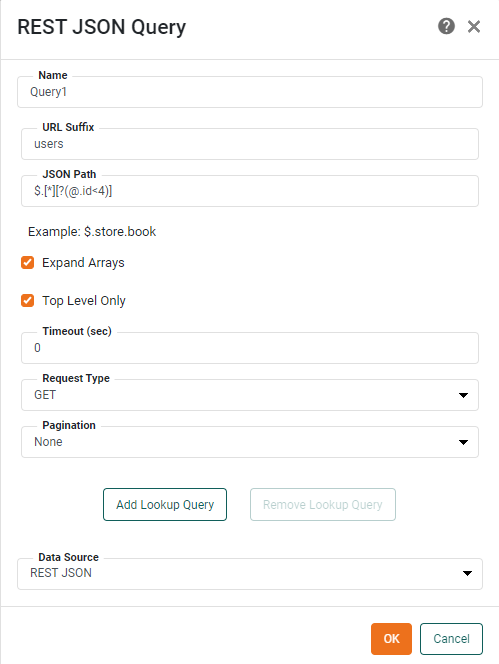
, and select ‘REST JSON Query’  . This opens the ‘REST JSON Query’ dialog box.
-
Enter the ‘URL Suffix’ and desired ‘JSON Path’. See JSONPath - XPath for JSON for information about the JSON Path syntax.
-
Optional: Select ‘Expand Arrays’ to expand a record that contains an array into multiple records.
Example: Expand Arrays…
Consider the following JSON:
{
    "id": 1,
    "items": [
        {
            "id": 1,
            "name": "Object 1",
            "list1": [ "Item 1.1.1", "Item 1.1.2" ],
            "list2": [ "Item 1.2.1", "Item 1.2.2" ]
        },
        {
            "id": 2,
            "name": "Object 2",
            "list1": [ "Item 2.1.1", "Item 2.1.2" ],
            "list2": [ "Item 2.2.1", "Item 2.2.2" ]
        }
    ]
}
If ‘Expand Arrays’ and ‘Top Level Only’ are both enabled (and ‘JSON Path’ is
$or blank), the top level of the array will be expanded into its individual items.
If ‘Top Level Only’ is disabled, all arrays will be fully expanded in parallel, as shown below:

To selectively expand only certain portions of the result, deselect the ‘Top Level Only’ option, and use the ‘Expanded Array Path’ field to specify the portion of the JSON path on which arrays should be expanded. For example, set ‘Expanded Array Path’ to
items.list1to expand theitemsandlist1arrays. (The top level array is always expanded.)
-
From the ‘Pagination’ menu, select the type of pagination used by the data source, and enter the desired parameters.
Pagination Options…
For read/response parameters you can select the following options from the right-side menus:
- Json Path
-
Path to a parameter in the body of the JSON response.
- Header
-
Parameter name in the header of the JSON response.
- Link Header
-
For ‘Link Iteration’ pagination, read parameter value from the link header of the JSON response.
For write/request parameters you can select the following options from the right-side menus:
- Query
-
Parameter to be added to the request query, for example,
example.com/api/query?queryParam=queryParamValue. - Header
-
Parameter to be added to the request header. Some or all of the following pagination options may be available:
-
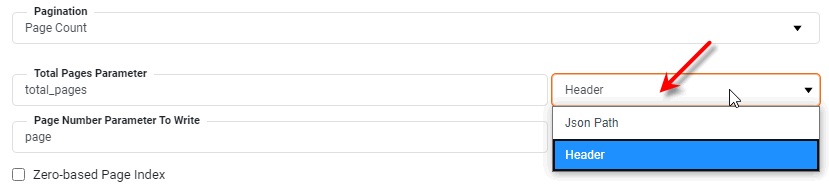
Page Count: Finds the total number of pages from the initial response and iterates through them page by page. The ‘Total Pages Parameter’ is the response parameter that contains the total page count, for example,
total_pages(JsonPath). The ‘Page Number Parameter To Write’ is the request parameter to specify the requested page, for example,page(Query). If ‘Zero-based Page Index’ is enabled, the page count starts with 0; otherwise, the page count starts with 1. -
Total Count And Offset: Reads the total count from the response, and iterates through each page using the ‘Max Results Per Page’ to find the total number of pages. The ‘Total Count Parameter’ is a response parameter that contains the total entry count, for example,
listcount(JsonPath). The ‘Offset Parameter To Write’ is a request parameter to specify the offset of the first item in the collection to return, for example,offset(Query). ‘Max Results Per Page’ specifies the number of entries that are returned for each request. The value of this property should match the value of the parameter in the API, most often namedlimit. -
Total Count And Page: Reads the total count from the response, and iterates through each page using the ‘Max Results Per Page’ to find the total number of pages. The ‘Total Count Parameter’ is a response parameter that contains the total entry count, for example,
listcount(JsonPath). The ‘Page Number Parameter To Write’ is a request parameter to specify the requested page, for example,page(Query). If ‘Zero-based Page Index’ is enabled, the page count starts with 0; otherwise, the page count starts with 1. ‘Max Results Per Page’ specifies the number of entries that are returned for each request. The value of this property should match the value of the parameter in the API, most often namedlimit. -
Iteration: Iterates over multiple pages of the response, by checking for the existence of the next page, using an offset parameter to get the next page, and then repeating. The ‘Has-Next Parameter’ is a response parameter to check whether the next page exists. Usually this is the same as the parameter containing the next offset, for example,
next_offset(Json Path). the ‘Page Offset Parameter To Read’ is a response parameter containing the offset to the next page, for example,next_offset(Json Path). The ‘Page Offset Parameter To Write’ is a request parameter to request the next page starting with this offset, for example,offset. ‘Enable Increment offset by 1 before writing’ if the offset from the response needs to be incremented before being added to the next pagination request. In most cases this should be disabled. -
Link Iteration: Extracts and executes the next page’s URL link from the current response. The strategy terminates once next page’s URL is not present in the most recent response. The ‘Link Parameter’ is a response parameter that contains the next page URL, for example,
Link(Link Header). The ‘Link Relation’ property is only available if ‘Link Header’ is specified for the ‘Link Parameter’. This specifies which relation should be used to get the next page URL. For example, the ‘Link Header’ parameter might contain different relations as shown below.<https://api.github.com/search/code?q=addClass+user%3Amozilla&page=2>; rel="next", <https://api.github.com/search/code?q=addClass+user%3Amozilla&page=34>; rel="last"
In this case, the URL value of the next relation is desired, so ‘Link Relation’ would be
next.
-
-
Optional: If you need to look up a value by using a URL provided by a specific field of the JSON query, follow the steps below:
-
Press the Add Lookup Query button.
-
In the ‘Lookup URL Suffix’ field, enter the name of a parameter, for example
{param1}. This placeholder will be replaced in the URL by the corresponding ‘Key’ field value. -
Enter the JSON path.
-
Enable the ‘Ignore Base Data Source URL’ option.
-
Press the Add Lookup Query button and repeat the above steps to add additional parameters.
Example 1. Lookup QueryThe Lookup Query below queries the URL provided by the
properties.forecastfield of the base query.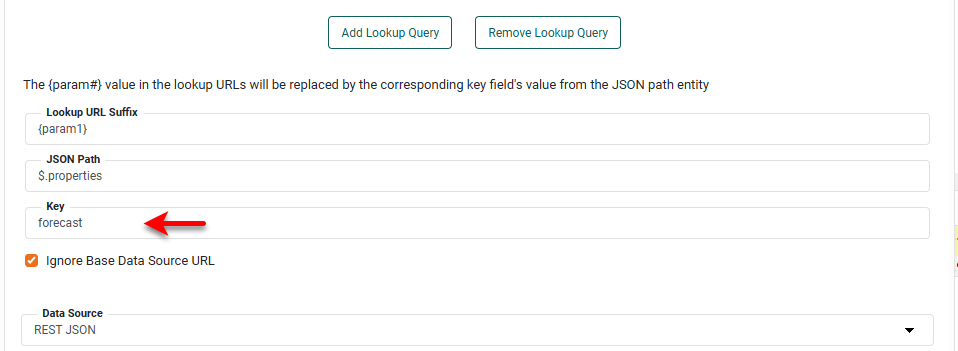
-
-
Optional: If you have more than a one data source of this type defined, you can select an alternate data source from the ‘Data Source’ menu.
-
Optional: Enter a ‘Timeout’ in seconds to limit the query execution time.
-
Press OK. This creates a new data block in the Data Worksheet.
-
Optional: Right-click on the data block, and select ‘Properties’ from the context menu. Note: You can also access menu options from the ‘More’ button (
 ) in the mini-toolbar. This opens the ‘Table Properties’ panel. In the ‘Name’ field, enter a name for the data block, and press ‘OK’. (See Modify a Column for information about how to rename columns.
Names must be unique without respect to case (e.g., "num1" is the same name as "Num1"). -
Press the ‘Save’ button
 in the toolbar to save the Data Worksheet.
You can now do pipeline operations on this data, as described in Prepare Your Data, or you can proceed to create Dashboards based on this Data Worksheet. See Visualize Your Data for information about how to construct a Dashboard.