Dynamically Set Properties
Every component in a Dashboard has certain properties that can be made dynamic, or dependent on other components. These properties can be set either by a Form component or by a scripted expression. For example, you can use a RadioButton to specify the Y-axis field in a Chart, or use a logical expression to specify the highlight (conditional format) on cells of a Table.
The following sections explain how you can use Form controls and expressions to parameterize component formatting and data presentation, as well as data filtering.
Control Properties with Form Components
Watch Video: Grouping Data in a Dashboard (User-Controlled Chart Grouping)
This video might show an earlier version of the feature or operation that differs in minor ways from the current version.
To parametrize a component property using a Form component, follow these steps:
-
Create and configure the Form component. Follow the steps below:
-
Add the desired Form control (RadioButton, CheckBox, etc.) to the Dashboard.
-
Right-click the Form component, and select ‘Properties’ from the context menu. Note: You can also access menu options from the ‘More’ button (
 ) in the mini-toolbar. This opens the ‘Properties’ panel for the Form component.
 -
Under the General tab, use the ‘Name’ field to assign the Form component a meaningful name. This is the name that will be used to refer to the component.
-
Specify the ‘List Values’ for the form component by manually entering ‘Embedded’ values or by specifying a ‘Query’ to provide the values. (See Slider/Spinner Properties and Radio Button/Check Box/Combo Box Properties for further details.)
-
Press OK to close the ‘Properties’ dialog box.
-
-
Link the Form control to the component property you want to manipulate. Follow the steps below:
-
Right-click the component you want to control, and select ‘Properties’ from the context menu. Note: You can also access menu options from the ‘More’ button (
) in the mini-toolbar. This opens the ‘Properties’ panel for the controlled component. -
Locate the property that you wish to control, press the ‘Value Type’ button
 , and select ‘Variable’.
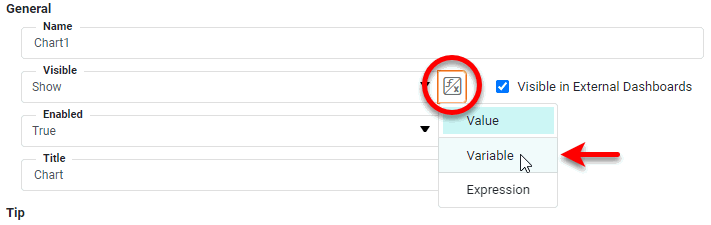
You can specify a Form control for any property that offers the ‘Variable’ option. -
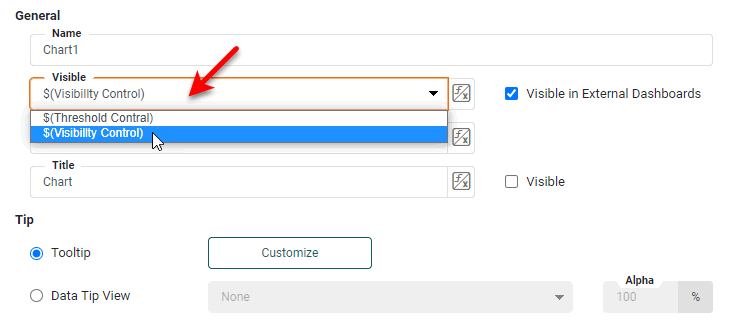
From the pop-up menu, select the Form component that you want to control the property.
When you link a Form component with a component property, you should ensure that the Form control evaluates to a permissible value for the particular property. There are three main cases:
-
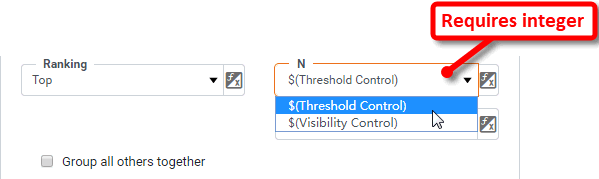
Property Requires a Numerical Value: If a property requires a numerical value, the Form component should provide an appropriate numerical value. For example, the ‘Ranking’ property in the Chart data binding (shown below) requires an integer value. An appropriate control for this property would therefore be a Spinner with ‘Increment’ property set to an integer value.
-
Property Requires a Boolean Value: If a property has a ‘True’ or ‘False’ setting, the Form component should provide a Boolean value. For example, the ‘Enabled’ property expects a Boolean value
trueorfalse. An appropriate control for this property would therefore be a RadioButton with embedded list values {true,false}, and with ‘Data Type’ set to ‘Boolean’. -
Property Requires a String Value: If a property requires one of a fixed set of strings, the Form component should provide a string from the set. For example, the ‘Visible’ property requires one of the strings ‘Show’, ‘Hide’, or ‘Hide on Print and Export’. The Form component must therefore return one of these strings. An appropriate control for this property would therefore be a RadioButton with embedded list values {‘Show’, ‘Hide’, ‘Hide on Print and Export’}, and with ‘Data Type’ set to ‘String’.
-
-
Press OK to close the ‘Properties’ dialog box for the controlled component.
-
The specified Form control will now control the setting of the selected property.
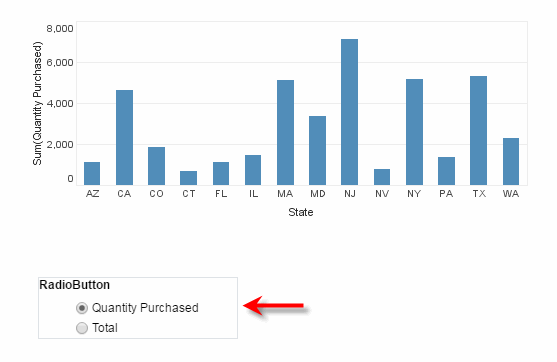
In this example, you will add a RadioButton that allows the user to set the Y-axis field of a Chart to either ‘Quantity Purchased’ or ‘Total Revenue’.
-
Create a new Dashboard based on the ‘ProductSales’ Data Worksheet. For information on how to create a new Data Worksheet, see Create a Data Worksheet.
The 'ProductSales' Data Worksheet can be found in . You may need to download the examples.zip file from GitHub into your environment. (This requires access to Enterprise Manager.) See Import and Export Assets for instructions on how to import. -
Add a RadioButton to the Dashboard, with two embedded values, ‘Quantity Purchased’ and ‘Total’. (See Radio Button/Check Box/Combo Box Properties for information on how to set the embedded list.)
-
Add a Chart to the Dashboard, and open the Chart Editor. (See Create a Chart for information on how to do this.) Add the ‘State’ field from the ‘SalesByDate’ data block to the X-axis and the ‘Quantity Purchased’ field to the Y-axis.
-
Press the ‘Value Type’ button
next to ‘Quantity Purchased’, and choose the ‘Variable’ option. The menu displays the available variable names.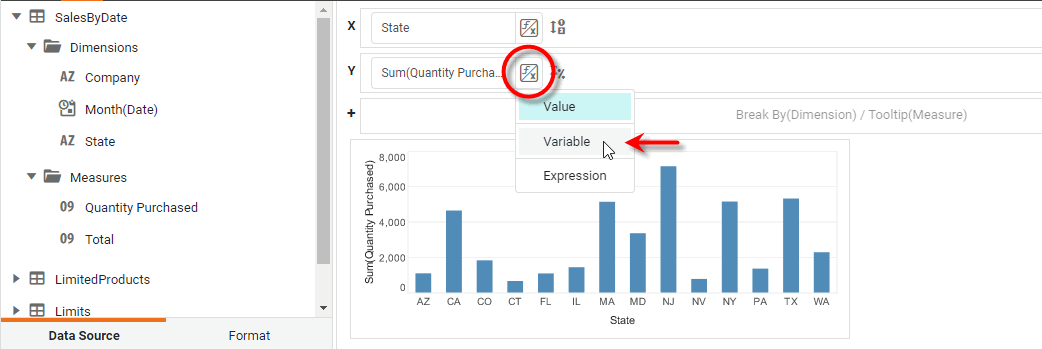
-
From the list of variables, choose
$(RadioButton). -
Now press the radio buttons in the RadioButton component. Note that the Chart displays the Y-axis field that you choose using the RadioButton control.
Control Conditions with Form Components
Watch Video: Filtering a Dashboard (Make Condition Dynamic)
This video might show an earlier version of the feature or operation that differs in minor ways from the current version.
Form components allow a user to manipulate a filter or highlight Condition applied to a Data View component (Chart, Table, Crosstab).
|
Before you use a Form component to control filtering, you should understand the distinction between Form components and Filter components:
Although you can use a Form component to achieve dynamic filtering in the Dashboard (as shown below) or in a Data Worksheet (see Filter Data in Prepare Your Data), in most cases you should perform filtering operations by using the available Filter components. See Filter a Dashboard for more information. |
To control a Condition using a Form component, follow these steps:
-
Create and configure the Form component. Follow the steps below:
-
Add the desired Form component (RadioButton, CheckBox, etc.) to the Dashboard.
-
Right-click the Form component, and select ‘Properties’ from the context menu. Note: You can also access menu options from the ‘More’ button (
) in the mini-toolbar. This opens the ‘Properties’ panel for the Form component. -
Under the General tab, use the ‘Name’ field to assign the Form component a meaningful name. This will be the name used to refer to the component.
-
Specify the ‘List Values’ for the form component by manually entering ‘Embedded’ values or by specifying a ‘Query’ to provide the values. (See Slider/Spinner Properties and Radio Button/Check Box/Combo Box Properties for further details.)
-
Press OK to close the Form component ‘Properties’ dialog box.
-
-
Link the Form component to the filter condition or highlight condition of the Data View component that you want the user to manipulate. Follow the steps below:
-
Right-click the Data View component (Chart, Table, etc.) you wish to highlight or filter, and select ‘Highlight’ or ‘Condition’ (as desired) from the context menu. Note: You can also access menu options from the ‘More’ button (
) in the mini-toolbar. This opens the ‘Highlight’ or ‘Condition’ panel for the component. -
Create the left side of the condition as described under Add Conditional Format (Highlight) and Add Conditions, e.g.,
[State][is][one of]. -
Press the ‘Value Type’ button
and select ‘Variable’.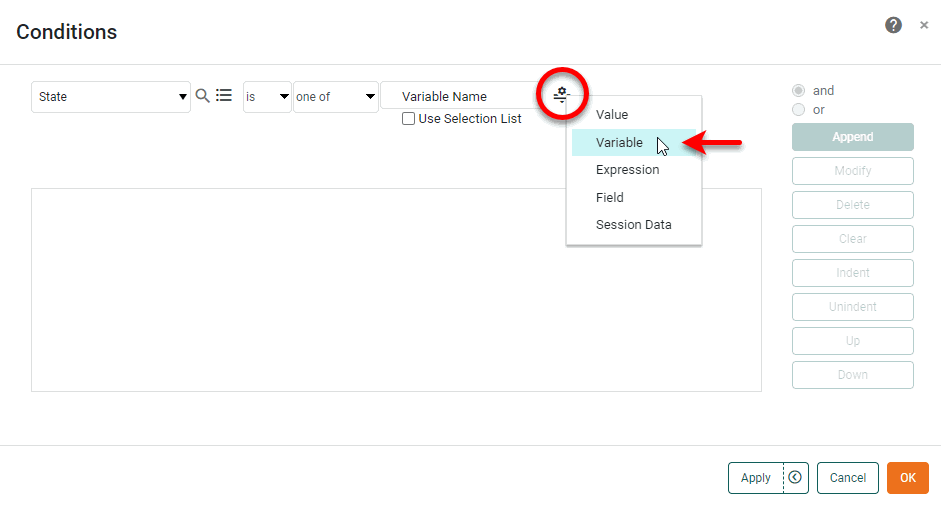 From the adjacent pop-up menu, select the Form component that you want to control the value.
-
Press Append to add the condition, and press OK to close the ‘Condition’ dialog box.
-
The specified Form component will now provide the value for the right side of the condition.
In this example, you will add a CheckBox that allows the user to highlight specified states within a table.
-
Create a new Dashboard based on the ‘Sales Explore’ Data Worksheet. For information on how to create a new Data Worksheet, see Create a Data Worksheet.
The 'Sales Explore' Data Worksheet can be found in . You may need to download the examples.zip file from GitHub into your environment. (This requires access to Enterprise Manager.) See Import and Export Assets for instructions on how to import. -
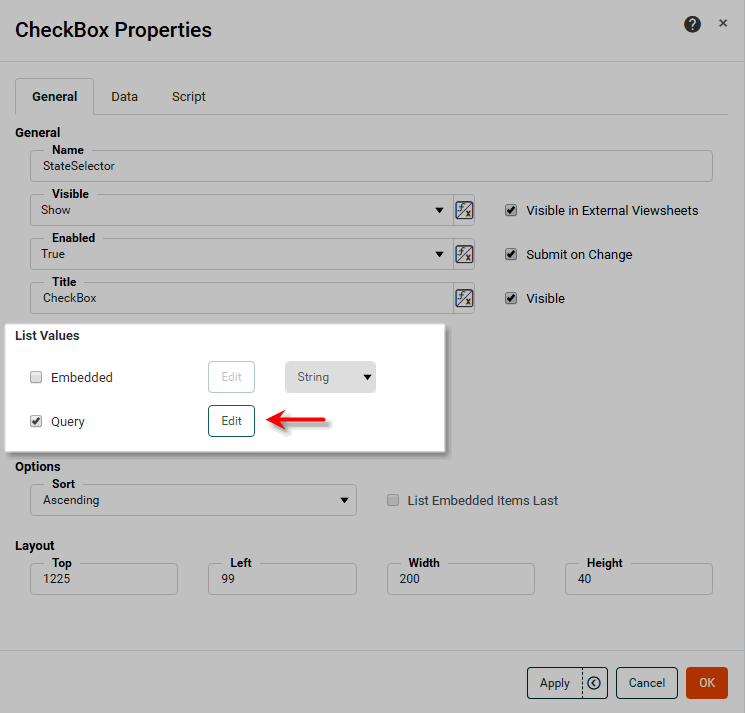
Drag a CheckBox component from the Toolbox panel to the Dashboard. Right-click the component, and select ‘Properties’ from the context menu. This opens the ‘CheckBox Properties’ panel.
-
In the ‘CheckBox Properties’ panel, make the following changes:
-
Change the ‘Name’ to “StateSelector”.
-
In the ‘List Values’ panel, select the ‘Query’ option. Press Edit to open the ‘List Values Selection’ dialog box.
-
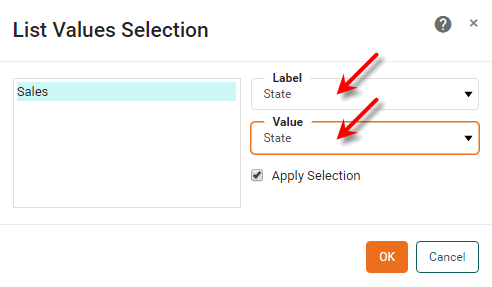
In the ‘List Values Selection’ dialog box, select the ‘Sales’ data block in the left panel, and then select ‘State’ in both the ‘Label’ and ‘Value’ menus.
-
Press OK to close both dialog boxes. This binds the CheckBox component to the ‘State’ field of the data block.
-
-
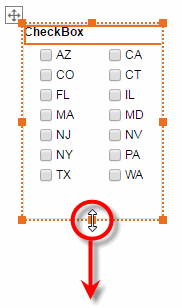
On the Dashboard, select the CheckBox component. Drag the handles to expand the component so that all state options are visible.
-
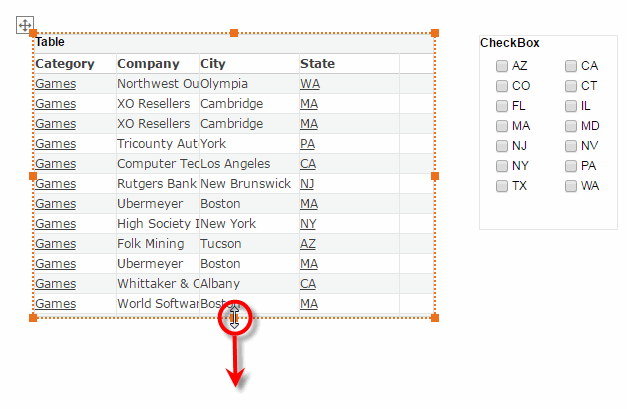
Drag a Table component from the Toolbox panel to the Dashboard.
-
Expand the ‘Sales’ data block at the top of the Toolbox panel, and drag the following fields into the Table: ‘Category’, ‘Company’, ‘City’, ‘State’, ‘Total’.
-
Enlarge the table so that at least 10 rows are visible.
-
Right-click a cell in the ‘City’ field of the Table, and select ‘Highlight’ from the context menu. This opens the ‘Highlight’ panel for the ‘City’ field.
-
In the ‘Highlight’ panel, press Add and enter the name “CityHighlight”.
-
For the ‘Background’ property, select yellow.
-
In the ‘Conditions’ panel, press Edit to open the ‘Conditions’ dialog box.
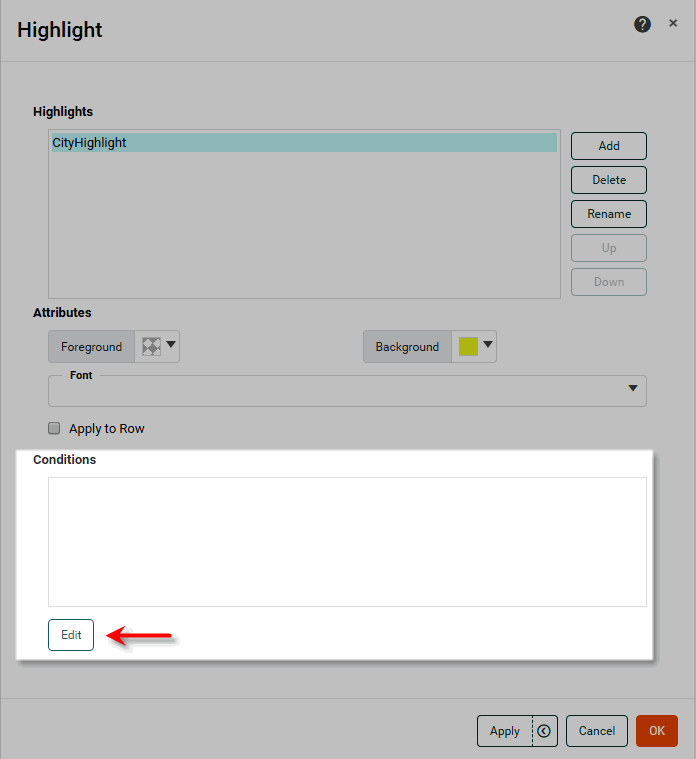
-
In the ‘Conditions’ dialog box, create the left side of the condition by making the following menu selections:
[State][is][one of]. -
Press the ‘Value Type’ button
and select ‘Variable’. -
From the adjacent pop-up menu, select the “StateSelector” CheckBox.

-
Press Append to add the condition, and press OK to close the ‘Conditions’ dialog box.
-
Press OK to close the ‘Highlight’ panel.
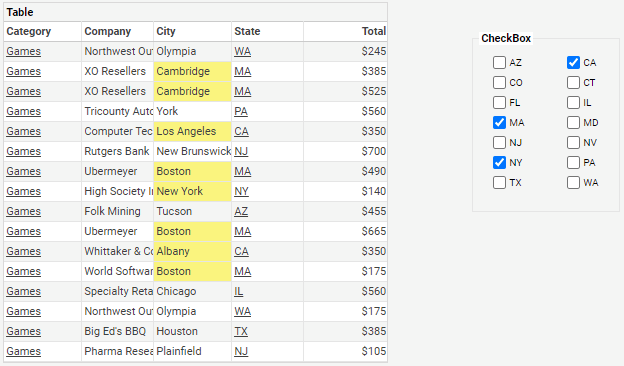
On the Dashboard, make selections in the CheckBox component, and observe how this highlights the cities in the Table that correspond to the selected states.
Control Data Worksheet Variable with Form Component
To control the value of a Variable in a Data Worksheet using a Dashboard Form component, see Use a Variable (Parameter) in a Condition in Prepare Your Data.
Control Data Worksheet Embedded Table with Form Component
To control the values within an Embedded Table in a Data Worksheet using a Dashboard Form component, see Modify Embedded Data from a Dashboard in Prepare Your Data.
Control Properties with Expression
|
Advanced Dashboard Scripting, for more information about how to add scripted logic to a Dashboard. |
You can enter a script in any property field that provides the ‘Value Type’ button with an ‘Expression’ option. This allows you to change the associated property in response to an event such as a user interaction.
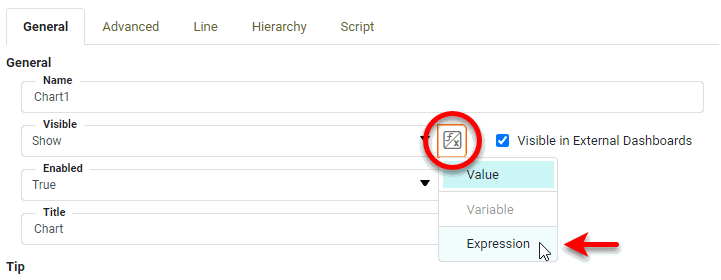
For example, to add a script to a component expression field, follow the steps below:
-
Right-click the component, and select ‘Properties’ from the context menu. Note: You can also access menu options from the ‘More’ button (
) in the mini-toolbar. This opens the ‘Properties’ panel.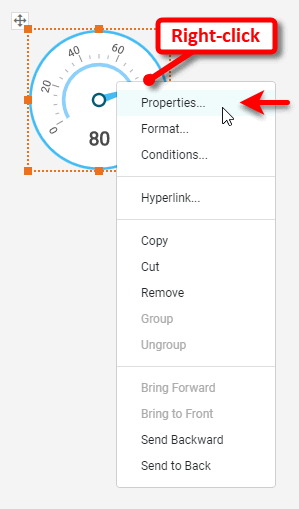
-
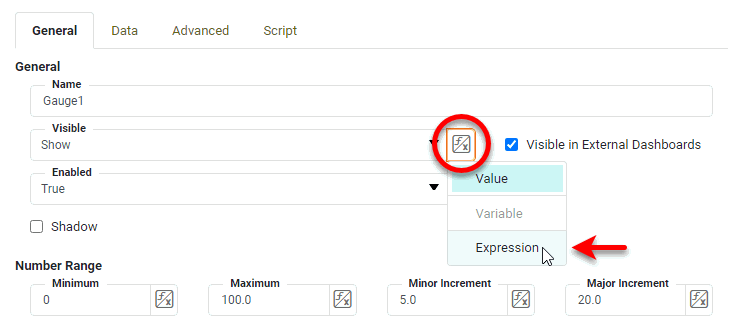
In the ‘Properties’ panel, find the property you want to dynamically change. (In the example, we use the ‘Visible’ property under the General tab.)
-
Press the ‘Value Type’ button
next to the property you want to modify, and select ‘Expression’ from the menu. This enables the ‘Edit Formula’ button  .
.
-
Press the ‘Edit Formula’ button
to open the Formula Editor.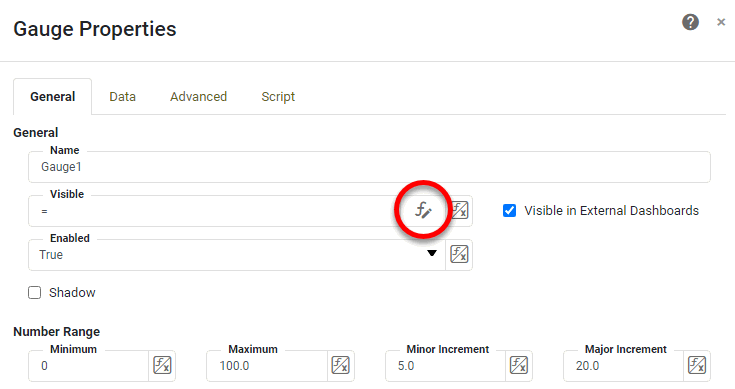
-
In the Formula Editor, enter the desired script. For example, the following script hides the component if the user has selected ‘Hide’ from a RadioButton control, and the current month is March (i.e., the third month).
if ((RadioButton1['selectedObject']=='Hide')
          && (CALC.today().getMonth() == 3)) {
  "Hide"
}
else {
  "Show"
}
The script must return one of the options in the property menu. For example, return values for the ‘Visible’ property must be one of “Show,” “Hide,” or “Hide on Print and Export.” (To achieve “Show on Print and Export” behavior, use the special expression !visible.)To automatically insert a function (such as
CALC.today()), click the corresponding option in the ‘Functions’ list above the edit area. To automatically insert a reference to another component’s property, click the corresponding option in the ‘Component’ list above the edit area.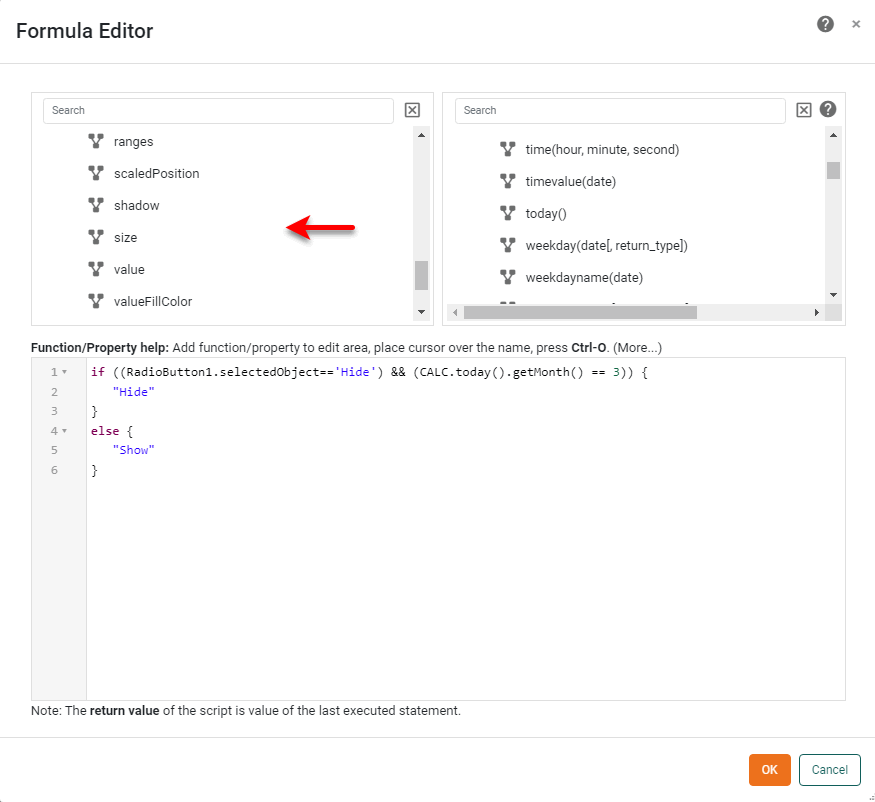
Many expressions are similar to formulas that you might use in Microsoft Excel®. See Dashboard Object Reference and User Functions for a full description of available properties and functions.
Expand to see some common examples…
Example 1. Excel-style Date functions- CALC.monthname(date)
-
Obtain the name of the month from a date field.
CALC.monthname(field['Date']) - CALC.fiscalweek(date, startMonth, startDay)
-
Obtain the number of the fiscal week for a year starting on a specified date (e.g., April 16).
CALC.fiscalweek(CALC.today(), 4, 16) - dateAdd(interval, amount, date)
-
Add or subtract a specified number of days, months, or years from a date field.
dateAdd('m',-1,field['Date']) // Subtract one month from the value in the date field - dateDiff(interval, date1, date2)
-
Return the difference in days, months, or years between two dates.
dateDiff('d',field['Date'],CALC.now()) // Return the days elapsed from the Date value until today - CALC.now()
-
Return the current date and time. Often used with a date operator such as dateDiff() or dateAdd().
dateDiff('d',field['Date'],CALC.now())
// Return the days elapsed from the Date value until today
Example 2. Excel-style Math functions- CALC.round(number, num_digits)
-
Round a numerical value to a specified number of decimal places.
CALC.round(field['Total'],2) - CALC.sqrt(number)
-
Compute the square root of a value.
CALC.sqrt(field['Total'])
Example 3. Excel-style Text functions- CALC.proper(string)
-
Convert a string to “proper” case (initial caps):
CALC.proper(field['Description']) - CALC.trim(string)
-
Remove extra whitespace from a string.
CALC.trim(' Mary had a little lamb.') // returns “Mary had a little lamb”. - CALC.len(string)
-
Return the length of a string, including spaces.
CALC.len(field['Company']) - CALC.concatenate(array)
-
Concatenate strings.
CALC.concatenate([field['First_Name'],' ',field['First_Name']]); // Or use the JavaScript concatenation operator, “+”: field['First_Name'] + field['First_Name'] - CALC.left(string, num_chars)
-
Return a specified number of characters from the left side of a string:
CALC.left(field['Category'], 4);
// Return the first four characters of each category name
Example 4. Excel-style Logical functions- CALC.iif(condition, value_if_true, value_if_false)
-
Test a condition to determine a return value:
CALC.iif(field['Total']>500,'big sale','small sale') // Return ”big sale” if Total > $500, otherwise “small sale” // Or use the JavaScript ternary operator: field['Total']>500 ? 'big sale' : 'small sale' - CALC.and(Boolean_1, Boolean_2, …, Boolean_n)
-
Return “true” if two or more conditions are simultaneously true. Often used together with a conditional operator such as iif.
CALC.and(field['Total']>200, field['Quantity Purchased']<10)
// Return true if Total > $200 AND Quantity is less than 10
// Or use the JavaScript “and” operator:
(field['Total']>200) && (field['Quantity Purchased']<10)
-
Press OK to close the Formula Editor, and press OK to close the ‘Properties’ dialog box.
An expression script can reference properties of its hosting component without full qualification. For example, in a expression script placed on component named Chart1, Chart1.yTitle.colorandyTitle.colorrefer to the same property.
Expressions must always return permissible values for the corresponding property. For example, if a property requires an integer, an expression that sets that property must evaluate to an integer. If a property requires one of a fixed set of options, e.g., {‘Rows’, ‘Columns’}, then the expression that sets that property must evaluate identically to one of those strings (‘Rows’ or ‘Columns’).
Submit Form Settings in Batch
To submit settings from all Form components in batch by using a Submit button, follow the steps below:
-
Add a Submit button to the Dashboard. (See Submit Button Properties for more information.)
-
Repeat the following for each Form component in the Dashboard:
-
Right-click the component, and select ‘Properties’ from the context menu. Note: You can also access menu options from the ‘More’ button (
) in the mini-toolbar. -
In the ‘Properties’ dialog box, disable the ‘Submit on Change’ option located in the General tab.
-
The Submit button will now batch-submit all Form selections, as well as selections made in any Filter components that similarly have the ‘Submit on Change’ option disabled.