Modularize a Dashboard
Some Dashboards require a large number of elements, and would be complex to design using just a single Dashboard. In such cases, it is often easier to use a modular design, and build the final Dashboard from a set of simpler Dashboards. Each of the simple Dashboards might contain just a few controls, and provide specific functionality to the composite Dashboard.
Modular designs offer several benefits:
-
Simplification: Small Dashboard modules are easier to build, and construction of different modules can be assigned to different developers. “Keep it simple.”
-
Reusability: Once you create a Dashboard module, you can use it within any number of larger Dashboards. “Build once, deploy many.”
-
Maintainability. When you use a Dashboard module in multiple composite Dashboards, you can update all the Dashboards simultaneously by making changes only to the shared module. “Don’t repeat yourself.”
To create a composite Dashboard, simply nest a set of simple Dashboards within a parent Dashboard. The following sections explain how to do this, and how to synchronize the nested Dashboards to work as a unified whole.
Nesting a Dashboard in Another Dashboard
To embed or nest one Dashboard within another Dashboard, follow these steps:
-
Create the Dashboard that you wish to embed. (This is the Dashboard containing the common components that you wish to embed in other Dashboards.)
-
Save this common Dashboard to the Repository.
-
Open or create the host Dashboard. (This is the Dashboard within which the common Dashboard will be embedded.)
-
Open the Asset panel on the left side of the Visual Composer to display the Asset tree.
-
Drag and drop the common Dashboard (saved in Step 2) from the Repository into the host Dashboard.
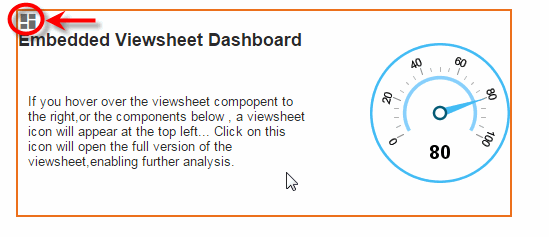
The common Dashboard is now embedded within the host Dashboard, and all the components marked ‘Visible in External Dashboards’ within the common Dashboard are displayed. To synchronize selection and form components within two (or more) Dashboards, see Synchronizing Dashboard Filters below.
To open an embedded Dashboard for editing, move the mouse over the embedded area in the host Dashboard, and then click the Dashboard icon in the upper left corner of the area.
| This feature is also available to end-users who view the host Dashboard in the Portal if there is at least one hidden element in the embedded Dashboard. (See General Tab for more information about hiding components.) |
Synchronizing Dashboard Filters
You can synchronize selection and form components within a Dashboard or across multiple Dashboards so that a selection in one component is automatically propagated to other compatible components. This is called sharing filters. The following selection and form components can be synchronized as shared filters:
-
Range Slider
-
Selection List
-
Selection Tree
-
Calendar
-
Radio Button, Check Box, Combo Box
-
Slider and Spinner
-
TextInput
|
To synchronize Filter components and Form components, assign them the same ‘Shared Filter’ ID. Only elements that have the same data type and same data binding should be synchronized. Follow the steps below:
-
Open the Dashboard in Visual Composer.
-
Press the ‘Options’ button
 in the toolbar. This opens the ‘Dashboard Options’ dialog.
-
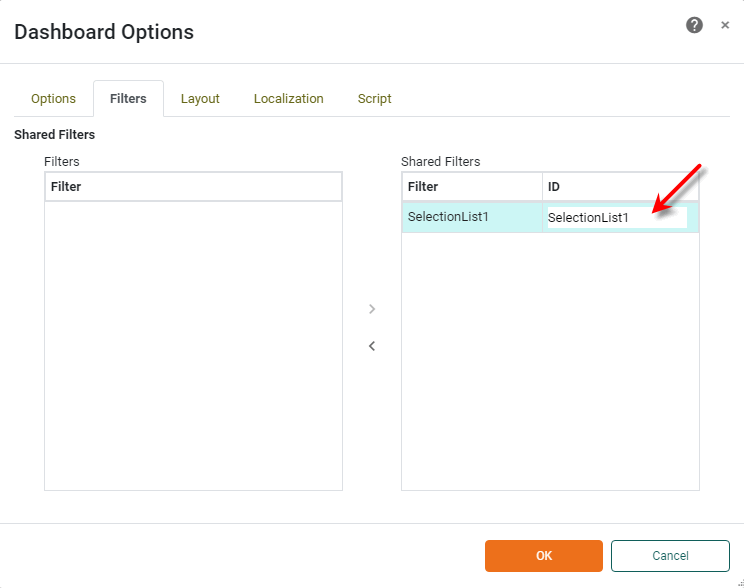
Select the Filters tab.
-
In the ‘Filters’ list, click on a selection or form component that you would like to synchronize, and drag it into the ‘Shared Filters’ list. (You can also double-click the item to add it to the list.)
-
Click on the component label in ‘ID’ column of the ‘Shared Filters’ list, and enter a suitable name.
Components that have the same ID (within the Dashboard or across Dashboards) will be synchronized. -
Repeat the above steps to add additional components to the ‘Shared Filters’ list.
-
Press OK to exit the dialog box.
-
Repeat the same process for other Dashboards (nested Dashboard or hyperlinked Dashboards).
You must configure shared filters using the above steps for each dashboard you want to be synchronized.
Use identical IDs for components you wish to synchronize with one another. For example, to synchronize an ‘Employee’ Selection List in a “parent” Dashboard with an ‘Employee’ Selection List in a nested “child” Dashboard, follow the steps below:
-
Open the ‘Dashboard Options’ dialog box for the parent Dashboard. Assign the ‘Employee’ Selection List in the parent Dashboard a shared filter ID such as “SharedEmployeeFilter”, and press ‘OK’.
-
Open the ‘Dashboard Options’ dialog box for the child Dashboard. Assign the ‘Employee’ Selection List in the child Dashboard the same shared filter ID (“SharedEmployeeFilter”), and press ‘OK’.
This will synchronize the ‘Employee’ Selection Lists in the two Dashboards.