Localize a Dashboard
You can use a simple text mapping to localize most text in a Dashboard. The first step in setting up localization for a particular Dashboard is to assign Text IDs to each text element to be mapped. You can do this in the ‘Options’ dialog box of Visual Composer. See Localize a Dashboard in Visualize Your Data for more information on how to assign Text IDs.
Create SreeBundle Mapping File
After you have assigned Text IDs to Dashboard elements, you can create the mapping file that specifies the text substitutions for these elements. (This is the same file that you use for mapping data source names. See Localize a Data Source.)
| The localization cannot take effect until you register the locale in Enterprise Manager. See Register a Locale. |
File Name
The mapping file should be ASCII text and should have the name
SreeBundle_{language}_{country}.properties
where {language} and {country} are Java-supported two-letter codes for locale language and country. For example, the localization mapping file for Canadian French speakers should be called SreeBundle_fr_CA.properties. This file must be placed in the /usr/local/inetsoft/classes/inetsoft/util directory.
|
File Contents
Each Dashboard translation is specified by a single line of text in the localization file:
{element_id}={translated_element}
The {element_id} is the Text ID assigned to the Dashboard element in Visual Composer. Spaces and certain other non-alphanumeric characters in the {element_id} must be escaped by a backslash, for example, ‘Head\ 1’. The {translated_element} is the translated text that you want to appear in the corresponding Dashboard element. Spaces in the {translated_element} do not need to be escaped.
The French Canadian localization file mentioned above, SreeBundle_fr_CA.properties, might contain the following lines of text, where, for purposes of illustration, State_fr is used as the French translation of State, and so on:
title=Localized Title_fr
state\ header=State_fr
sales\ header=Sales_fr
The above mapping translates the text corresponding to three Text IDs, (which might be assigned in a Dashboard) into the specified mock French text:
| Text ID | Translated Text |
|---|---|
title |
Localized Title_fr |
state header |
State_fr |
sales header |
Sales_fr |
Find Available Localization Targets
To determine the elements for which you need to provide a localization, it is helpful to download a sample SreeBundle file. To do this, follow the steps below:
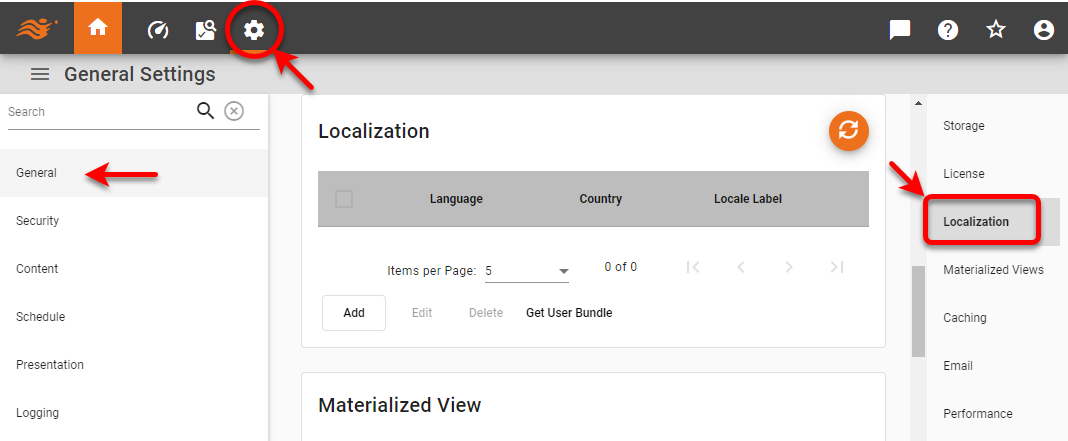
-
Press the ‘Settings’ button
 at the top of Enterprise Manager.
 -
Select the General page in the left panel, and select the Localization page in the right panel.
-
Press the Get User Bundle button.
This downloads a file called user_bundle.properties that contains a list of all properties that can be localized, including Text IDs in Dashboards, data source names, and so on. By adding localized text for all the entries in the file, you can ensure that your localization is complete.