Scheduler Actions
The scheduler action specifies the operations to be performed when the scheduled task runs. (See Create a Task, Cycle, or Alert.) There are three types of actions: ‘Dashboard’, ‘Backup’, and ‘Batch’.
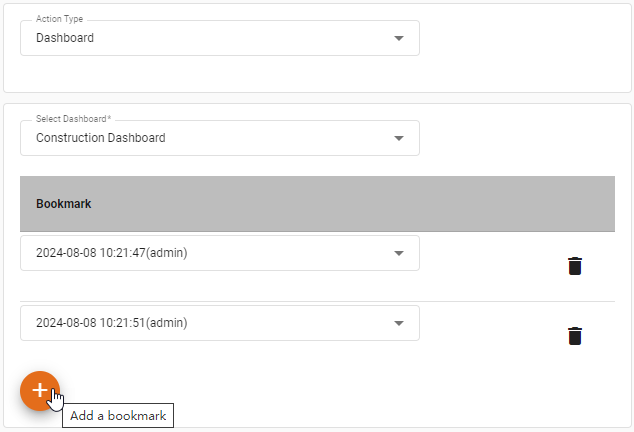
Dashboard Action
A Dashboard action executes one or more Dashboards, and delivers them as emails, transmits a notification, or saves a snapshot to the server. If the Dashboard requires parameter values, assign these parameters in the 'Creation Parameters' table at the bottom of the page.
| If the generated Dashboard does not reflect the most recent data, the Scheduler may be using a cached dataset. In this case, you can either increase the separation of your scheduled tasks or reduce the ‘Data Cache Timeout’. See Tailor Performance for details about this property. |
Use the Bookmarks section to add the bookmarks that you wish to include. (For Excel output, bookmarks are exported to separate Excel tabs.)
The following actions are available:
Notification of Task Status
This option sends notifications to the email addresses that you specify in the ‘Notify’ field. The email notification informs the recipient of whether the Dashboard was generated or not. Enter a comma-separated list of emails, or press the ‘Select Emails’ button  button next to the email field to open the ‘Select Emails’ dialog box and choose emails from a list. Select ‘Notify only if failed’ to limit the notification only to the event of a task failure.
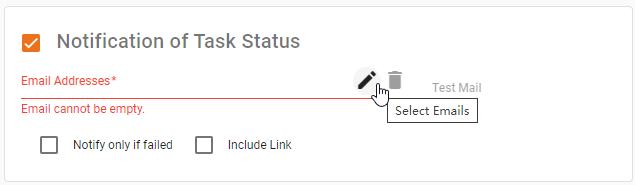
To send a test email to the addresses you entered, press the 'Test Mail' button. To send an SMS message to a phone, enter the provisioned email address supplied by the recipient’s service provider. (For example, to send a text message to Verizon number 1234567890, enter the email address 1234567890@vtext.com.)
Select ‘Include Link’ to include a URL link to the Dashboard in the email. The email recipient can click the link to open the Dashboard in a new browser tab if they possess the appropriate permissions for that Dashboard.
Deliver to Emails
This option sends the Dashboard as an email attachment to the email addresses that you specify. Enter a comma-separated list of emails in the ‘To’ field, or press the ‘Select Emails’ button next to the email fields to open the ‘Select Emails’ dialog box and choose emails from a list.
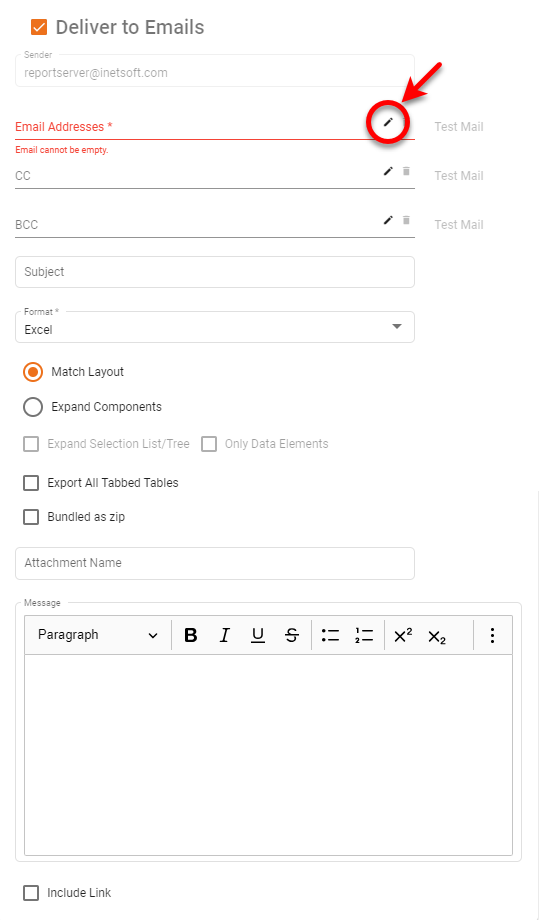
Use the ‘Format’ menu to choose the format in which to generate the Dashboard: ‘PDF’, ‘PowerPoint’, or ‘Excel’. Enter the ‘Message’ body of the email using the rich text editor provided. For information on using an email template for the body, see Configure Server Email.
| If the generated file is too large, it will be split into multiple emails. The ‘Bundled as zip’ option allows you to zip the attachment and optionally specify a password to encode the archive with WinZip 256-bit AES encryption. (See ‘Maximum Attachment Size’ in Configure Server Email to set this threshold.) |
The email ‘Subject’ line can include parameters for automatic insertion of Dashboard alias and time or date of generation (see Insert Parameters below). The subject line that you specify here overrides the setting on the ‘Mail Configuration’ page. (See Configure Server Email.)
- Other Options
-
-
The ‘Match Layout’ option obtains the closest possible match between the appearance of the emailed copy and the original Dashboard.
-
The ‘Expand Components’ option expands scrolling tables and charts in the generated Dashboard so that all data is displayed.
-
The ‘Only Data Elements’ option limits the export to only the data-bearing components.
-
The ‘Include Link’ option includes a URL link to the Dashboard in the email. The email recipient can click the link to open the Dashboard in a new browser tab if they possess the appropriate permissions for that Dashboard.
-
Save to Disk
This option saves a copy of the Dashboard to the server file system or to an FTP server. Use the ‘Format’ menu to choose the format in which to generate the Dashboard: 'PDF', 'PowerPoint', or 'Excel'.
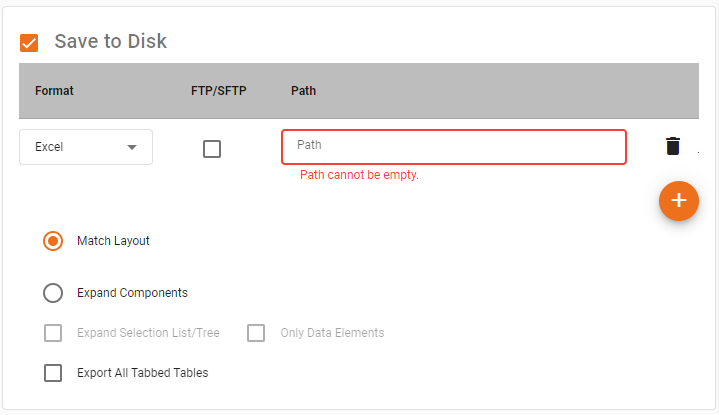
To save to the server file system, press the ‘Add the file path’ button  button and specify a valid absolute path including filename. (The filename extension, e.g.,
 .pdf, is added automatically.) The filename can include parameters for automatic insertion of Dashboard name and time/date of generation (see Insert Parameters below).
To save to an FTP server, check the ‘FTP/SFTP’ box and enter a valid ‘Path’, ‘Username’ and ‘Password’. To append rather than overwrite using SFTP, add ?append=true to the end of the URL. For example:
sftp://hostname:8080/myExcelFile?append=true| For SFTP connections, the known hosts file, .ssh/known_hosts, is automatically read from the user’s home directory. Before running the scheduled task, an administrator should populate the known_hosts file by first connecting (SSH) to the target server from each InetSoft server node. |
- Other Options
-
-
The ‘Match Layout’ option obtains the closest possible match between the appearance of the saved copy and the original Dashboard.
-
The ‘Expand Components’ option expands scrolling tables and charts in the generated Dashboard so that all data is displayed.
-
The ‘Only Data Elements’ option limits the export to only the data-bearing components.
-
- Insert Parameters
-
The filename can include parameters for automatic insertion of Dashboard name and time and date of generation. These parameters use the java.text.MessageFormat syntax, where
{0}represents the Dashboard alias (or name, if no alias is specified), and{1,date}represents the time and date of Dashboard generation. You can specify a format for the date parameter using the patterns described in Add Data Format. Some examples of automatically generated names are shown below.Filename Generated As… myDash_{1,date}.pdf
myDash_Nov 14, 2007.pdf
{0}_{1,date}.pdf
Production_Nov 14, 2007.pdf
myDash_{1,date,MMM-dd}.pdf
myDash_Nov-14.pdf
myDash_{1,date,EEE-h-mm a}.pdf
myDash_Wed-11-49 AM.pdf
myDash_{1,date,yy-MM-dd-HH-z}.pdf
myDash_07-11-14-11-EST.pdf
Because of filename restrictions, you cannot use the {1,time}syntax for the name.To include Dashboard creation parameter values in the filename, simply place each parameter name within curly braces. The parameter names you enter must exactly match the parameter names in the ‘Creation Parameters’ panel of the Actions tab. (See Creation Parameters below.) For example, if a parameter called
stateParamis assigned a value of “NJ” in the ‘Creation Parameters’ panel, then the filenamemyRep_{1,date,MMM-dd}_{stateParam}.pdfwill yield a generated filename ofmyRep_Nov-14_NJ.pdf.
Insert Parameters
The ‘Subject’ line and ‘Attachment Name’ can include parameters for automatic insertion of Dashboard name and time and date of generation. These parameters use the java.text.MessageFormat syntax, where {0} represents the Dashboard alias (or name, if no alias is specified), and {1,date} represents the time and date of Dashboard generation. You can specify a format for the date parameter using the patterns described in Add Data Format. Some examples of automatically generated names are shown below.
| Subject or Filename | Generated As… |
|---|---|
myRep_{1,date}.pdf |
myRep_Nov 14, 2007.pdf |
{0}_{1,date}.pdf |
Production_Nov 14, 2007.pdf |
myRep_{1,date,MMM-dd}.pdf |
myRep_Nov-14.pdf |
myRep_{1,date,EEE-h-mm a}.pdf |
myRep_Wed-11-49 AM.pdf |
myRep_{1,date,yy-MM-dd-HH-z}.pdf |
myRep_07-11-14-11-EST.pdf |
For example, for a Dashboard with alias ‘SalesDashboard’, the ‘Subject’ specification Dashboard named {0}, generated at {1,time} on {1,date} would produce an email subject line such as the following: Dashboard named SalesDashboard, generated at 16:32:21 UTC on 2026-04-29.
Because of filename restrictions, you cannot use the {1,time} syntax for the attachment name. However, you can use this syntax for the subject line.
|
To include Dashboard creation parameter values in the filename or subject line, simply place each parameter name within curly braces. The parameter names you enter must exactly match the parameter names in the ‘Creation Parameters’ panel of the Actions tab. (See Creation Parameters below.) For example, if a parameter called stateParam is assigned a value of “NJ” in the ‘Creation Parameters’ panel, then the attachment name myRep_{1,date,MMM-dd}_{stateParam}.pdf will yield a generated filename of myRep_Nov-14_NJ.pdf.
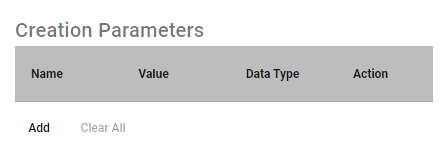
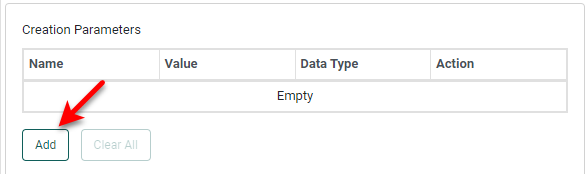
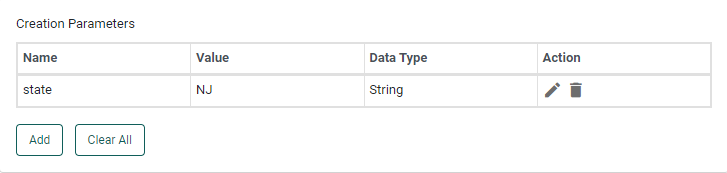
Creation Parameters
To include parameters in the scheduled action, follow the steps below:
-
Press the Add button below the ‘Creation Parameters’ table. This opens the ‘Add Parameter’ dialog box.
-
In the ‘Parameter Name’ field, select an existing parameter or manually enter the name of a parameter.
-
In the ‘Type’ field, select the data type of the parameter. Select ‘Array’ if the parameter requires an array of values.
-
In the ‘Value’ field, press the ‘Value Type’ button
 and select ‘Value’ to enter a fixed value to be passed into the parameter. (Enter a comma-separated list for an array parameter.)
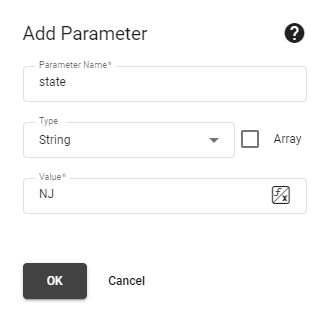
To set the value using scripted logic, select ‘Expression’ or press the ‘Edit Formula’ button
 if available. This opens the Formula Editor. Create a script that returns the desired parameter value. You can use the predefined relative dates in the ‘Dynamic Dates’ folder.
See some examples of dynamic dates…
If the current time is 2023-08-16,13:50:29, dynamic dates will yeild the following results:
_BEGINNING_OF_THIS_YEAR is 2023-01-01,00:00:00
_BEGINNING_OF_THIS_QUARTER is 2023-07-01,00:00:00
_BEGINNING_OF_THIS_MONTH is 2023-08-01,00:00:00
_BEGINNING_OF_THIS_WEEK is 2023-08-13,00:00:00
_END_OF_THIS_YEAR is 2023-12-31,23:59:59
_END_OF_THIS_QUARTER is 2023-09-30,23:59:59
_END_OF_THIS_MONTH is 2023-08-31,23:59:59
_END_OF_THIS_WEEK is 2023-08-19,23:59:59
_NOW is 2023-08-16,13:50:29
_THIS_QUARTER is 2023-07-16,13:50:29
_TODAY is 2023-08-16,00:00:00
_LAST_YEAR is 2022-08-16,13:50:29
_LAST_QUARTER is 2023-04-16,13:50:29
_LAST_MONTH is 2023-07-16,13:50:29
_LAST_WEEK is 2023-08-09,13:50:29
_LAST_DAY is 2023-08-15,13:50:29
_LAST_HOUR is 2023-08-16,12:50:29
_LAST_MINUTE is 2023-08-16,13:49:29
_NEXT_YEAR is 2024-08-16,13:50:29
_NEXT_QUARTER is 2023-10-16,13:50:29
_NEXT_MONTH is 2023-09-16,13:50:29
_NEXT_WEEK is 2023-08-23,13:50:29
_NEXT_DAY is 2023-08-17,13:50:29
_NEXT_HOUR is 2023-08-16,14:50:29
_NEXT_MINUTE is 2023-08-16,13:51:29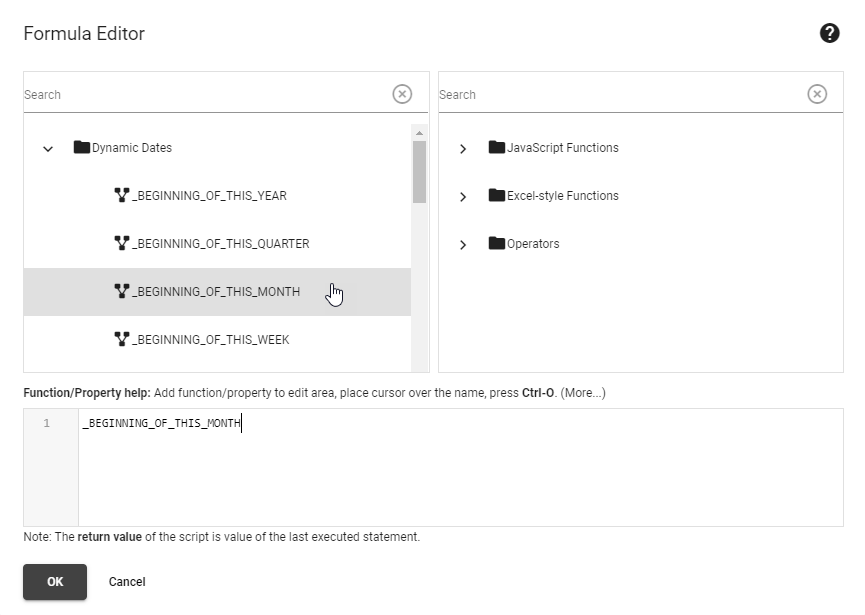
-
Press OK to close the dialog box. The parameter that you added is now listed in the table.
-
Optional: To modify the parameter settings, press the ‘Edit’ button
next to the parameter. To remove the parameter, press the ‘Delete’ button  next to the parameter.

Backup Action
| The backup action is available only in Enterprise Manager. |
A backup action automatically backs up selected assets from the repository on the selected schedule. To create a backup task, follow the steps below:
-
Enter a path to the backup file in the ‘Path’ field.
-
Click or Ctrl-click to select assets in the left panel and press the Add button to add them to the right panel.
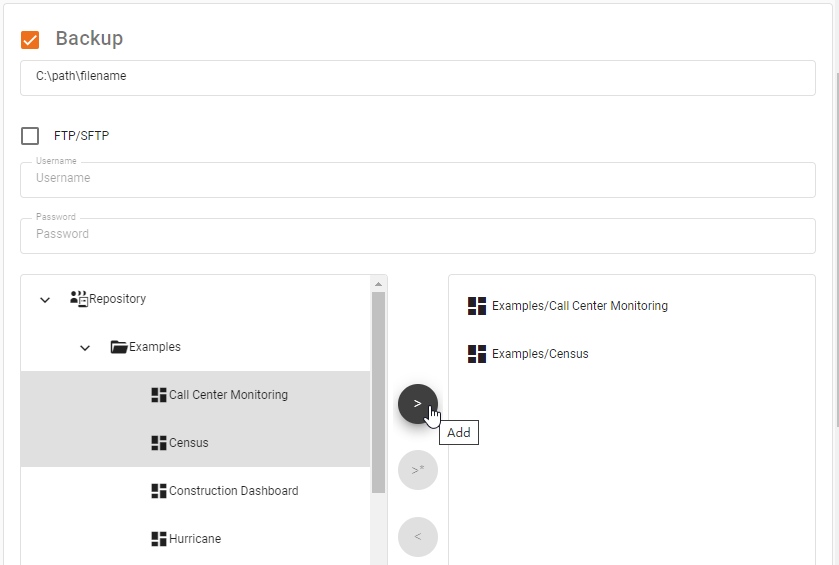
-
Press the Save button.
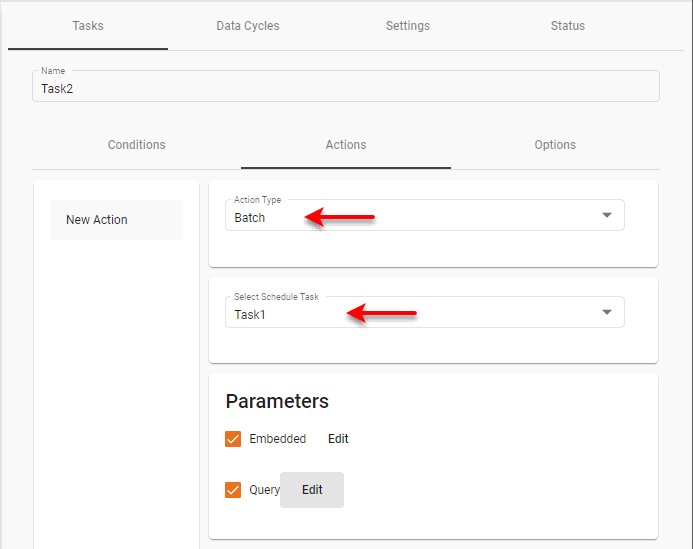
Batch Action
A ‘Batch’ action allows you to run another task with a ‘Dashboard’ action repeatedly using different sets of parameters. Parameters values can be entered manually or retrieved from a Data Worksheet. Follow the steps below to configure a ‘Batch’ action:
-
In the ‘Select Schedule Task’ field, choose the existing task that you want to run with different sets of parameters.
-
To manually enter parameter/value pairs, select the ‘Embedded’ option, and follow the steps below:
-
Press the Edit button to open the ‘Embedded Parameters’ dialog box.
-
Press the Add button. This opens the ‘Edit Parameters’ dialog box.
-
Press the Add button to open the ‘Add Parameter’ dialog box.
-
Enter the ‘Parameter Name’, ‘Type’, and ‘Value’. The ‘Parameter Name’ can be a parameter in the Dashboard that the task executes, or it can provide a value for one of the following properties of the task’s ‘Deliver To Emails’ action: ‘Email Addresses’, ‘CC’, ‘BCC’, ‘Subject’, ‘Attachment Name’, ‘Message’.
To parametrize a property, specify a variable name (e.g.,
messageVar) in the relevant property field (e.g., the ‘Subject’ field) of the task action using the syntax$(messageVar), and enter the variable name in the ‘Parameter Name’ field of the ‘Add Parameter’ dialog box.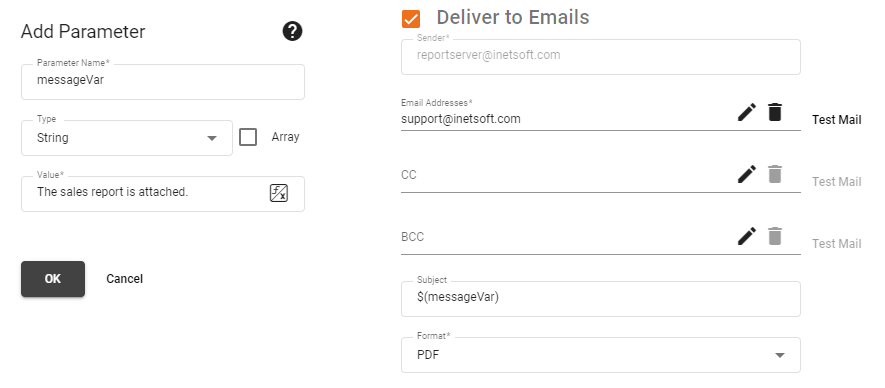
-
Press OK and repeat the above steps to add additional parameters.
-
-
To retrieve parameter/value pairs from a Data Worksheet, select the ‘Query’ option, and follow the steps below:
-
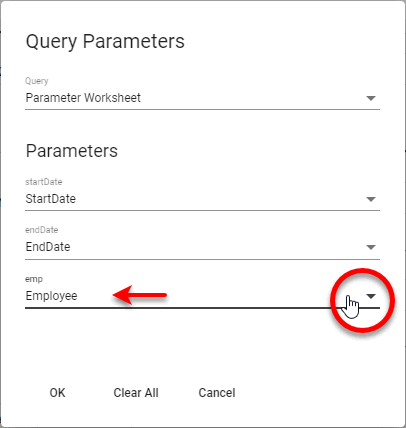
Press the ‘Edit’ button to open the ‘Query Parameters’ dialog box. The dialog box displays the parameters that are expected by the Dashboard associated with the scheduled task.
-
From the ‘Query’ menu, choose the Data Worksheet that contains the parameter information.

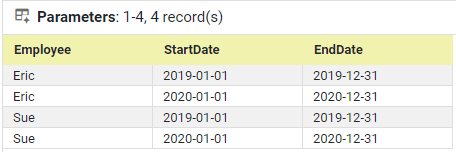
This Data Worksheet should contain a data block with relevant parameter value sets in each row, such as the one below (with four parameter value sets). See Enter Data in Prepare Your Data for information on how to create a table like this.
-
Use the menus next to the parameter names to specify the columns in the data block that contain the values for each parameter.
Parameters can also provide a value for one of the following properties of the task’s ‘Deliver To Emails’ action: ‘Email Addresses’, ‘CC’, ‘BCC’, ‘Subject’, ‘Attachment Name’, ‘Message’. To parametrize a property, specify a variable name (e.g.,
messageVar) in the relevant property field of the task action (e.g., the ‘Subject’ field) using the syntax$(messageVar). This variable will then appear in the ‘Query Parameters’ dialog box along with the Dashboard parameters.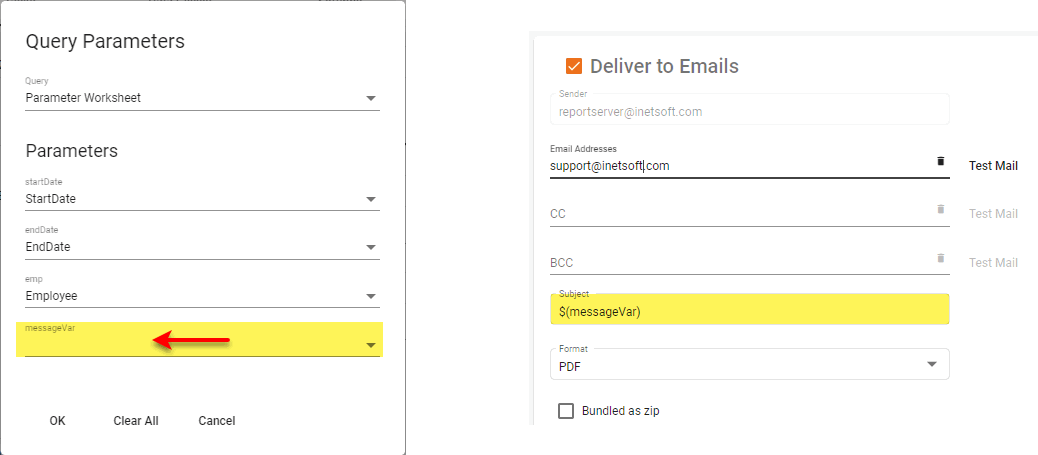
-
Press OK to exit the dialog box.
-
-
Press the Save button to save the Batch task.