Change Images with Script
|
You can dynamically set the image file (GIF, JPG, etc.) of an image component using a variable or an expression. Follow the steps below:
-
Add an image element into the Dashboard. Right-click and select the ‘Properties’ option. This opens the ‘Image Properties’ panel. (See Image Properties.)
-
Select the Advanced tab and select ‘Dynamic Image Selection’.
-
Press the ‘Value Type’ button
 and select ‘Expression’ or ‘Variable’, depending on the mechanism you wish to use to set the image property.
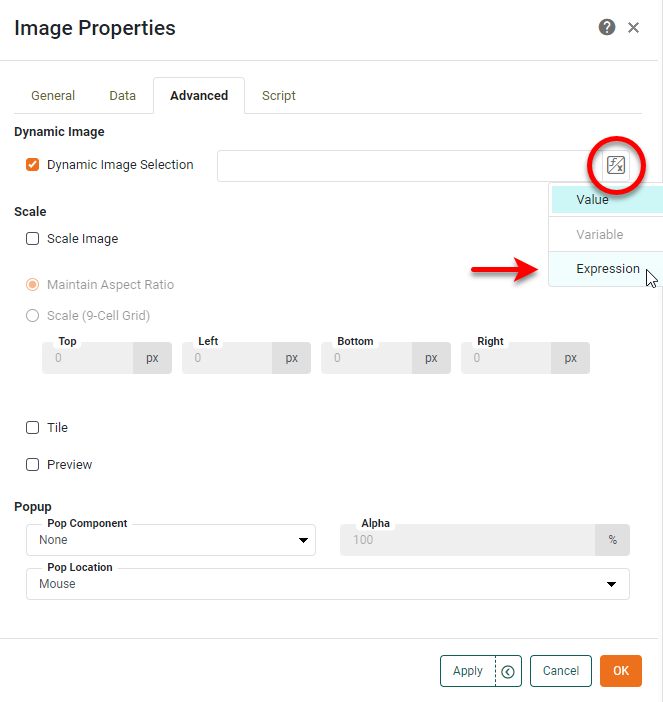
-
If you chose ‘Expression’, press the ‘Edit’ button
 and use the Formula Editor to add a script. A typical script might take the following form. See Control Properties with Expression for more details.
if(condition) { 'image1.gif'; } else { 'image2.gif'; } -
If you chose ‘Variable’, select the Form component that will provide the name of the image. See Control Properties with Form Components for more information.
You can specify an image by the uploaded image name (e.g., 'image1.gif'), a resource path on the server (e.g.,'/library/image1.gif'), or a URL (e.g., https://www.google.com/images/logos/ps_logo2.png).To make an asset (such as an image) accessible by URL, an administrator can upload the asset to the web-assets directory as described in Manage Stored Assets.
-
-
Press OK to close the Formula Editor, and then press the OK to close the ‘Image Properties’ panel.
The Image component now displays the specified image file.