Materialized View
A materialized view is a caching strategy that pre-aggregates and stores the data required by a Dashboard or Data Worksheet. When a Dashboard has a materialized view, the Dashboard will attempt to query the cached materialized view rather than the database. This can significantly reduce the run time for certain queries, and greatly improve performance for the end-user.
Dashboards that are configured to use a materialized view will rely on this materialized view to supply their data. If no materialized view is found, the Dashboard will either query the database directly or automatically trigger the creation of a materialized view. Use the ‘Enable MV On-demand’ option in Materialized View Options to enable the latter behavior.
Create a Materialized View
To create a materialized view for a Dashboard, follow the steps below:
-
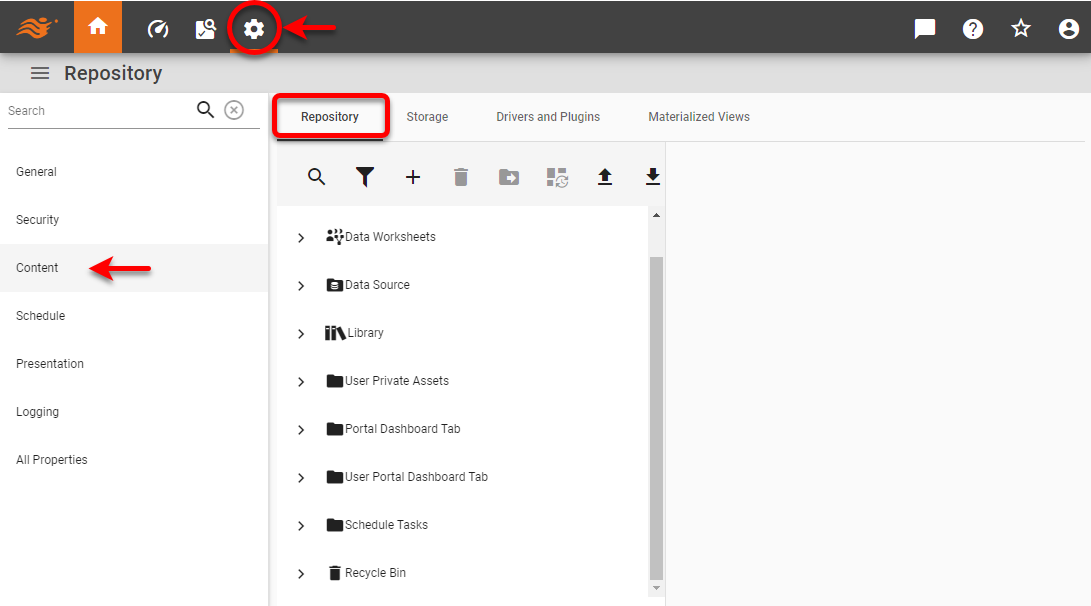
Press the ‘Settings’ button
 at the top of Enterprise Manager.
 -
Select the Content page in the left panel, and select the Repository tab.
-
Click to select the desired Dashboard in the tree. Optional: Hold the Ctrl and click to select more than one Dashboard to create materialized views for multiple Dashboards at the same time.
-
Select the MV tab (if you have selected just a single Dashboard) or press the ‘Materialize’ button
 above the list (for one or more selected Dashboards).
-
Choose either ‘Full Data’ or ‘Minimum Data’.
-
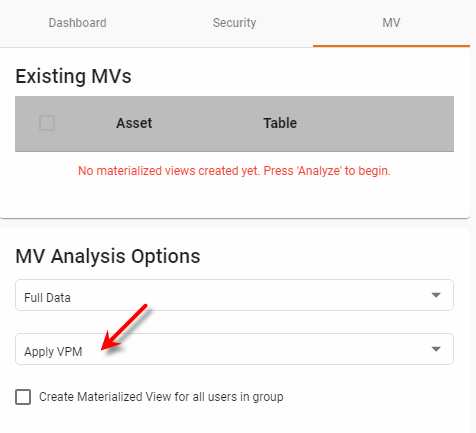
Optional: If you are using VPMs, select ‘Apply VPM’ if you want to apply existing VPMs when creating the materialized view. If your VPM filters data based on particular users, enable ‘Create Materialized View for all users in group’. This allows a custom materialized view to be generated for each user, if needed. (See Security with Materialized Views below for more details.) To keep a materialized view free from the effects of any existing VPMs, select ‘Bypass VPM’.
-
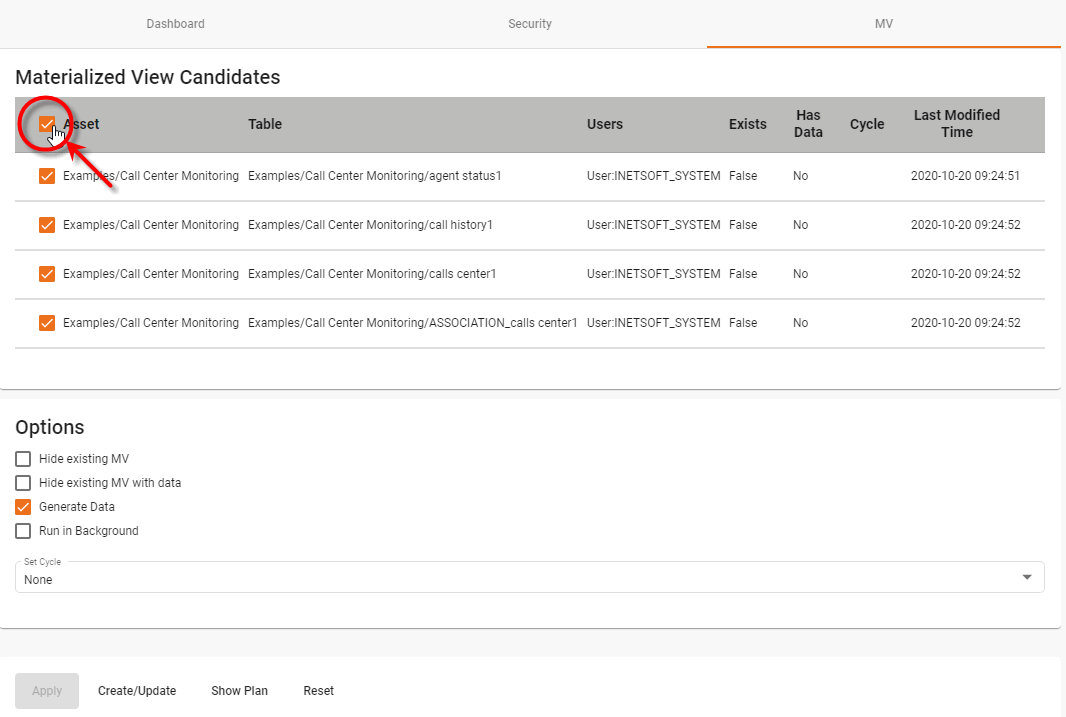
Press the Analyze button. This opens the ‘Materialized View Candidates’ page containing a list of Dashboard assets that can be materialized.

-
The analysis includes any nested (embedded) Dashboards, so these do not need to be analyzed independently.
-
Only Dashboards containing aggregated data can be considered candidates for materialized views.
-
See Transformations and Faults for information about design features that may interfere with materialization.
-
-
Optional: Select ‘Hide existing MV’ to remove a Dashboard from the list if the Dashboard already possesses a materialized view (with or without data). Select ‘Hide existing MV with data’ to remove a Dashboard from the list if the Dashboard already possesses a materialized view that has been populated with data.
-
Select the Dashboard assets in the table for which you want to create a materialized view.
-
From the ‘Set Cycle’ menu, choose the cycle on which these materialized view should be regenerated. (See Schedule for more information about defining cycles.)
-
Optional: Select ‘Generate Data’ if you want to immediately perform the full materialization process for the selected Dashboards upon pressing the Create/Update button. (This may take a significant amount of time, during which the materialized view is constructed and data files are saved. The data file names are generated automatically and cannot be changed.)
If you do not want to wait for materialized view generation to complete, select both ‘Generate Data’ and ‘Run in Background’. This automatically creates a scheduled task to generate the materialized view. You can check the status of the task under the Schedule page. (See Create a Task, Cycle, or Alert.) If you do not select the ‘Generate Data’ option, materialized views will be created immediately, but will not be populated with data until the assigned cycle next executes.
-
Press Create/Update to proceed with the options as specified above. If you selected ‘Generate Data’ only, this will immediately start the generation process. You will be notified upon completion.
If you selected ‘Run in Background’, the materialized view will be scheduled to begin generation. You can check the status of the task under the Schedule page.
To manage existing materialized views, see Manage Materialized Views. To verify whether a particular dashboard is using a materialized view or database access, consult the server logs generated on the ‘Debug’ level. (See Logging for information about how to adjust the logging level.)
Manage Materialized Views
| You can also access materialized view status from the Web API endpoints. See Access InetSoft API Methods and REST JSON for details on how to access API endpoints from a datasource. |
To manage existing materialized views, follow the steps below:
-
Press the ‘Settings’ button
at the top of Enterprise Manager. -
Select the Content page in the left panel, and select the Materialized Views tab at the top.
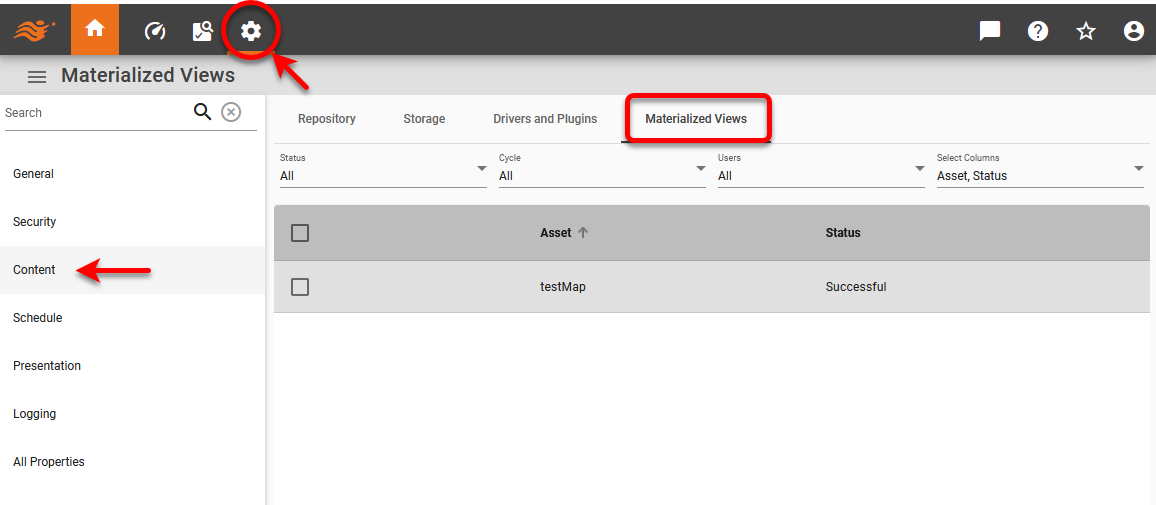
The table lists all existing materialized views.
-
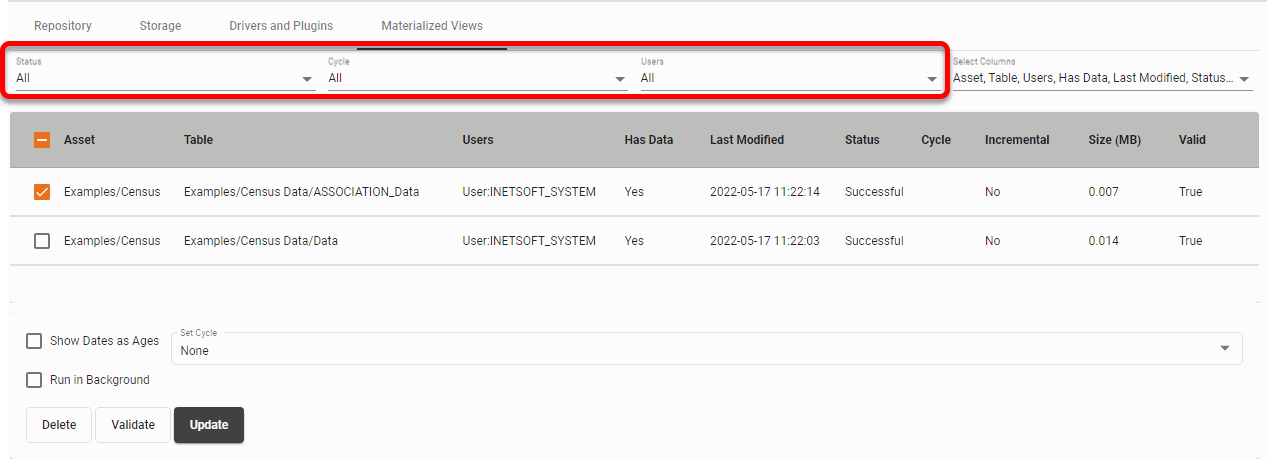
To restrict the items shown in the table by status, cycle, or user, make the desired selections from the top menus.
-
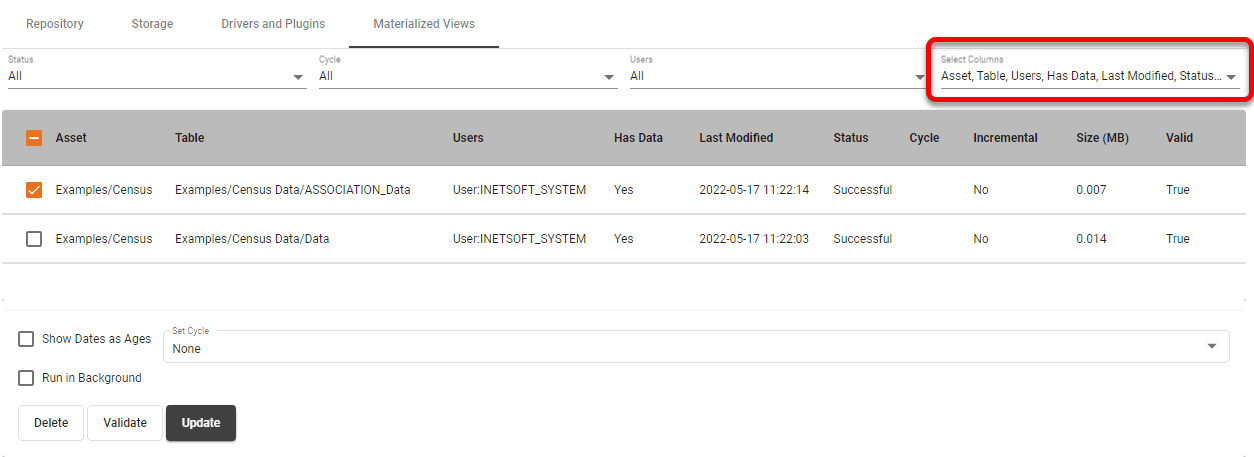
To restrict the columns shown in the table, expand the ‘Select Columns’ menu on the right side. Choose the columns you want to display.
-
To update a materialized view with new data, select the desired materialized view in the table and press Update.
-
To delete a materialized view (for example, if changes have been made to the underlying database schemas), select the materialized view in the table and press Delete.
If you experience a problem when a Dashboard attempts to retrieve data from a materialized view, delete the materialized view, recreate it, and assign it to a cycle. See Create a Materialized View for details.
Materialized View Options
| In Enterprise Edition this feature is available to Site Administrators only. |
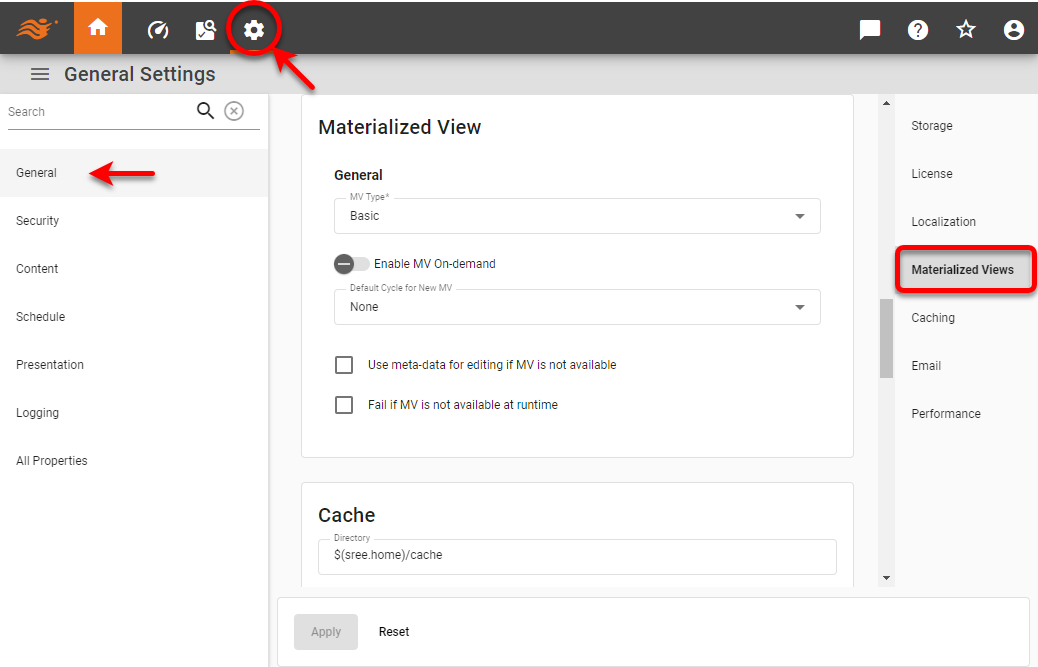
To configure options for materialized views, follow the steps below:
-
Press the ‘Settings’ button
at the top of Enterprise Manager. -
Select the General page in the left panel, and select Materialized Views page in the right panel.
-
Set any desired global options:
- Create MV On-demand
-
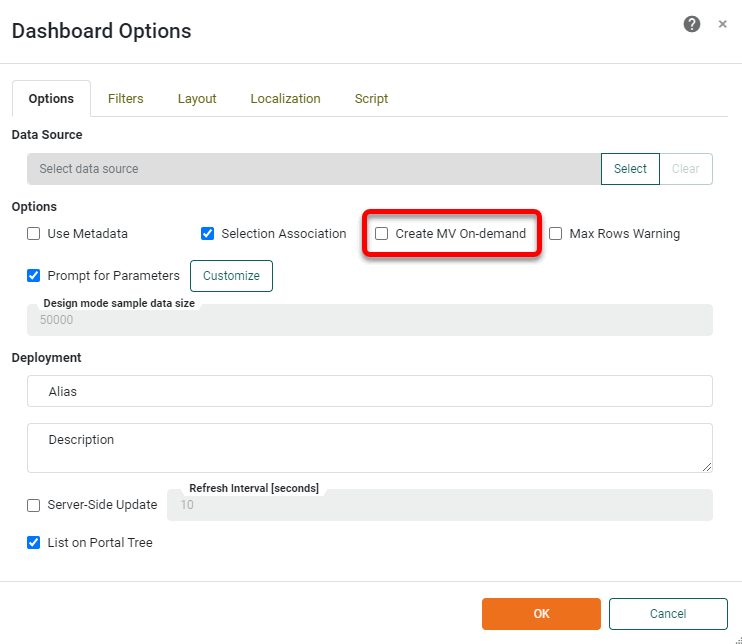
Set ‘Create MV On-demand’ to specify that the ‘Dashboard Options’ dialog box in Visual Composer should offer the ‘Create MV On-demand’ option for individual Dashboards. When ‘Create MV On-demand’ is enabled for a Dashboard, a new materialized view is automatically created on-the-fly if the Dashboard does not have an existing materialized view (either because the materialized view was never populated with data or because the Dashboard underwent modifications that rendered an existing materialized view unusable). The materialized view will supply data to the Dashboard both at design time and at runtime. See Dashboard Options for information on setting this option.
- MV On-demand by Default
-
Set ‘MV On-demand by Default’ to specify that the ‘Dashboard Options’ dialog box in Visual Composer should have the ‘Create MV On-demand’ option enabled by default for all new Dashboards. This relieves you from creating a materialized view for each Dashboard individually.
- Default Cycle for New MV
-
Set ‘Default Cycle for New MV’ to specify that the default cycle to be used for on-demand materialized view generation. See Schedule for information on how to create a cycle.
- Use meta-data for editing if MV is not available
-
Set ‘Use meta-data for editing if MV is not available’ to specify that when a materialized view is not available to supply data for a Dashboard (for any reason), the design mode of Visual Composer should display meta-data rather than querying the database for data. This will improve design-time performance. See Dashboard Options for more information about meta-data mode.
- Fail if MV is not available at runtime
-
Set ‘Fail if MV is not available at runtime’ to specify that when a user loads a Dashboard in the User Portal an error message should be generated if the requested Dashboard does not possess a corresponding materialized view or the materialized view fails to generate (due to user-cancellation or for any other reason). If you prefer the Dashboard to query the database for data rather than generate an error in this case, disable ‘Fail if MV is not available at runtime’.
Materialized View Performance
When you design Data Worksheets and Dashboards to be used with materialized views, keep the following points in mind:
-
In the Data Worksheet, try to keep the design as simple as possible.
-
In the Data Worksheet, if you are joining or concatenating tables, try to place any parameterized filtering conditions (i.e., conditions that change in response to user input or the runtime environment) on the resultant data block rather than on the base tables. Conditions that are placed on base tables may necessitate the creation of a “sub-materialized view” corresponding to each base table and require additional post-processing of these sub-materialized views.
-
In the Dashboard, try to place selection (filtering) components such as Selection List and Range Slider on the resultant data block of the Data Worksheet (i.e., the final data block resulting from join or concatenation operations) rather than on the base tables.
-
In the Dashboard, try to avoid creating tables that display large numbers of records (i.e., long, scrolling tables).
-
If you wish to add a fixed filter condition (i.e., a condition that does not change in response to user input or the runtime environment), implement the fixed condition in the Data Worksheet rather than in the Dashboard.
-
For multi-tenant implementations utilizing the multi-connection feature, materialized views are created based on user/group connection assignments. For this reason, if you set a Dashboard’s permissions by role (on the Dashboard’s Security tab), you must also add individual permissions for users or groups that have particular connections. This will enable the materialized views to be generated from the appropriate connections. See Configure Security for more information about setting Dashboard security.
See Transformations and Faults for an approach to addressing other common impediments to effective materialization.
Security with Materialized Views
If you are using a VPM to filter data based on particular users (see Add Data Security (VPM) for more about VPMs), you should generally enable the ‘Create Materialized View for all users in group’ option when creating the materialized view. (See Create a Materialized View above for instructions on how to create a materialized view.)
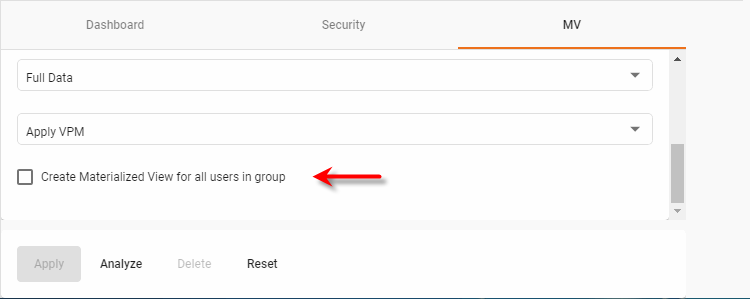
This allows custom materialized views to be generated for each user (based on their individual VPM permissions). If this option is disabled, only the group name will be available to the VPM, and the filter will not be correctly applied for users.
In some cases, this VPM-based approach may generate too many distinct materialized views when security is applied at the user-level. In this case, you can substitute data block filtering in place of VPM-based filtering. To implement data block filtering, follow the steps below:
-
Place a filtering condition directly on the Data Worksheet data block that supplies data to the Dashboard. (See Filter Data in Prepare Your Data for directions on how to use conditions.) The condition should include a parameter that filters the data block appropriately for a particular user. For example, the condition
[First Name][is][equal to][$(_USER_)]
filters the data block based on the user name by using the predefined variable
_USER_(which supplies the name of the currently logged-in user). To filter on a property such as the user’s corporate customers (i.e., companies), simply define your own variable to store the information:[Company][is][one of][$(comp)]
The value of the variable (
comp) will be provided by the SRPrincipal object as explained in the next step. -
Optional: Use the setParamater() method of the SRPrincipal object to assign a value to the data block condition variable. You can do this from within an external module (e.g., an SSO request filter or Login Listener) or from within an internal Dashboard script.
These procedures pass the desired user data (e.g., companies) directly into the data block condition. If a materialized view has been generated for the data set, the condition is applied to the post-materialized data set, extracting the appropriate data for the logged-in user. There is therefore no need to generate a distinct materialized view for each user.
Incrementally Update a Materialized View
Watch Video: Create a High-Performance Cache (Incremental Materialized View)
This video might show an earlier version of the feature or operation that differs in minor ways from the current version.
You can schedule a materialized view to be regenerated on a predefined schedule by assigning a “cycle” to the view. (See Create a Materialized View above for more information.) This allows the materialized view to be updated with new data from the database. However, for a large data set, repeatedly regenerating the materialized view in its entirety may be inefficient.
To improve performance, you can elect to update the materialized view incrementally based on a set of specified conditions. For example, you can selectively update the materialized view with data which has posted after the previous materialization. Likewise, you can delete selected records from the materialized view if they meet a specified condition, such as an expiration date.
You can specify an incremental update condition both for mergeable queries (e.g., relational database queries) and for non-mergeable queries (e.g., non-relational database queries, un-parsable queries, etc.), as described below.
- Mergeable query
-
To specify the criteria that govern the incremental materialized view update for a mergeable query (i.e., standard, parsable, relational database query), add the desired conditions to the MV Update tab of the data block in the Data Worksheet. The data block’s MV Update condition will be tested each time an existing materialized view is regenerated (based on the cycle specified for the materialized view), and the materialized view regeneration will be limited to the additions and deletions specified by the condition. (See Filter Data in Prepare Your Data for more information on how to define the update conditions in the MV Update tab.)
- Non-Mergeable Query
-
To specify the criteria that govern the incremental materialized view update for a non-mergeable query (e.g., non-relational database query or un-parsable query), follow the steps below to the criteria to the SQL string:
Transformations and Faults
When a particular data view component (Chart, Table, etc.) is materialized, the materialization process caches the data in the underlying Data Worksheet data block to which the component is bound. This allows the component to rapidly query the cached dataset rather than the database.
In order for the underlying data block to be materialized, any Dashboard filters (e.g., Selection Lists) that operate on the data block must be applied directly to the data block itself, rather than to any precursor data blocks. To materialize a data block, the materialization process must often first transform the Dashboard by moving these filter components forward to operate on the resultant data block rather than its precursors. This transformation process is done internally and automatically during the materialization process. The result of the transformation is a new representation of the data set that preserves the same data as the original data block but is more appropriate for materialized view querying. When this transformation cannot be accomplished in a way that preserves the data intact, Enterprise Manager reports a “fault”. The fault means that a data block cannot be materialized.
In many of these instances, you may be able to facilitate materialization by manually moving the filters forward. To do this, shift the filters to apply to the resultant data block rather than its precursor data blocks.
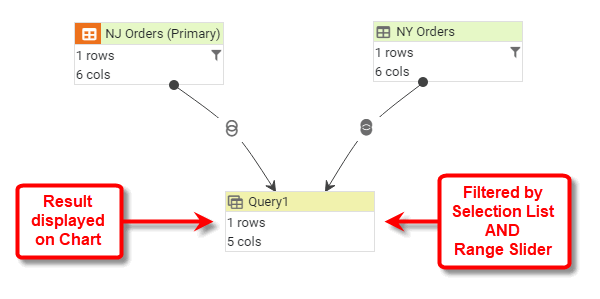
In the Data Worksheet below, the ‘NJ Orders’ data block is filtered by a Dashboard Range Slider, and the ‘NY Orders’ data block is filtered by a Dashboard Selection List. These two precursor data blocks are concatenated to create the resulting ‘Query1’ data block that is displayed on the Dashboard Chart.
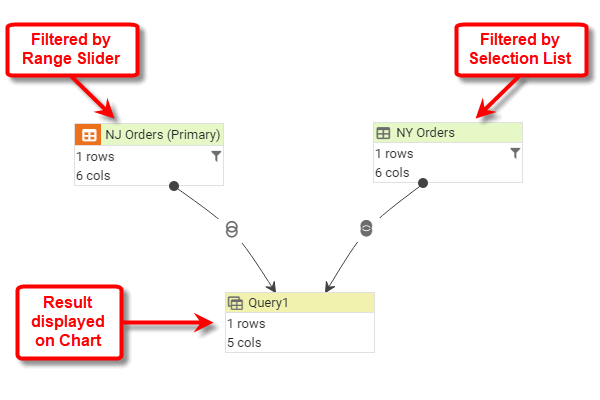
Rather than applying the Dashboard filters to the precursor data blocks as above, it may be beneficial to move the filters forward to resultant ‘Query1’ data block, as shown below. Applying the filters to the ‘Query1’ data block (i.e., the data block that will be materialized) may prevent faults during the materialized view generation process.