Write Back to Storage
You can configure an Embedded Table to be editable by users and save user modifications back to the Data Worksheet. The following sections explain how to do this. See Table Properties to designate a Table as an Embedded Table.
Set a Table to be Editable
An editable table is a table whose data can be modified by the user and written back to the Data Worksheet. The following sections explain how to create an Editable Table.
Set a Table as Editable
To set a table as editable, follow the steps below:
-
Right-click the Table, and select ‘Properties’ from the context menu. This opens the ‘Table Properties’ panel.
-
Select the Advanced tab in the ‘Table Properties’ panel.
-
Select the ‘Enable Table Editing’ option, and choose the actions available to the user: ‘Add Rows’, ‘Delete Rows’, and/or ‘Edit Rows’. (See Table Properties for more details.)
-
Press OK to close the ‘Table Properties’ panel.
Set Edit Options for a Column
You can place restrictions on which columns may be edited by users, and what types of values can be entered. To set the editing interface for a particular column, follow the steps below:
-
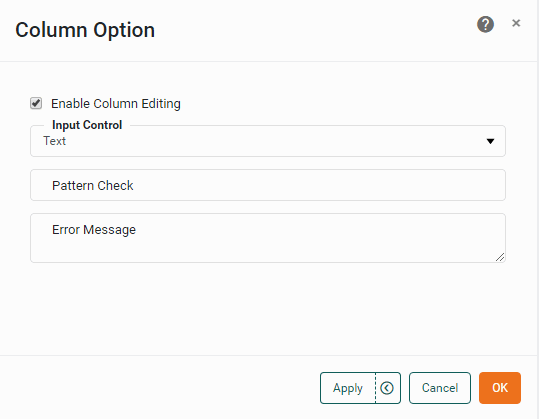
Right-click the column header, and select ‘Column Options’ from the context menu. This opens the ‘Column Option’ dialog box.
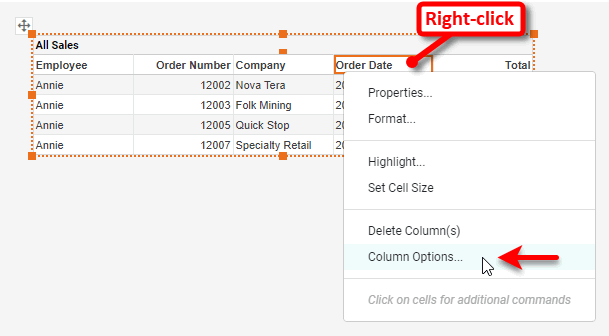
-
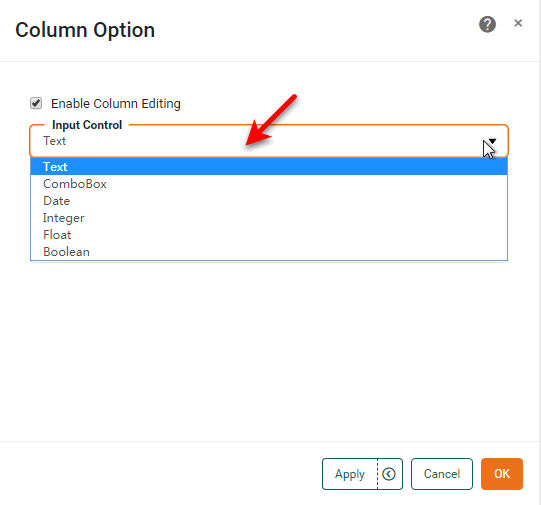
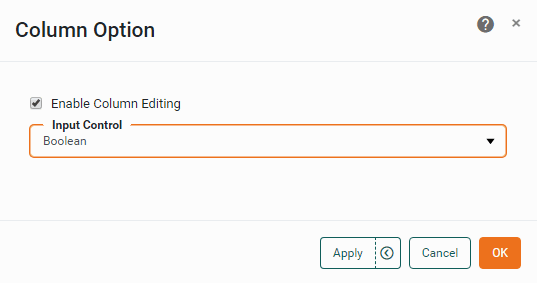
In the ‘Column Option’ dialog box, select ‘Enable Column Editing’ to make the column editable by users.
-
In the ‘Column Editor’ menu, select the type of editing control you wish to provide to users. The available options are ‘Text Editor’, ‘ComboBox Editor’, ‘Date Editor’, ‘Number Editor’, ‘Float Editor’, and ‘Boolean Editor’.
-
Press OK to close the dialog box.
Each type of column editor provides settings which allow you to restrict the values that a user may enter into the column. This allows you to perform validation checking on user input. See Validate User Input for the available settings.
You can apply formatting to an editable column in the usual manner (see Add Data Format). Formatting is applied to existing column data as well as to any data that a user adds or edits in the column.
Set Visibility for a Column
You can choose to hide specific table columns, for example when the table includes a primary key column (used to write data back to the database) that should not be displayed to the user. See Create a Table or Create a Crosstab for information about how to hide table columns.
To retrieve the value of a hidden column, use the script function getHiddenColumnValue(col,row). See Access User-Modified Data for more details.
Validate User Input
You can configure TextInput components and Editable Table columns with different types of input controls and validation features. (See Set Edit Options for a Column above for information on how to make a Table editable and set these column options.) The following sections describe the available editors.
Boolean Data
The ‘Boolean Editor’ provides the user with a simple checkbox input. This allows the user to enter true (checked) or false (unchecked) into an Editable Table cell or a TextInput component.
Categorical Data
The ‘ComboBox Editor’ provides the user with standard menu input. This allows a user to simply select a value from a predefined list.
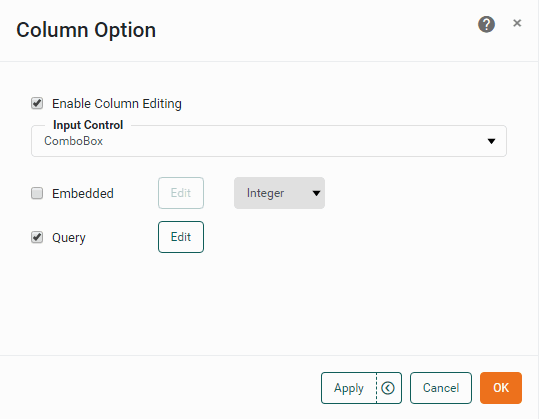
To populate the menu from a manually-created list, follow these steps:
-
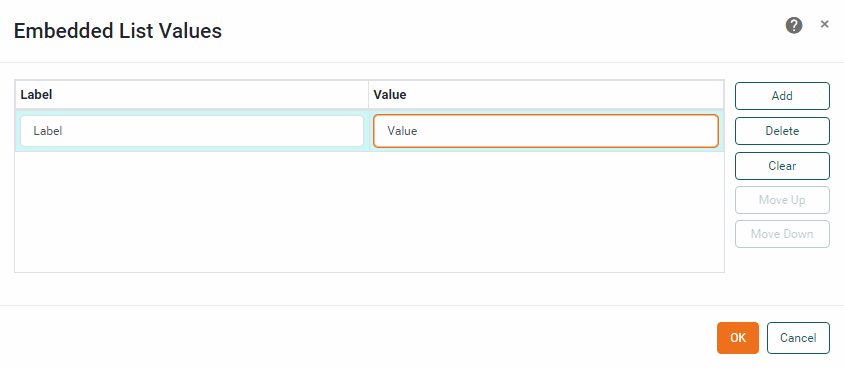
In the ‘Column Option’ dialog box, select the ‘Embedded’ option and press Edit. This opens the ‘Embedded List Values’ dialog box.
-
Press Add. This will populate the list with blank ‘Label’ and ‘Value’ fields.
-
Double-click on the list elements, and enter a desired ‘Label’ and ‘Value’.
-
Repeat the above steps to insert more elements.
-
Press OK to close the dialog box.
To populate the menu from the Dashboard data source, follow these steps:
-
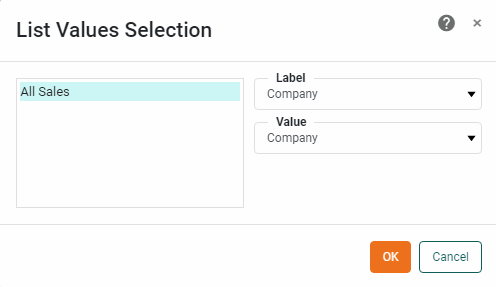
In the ‘Column Option’ dialog box, select the ‘Query’ option, and press Edit. This opens the ‘List Values Selection’ dialog box.
-
Select a data block from the list on the left side. Select the appropriate fields from the ‘Label’ and ‘Value’ menus.
-
Press OK to close the dialog box.
Enable both the ‘Embedded’ and ‘Query’ options to merge together the values retrieved from both sources into a single list.
Date Data
The ‘Date Editor’ provides the user with a pop-up calendar on which to select a date. This allows a user to enter date values into an Editable Table cell or a TextInput component.
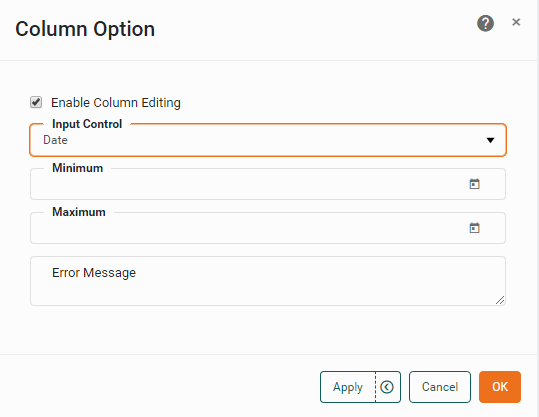
The following options are available in the dialog box:
- Minimum
-
Specifies the start date for the permitted time interval. If the user enters a date earlier than the minimum, the error message will be displayed.
- Maximum
-
Specifies the end date for the permitted time interval. If the user enters a date later than the maximum, the error message will be displayed.
- Error Message
-
A text message to display when the user enters a date outside the specified interval. The placeholder
{0}can be used to insert the user-entered value at a desired location in the error message. Example error message:The value you entered, {0}, is not acceptable.
Decimal Data
The ‘Float Editor’ provides the user with a standard floating point field input. This allows a user to type decimal values into an editable table cell or a TextInput component.
| Alphabetical characters are not permitted. |
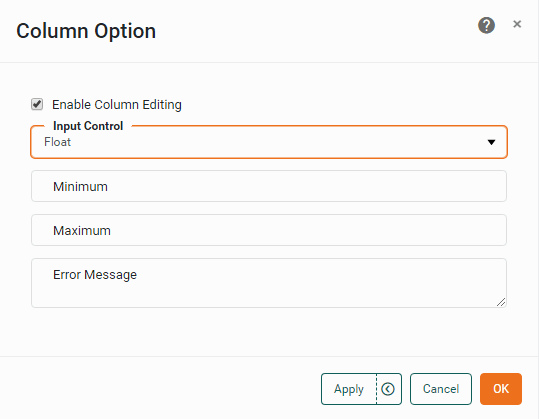
The following options are available in the dialog box:
- Minimum
-
Specifies the lowest allowed floating point value. If the user enters a value lower than the minimum, the error message will be displayed.
- Maximum
-
Specifies the highest allowed floating point value. If the user enters a value higher than the maximum, the error message will be displayed.
- Error Message
-
A text message to display when the user enters a value outside the specified interval. The placeholder
{0}can be used to insert the user-entered value at a desired location in the error message. Example error message:The value you entered, {0}, is not acceptable.
Integer Data
The ‘Integer Editor’ provides the user with standard integer field input. This allows a user to type integer values into an editable table cell or a TextInput component.
| Alphabetical characters and decimal points are not permitted. To enter decimals, use the Float Editor. |

The following options are available in the dialog box:
- Minimum
-
Specifies the lowest allowed integer value. If the user enters a value lower than the minimum, the error message will be displayed.
- Maximum
-
Specifies the highest allowed integer value. If the user enters a value higher than the maximum, the error message will be displayed.
- Error Message
-
A text message to display when the user enters a value outside the specified interval. The placeholder
{0}can be used to insert the user-entered value at a desired location in the error message. Example error message:The value you entered, {0}, is not acceptable.
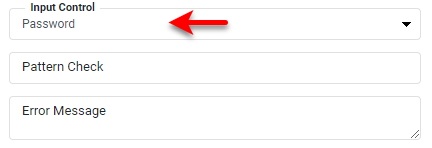
Password
The ‘Password Editor’ option is the same as the ‘Text Editor’ option, but masks the entered text using **** characters. See Text Data below.
Text Data
The ‘Text Editor’ provides the user with standard text field input. This allows a user to simply type values into an editable table cell or a TextInput component.
To mask the entered text, use the ‘Password Editor’ option instead of the ‘Text Editor’ option.
The following options are available in the dialog box:
- Pattern Check
-
Specifies a regular expression (regex) which the input must match. Failure to match the regular expression will cause the error message to be displayed.
- Error Message
-
A text message to display when the pattern check fails. The placeholder
{0}can be used to insert the user-entered value at a desired location in the error message. Example error message:The value you entered, {0}, is not acceptable.
You can find many regex tutorials and examples on the Internet (e.g., https://www.regular-expressions.info). Some sample expressions and error message combinations are show below:
| Pattern Check | Error Message (Suggested) |
|---|---|
^[a-zA-Z0-9_*$] |
Input can contain only numbers, letters, and underscore (_). |
\d{3}-\d{3}-\d{4} |
Input must be a phone number with form ###-###-####. |
^[a-zA-Z0-9_{0,15}$] |
Input length must be 15 characters or fewer. |
The following is a summarization of the regular expression syntax:
Quantified atoms:
{n,m} Match at least n but not more than m times.
{n,} Match at least n times.
{n} Match exactly n times.
* Match 0 or more times.
+ Match 1 or more times.
? Match 0 or 1 times.
a . matches everything except \n
a ^ is a null token matching the beginning of a string or line
(i.e., the position right after a newline or right before the
beginning of a string)
a $ is a null token matching the end of a string or line
(i.e., the position right before a newline or right after
the end of a string)

Character classes (e.g., [abcd]) and ranges (e.g., [a-z])
Special backslashed characters work within a character class
(except for backreferences and boundaries).
\b is backspace inside a character class

Special backslashed characters:
\b null token matching a word boundary (\w on one side and \W
on the other)
\B null token matching a boundary that isn't a word boundary
\A Match only at beginning of string
\Z Match only at end of string (or before newline at the end)
\n newline
\r carriage return
\t tab
\f formfeed
\d digit [0-9]
\D non-digit [^0-9]
\w word character [0-9a-z_A-Z]
\W a non-word character [^0-9a-z_A-Z]
\s a whitespace character [ \t\n\r\f]
\S a non-whitespace character [^ \t\n\r\f]
\xnn hexadecimal representation of character
\cD matches the corresponding control character
\nn or \nnn octal representation of character unless a backreference.
a \1, \2, \3, etc. match whatever the first, second, third, etc.
parenthesized group matched. This is called a backreference. If
there is no corresponding group, the number is interpreted as an
octal representation of a character.
\0 matches null character
Any other backslashed character matches itself
Expressions within parentheses are matched as subpattern groups
and saved for use by certain methods.
Access User-Modified Data
The following sections explain how to access user-modified data so that it can be written back to the database.
Access User-Modified Data in Table
When you configure a Dashboard table to be editable (see Table Properties), this allows users to insert, delete, or modify data in the table. The getFormRows table function provides you with records that have been modified.
- Table1.getFormRows(ADDED)
-
Provides a two-dimensional array containing the new rows that have been inserted by the user. The length of the array is equal to the number of inserted rows, and the width of the array is equal to the number of columns in the table.
- Table1.getFormRows(CHANGED)
-
Provides a two-dimensional array containing the rows that have been modified by the user. The length of the array is equal to the number of modified rows, and the width of the array is equal to the number of columns in the table.
- Table1.getFormRows(DELETED)
-
Provides a two-dimensional array containing the rows that have been deleted by the user. The length of the array is equal to the number of deleted rows, and the width of the array is equal to the number of columns in the table.
- Table1.getFormRow(idx)
-
Provides the row designated by index
idx.
These functions are typically called within the onClick handler of a Submit Button (see Submit Button Properties). See Add Component Script for information about the onClick handler.
When a user adds or changes a row in an editable table, the new or modified row is highlighted in color. To clear the highlight on these rows and remove them from the corresponding array returned by getFormRows, use the table’s commit(type) function.
- Table1.commit(ADDED)
-
Clears highlights on added rows, and removes them from array returned by
getFormRows(ADDED). - Table1.commit(CHANGED)
-
Clears highlight on changed rows, and removes them from array returned by
getFormRows(CHANGED). - Table1.commit(DELETED)
-
Removes deleted rows from array returned by
getFormRows(DELETED). - Table1.commit(idx)
-
Removes the row returned by
getFormRows(idx)from the array of modified rows.
Access User-Modified Data from TextInput
To acquire the data that a user has entered in a TextInput component (see TextInput Properties), simply reference the component’s value property:
TextInput1.valueAccess Most Recent User Modification
When a user makes a modification to an Editable Table or Form component, the change triggers the Dashboard’s onRefresh Handler script to re-execute. (See Add Dashboard Script for more information about this handler.) The onRefresh handler offers an event object that you can use to detect the user’s action and make an appropriate response. The event object provides access to the following Dashboard event:
For an Form Component, the event object provides the name and type of the component in which the user has just made a selection. For an Editable Table, the event object provides the following properties:
- name
-
The name of the table component.
- type
-
The type of the component, always
table. - row
-
The index of the modified row in the table.
- column
-
The index of the modified column in the table.
- source
-
A reference to the table object which can be used to access table properties.
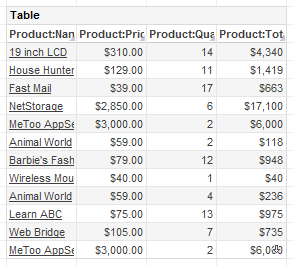
The following example illustrates how you can use the event object to dynamically update table data in response to user modifications. You will create a table that contains the fields ‘Name’, ‘Price’, ‘Quantity’, and ‘Total’. You will enable the user to modify the ‘Price’ and ‘Quantity’ fields, and use script to automatically update the ‘Total’ field with the corresponding data (i.e., the product of ‘Price’ and ‘Quantity’).
To create this example, follow the steps below:
-
Create a new Dashboard based on the ‘Order Model’ data model.
You may need to download the examples.zip file from GitHub into your environment. (This requires access to Enterprise Manager.) See Import and Export Assets for instructions on how to import. -
From the Toolbox panel, drag a Table component to the Dashboard.
-
Expand the ‘Order Model’ node at the top of the Toolbox panel, and drag the following fields into the Table component:
Product.Name Product.Price Product.Quantity Purchased Product.Total -
Resize the table as desired.
-
Right-click the table and select ‘Properties’. Note: You can also access menu options from the ‘More’ button (
 ) in the mini-toolbar. This opens the ‘Table Properties’ panel.
 -
Under the Advanced tab, select ‘Enable Table Editing’ and press OK to close the panel.
-
In the table, right-click the ‘Product:Name’ header and select ‘Column Options’ from the context menu. Note: You can also access menu options from the ‘More’ button (
) in the mini-toolbar. -
Deselect the ‘Enable Column Editing’ option, and press ‘OK’. This prevents the user from editing the product name.
-
In the table, right-click the ‘Product:Total’ header and select ‘Column Options’ from the context menu.
-
Deselect the ‘Enable Column Editing’ option, and press OK. This prevents the user from manually editing the total. (The total will be calculated by script.)
-
Press the ‘Options’ button
 in the Dashboard toolbar. This opens the ‘Dashboard Options’ panel.
 -
Select the Script tab. Press the ‘onRefresh’ radio button to select the onRefresh handler.
-
Enter the following script into the Editor:
if(event != null) {
  var tableObject = event.source;
  var row = event.row;
  var column = event.column;

  if(column == 1 || column == 2) {
    var editedRow = tableObject.getFormRow(row);
    var price = editedRow[1]; // second column = Price
    var quant = editedRow[2]; // third column = Quantity

    if(price != null && quant != null) {
      tableObject.setObject(row, 3, price*quant); // fourth column = Total
    }
    else {
      tableObject.setObject(row, 3,'');
    }
  }
}
Observe that
event.rowandevent.columnare used together withgetFormRowto acquire the particular value that the user has entered, andsetObjectis used to write the calculated data into the table. -
Press OK to close the Script Editor.
-
Preview the Dashboard.
Edit various values in the ‘Price’ and ‘Quantity Purchased’ columns, and observe how the ‘Total’ column is automatically updated. Note, however, that changes a user makes to the table (including calculated values) do not persist across sessions unless they are saved to the Data Worksheet by using the ‘Write Back to Storage’ option.