Storage
| To move assets such as Dashboards, queries, or data sources from one environment to another, see Import and Export Assets. |
Asset storage is configured by the docker-compose.yaml file upon Docker container initialization. A sample docker-compose.yaml file can be found in the Github community-examples repository.
To view the current storage configuration, follow the steps below:
| In Enterprise Edition, when multi-tenancy is enabled (see Enable Multi-Tenancy), this feature is available to Site Administrators only. |
-
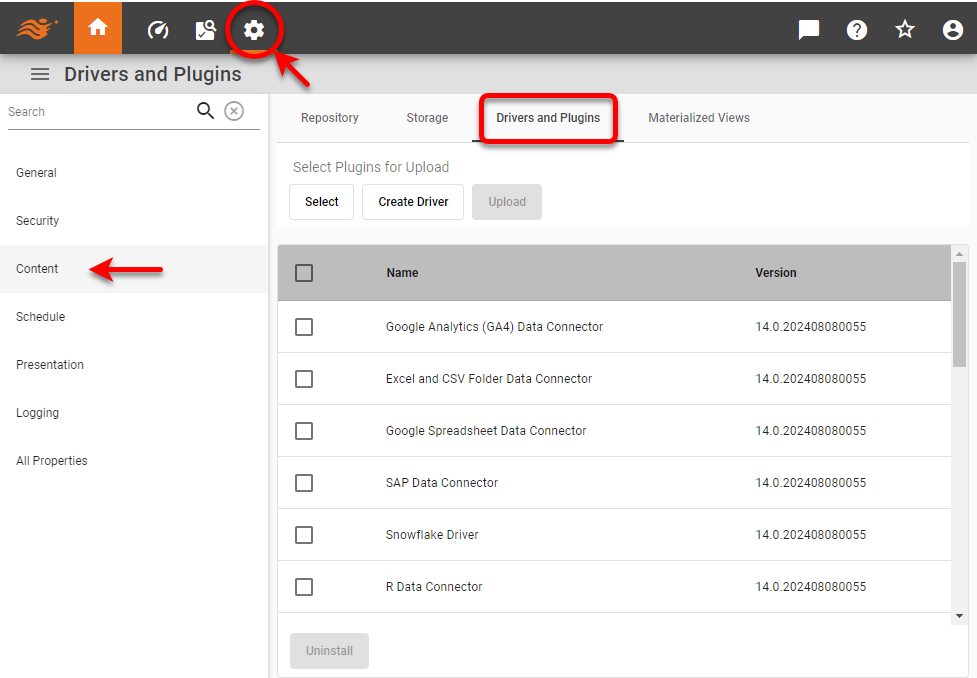
Press the ‘Settings’ button
 at the top of Enterprise Manager.
 -
Select the General page in the left panel, and select the Storage page in the right panel.
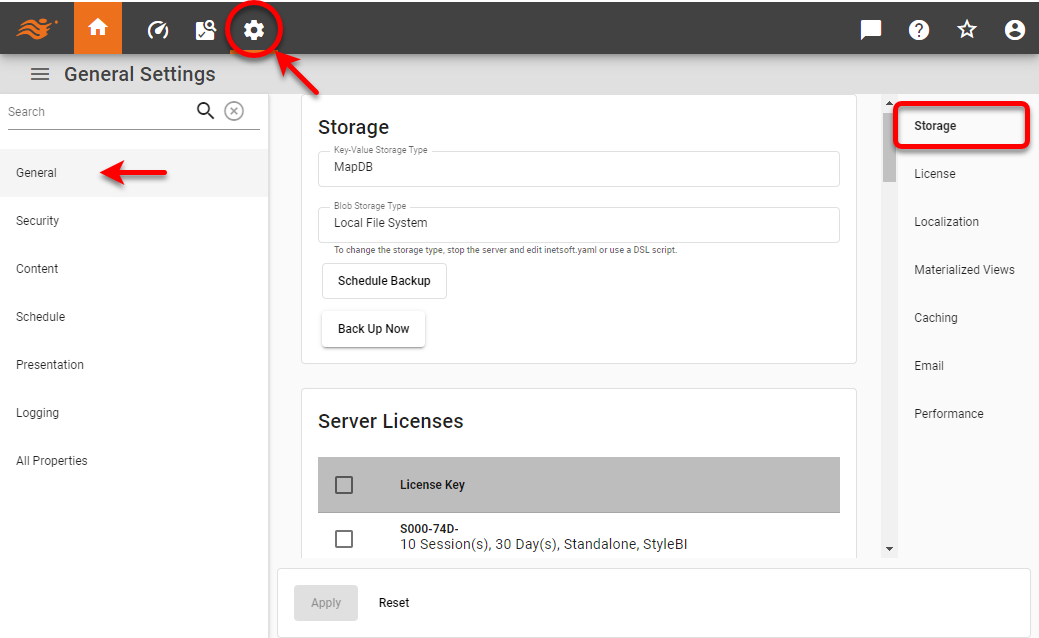
The information The ‘Key-Value Storage Type’ field displays the method of storage for key-value settings, such as server properties. The default is MapDB. The ‘Blob Storage Type’ field displays the method of storage for binary objects, such as Dashboards. The default is file system. To change the type of storage, see below.
Manage Stored Assets
| To move assets such as Dashboards, queries, or data sources from one environment to another, see Import and Export Assets. |
| In Enterprise Edition, when multi-tenancy is enabled (see Enable Multi-Tenancy), this feature is available to Site Administrators only. |
To manage stored assets, follow the steps below:
-
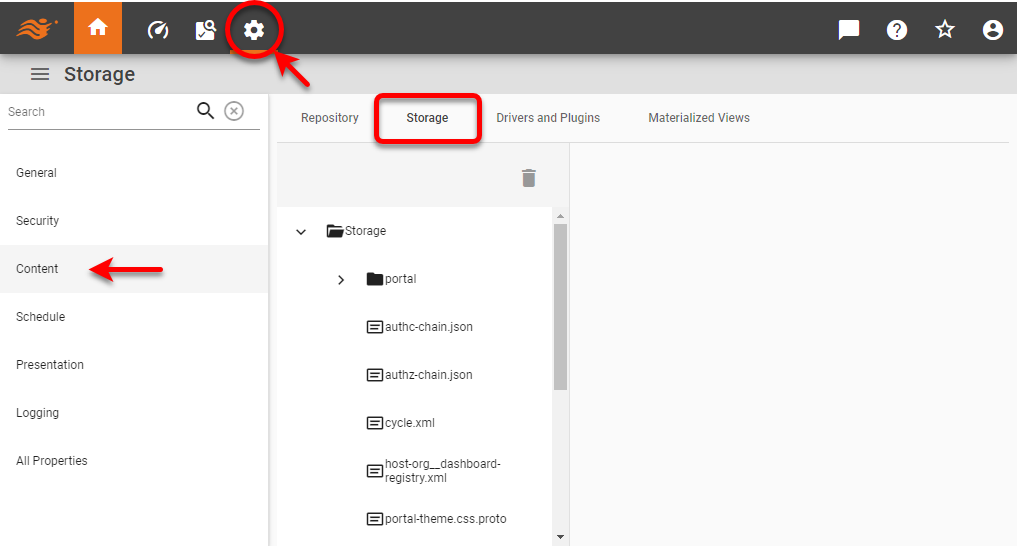
Press the ‘Settings’ button
at the top of Enterprise Manager. -
Select the Content page in the left panel, and select the Storage tab.
-
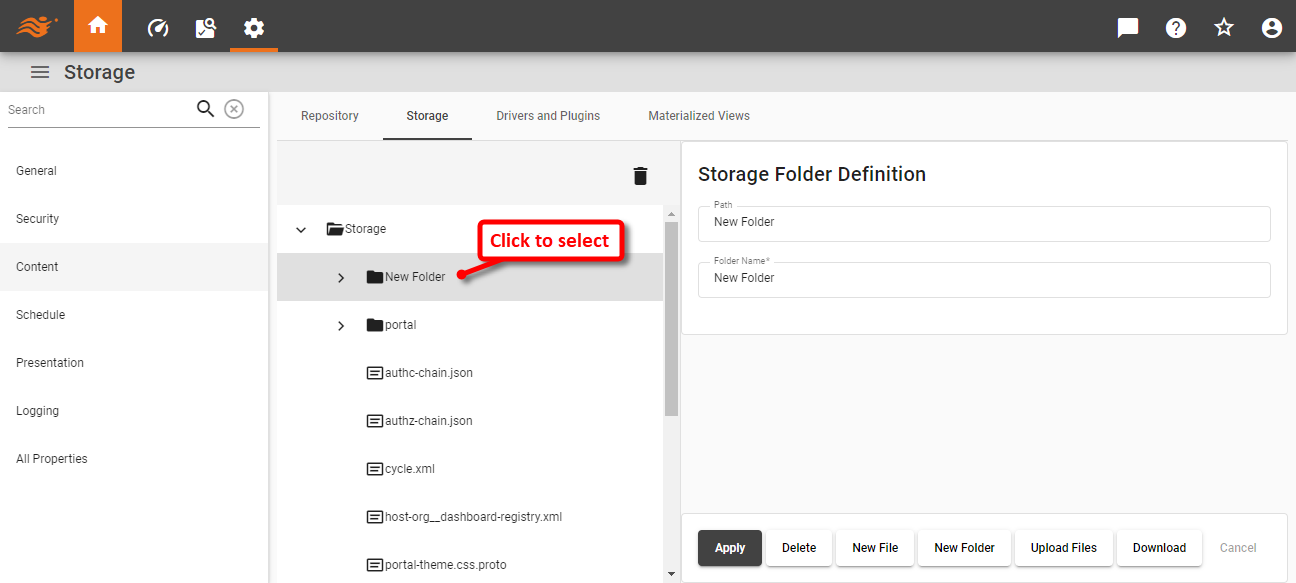
To access a folder’s properties, click the desired folder name on the navigation tree. This opens the ‘Storage Folder Definition’ panel.
-
Then perform the desired operation:
-
To rename the folder, enter a name in the ‘Folder Name’ field and press Apply.
-
To delete a folder, press the Delete button at the bottom-right.
-
To add a new file or folder to the selected folder, press the New File or New Folder button at the bottom-right.
-
To upload a file to server storage, press the Upload Files button.
To make an asset accessible via URL, upload it to the web-assets directory in Storage. (Create the web-assets folder if it does not exist.) For example, upload image.png to the web-assets folder to make it accessible at http://host:8080/image.png. -
To download a folder to a Zip file, press the Download button. (The downloaded folder can be uploaded into another environment using the Upload button.)
-
-
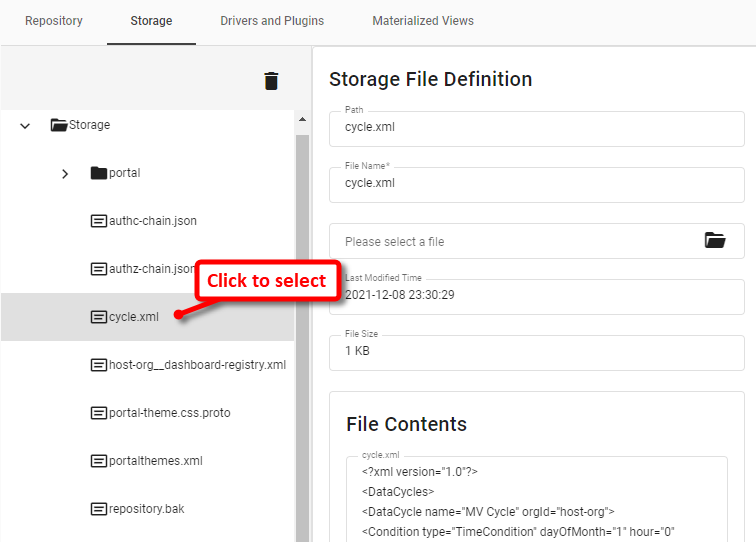
To access a file’s properties, click the desired file name in the navigation tree. This opens the ‘Storage File Definition’ panel.
-
To rename the file, enter a name in the ‘File Name’ field and press Apply.
-
To update the contents of the file, click the ‘Please select a file’ label and choose a file that contains the updated contents you wish to use. Then press Apply. This overwrites the current contents in storage with the contents of the selected file.
-
To download the file from storage to the local file system, press the Download button.
-
To delete the file from storage, press the Delete button.
-
To modify the contents of the file, press the Edit Content button.
It is not recommended to manually edit XML files in Enterprise Manager, as this may result in file corruption. Use Visual Composer to make modifications to assets.
-
Manage Drivers and Plugins
| In Enterprise Edition, when multi-tenancy is enabled (see Enable Multi-Tenancy), this feature is available to Site Administrators only. |
To retrieve data from a relational database or other data source, you will generally need to upload and deploy a driver or plugin to the server. The driver or plugin allows the server to connect to the particular data source. See Support Center > Drivers for a list of drivers and connectors that you may need to download for various data sources.
To manage drivers and plugins, follow the steps below:
-
Press the ‘Settings’ button
at the top of Enterprise Manager. -
Select the Content page in the left panel, and select the Drivers and Plugins tab at the top.
-
See the sections below to perform the desired operations.
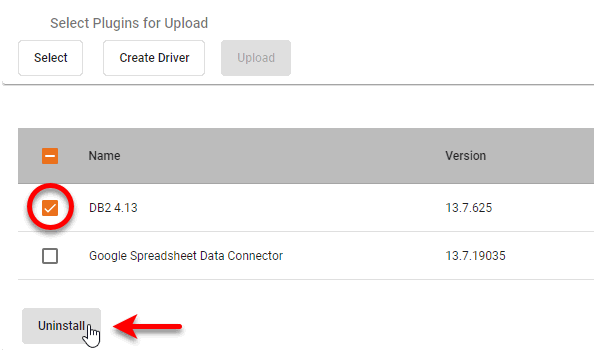
Upload a plugin to the server
To upload an existing plugin to the server, follow the steps below:
-
Press the Select button under ‘Select Plugins for Upload’, and select the desired plugin Zip file from the file system browser.
-
Press the Upload button.
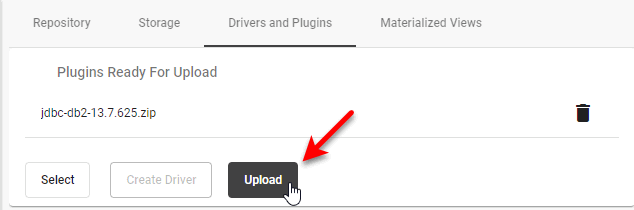
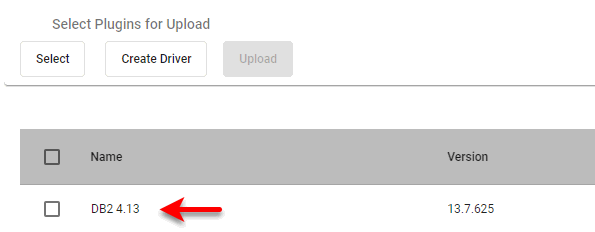
The uploaded plugin is shown in the table below the buttons.
-
Restart the server (if this is required by the particular plugin).
Upload a new driver to the server
To upload a database driver to the server, you will package it as a plugin. Follow the steps below:
-
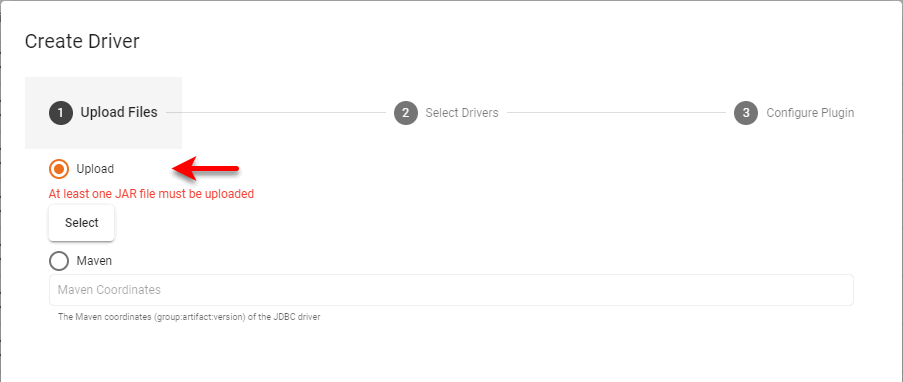
Press the ‘Create Driver’ button under ‘Select Plugins for Upload’ to open the ‘Create Driver’ dialog box.
-
To upload drivers from local storage, follow the steps below:
-
Select the ‘Upload’ option.
-
Press the Select button select the desired JAR files, as well as any other files required by the database.
-
Press Next, and choose the desired driver file or files to package into a plugin.
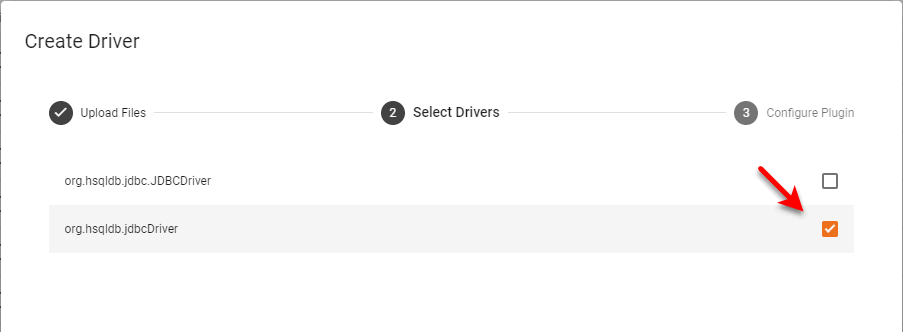
-
Press ‘Next’, and enter the desired ‘Plugin ID’, ‘Plugin Name’, and ‘Plugin Version’. The ‘Plugin ID’ must be unique, and should typically be a namespaced value, such as
com.mycompany.jdbc.dbtype. The ‘Plugin Version’ should conform to semantic versioning standards. The ‘Plugin Name’ is an arbitrary label.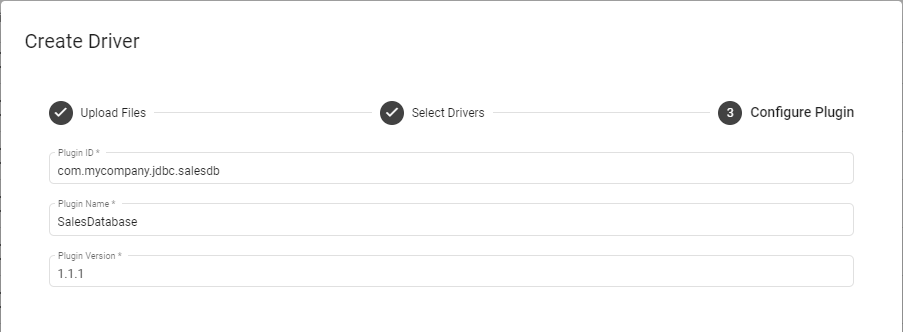
-
Press Finish to create the plugin Zip file.
-
-
To create a plugin from assets in a Maven repository, follow the steps below:
-
Select the ‘Maven’ option.Enter the ‘Maven Coordinates’ as
groupId:artifactId:packaging:version.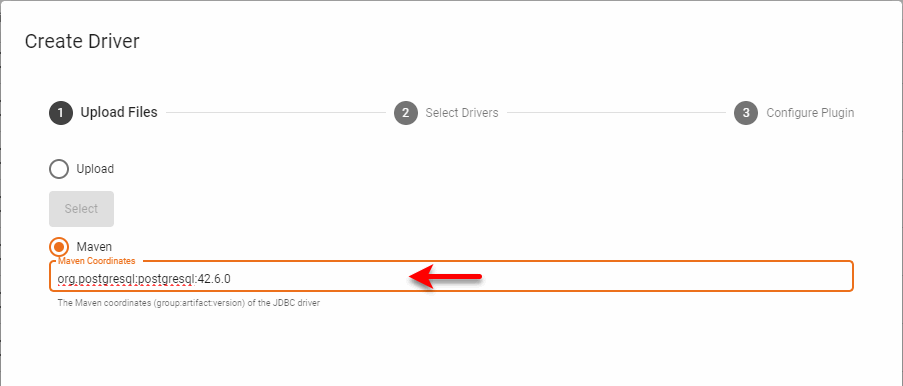
-
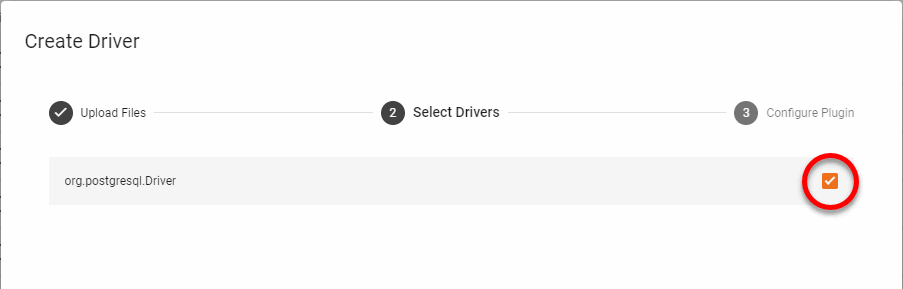
Press Next, and choose the desired driver file or files to package into a plugin.
-
Press Next, and enter the desired ‘Plugin ID’, ‘Plugin Name’, and ‘Plugin Version’. The ‘Plugin ID’ must be unique, and should typically be a namespaced value, such as
com.mycompany.jdbc.dbtype. The ‘Plugin Version’ should conform to semantic versioning standards. The ‘Plugin Name’ is an arbitrary label. -
Press Finish to create the plugin Zip file.
-
Change the Storage Method
You can configure the type of back-end storage by setting variables in the docker-compose.yaml file. If you have previously configured ‘File System’ storage, you can import the existing files into the database. See Manage Content for more information.
| If you change the key-value storage from the default MapDB, you will also need to change the specified audit database (see Configure the Audit Database). |
| A sample docker-compose.yaml file can be found in the Github community-examples repository. |
The sections below provide examples of common storage configurations.
MapDB and local file system (default)
The default configuration has MapDB as key-value storage and local file system as blob storage. Variable definitions for docker-compose.yaml are shown below:
| The local blob storage should only be used with a single server and single scheduler running on the same machine. |
INETSOFTCONFIG_KEYVALUE_TYPE:"mapdb"
INETSOFTCONFIG_KEYVALUE_MAPDB_DIRECTORY:"/data_dir/kv"
INETSOFTCONFIG_BLOB_TYPE:"local"
INETSOFTCONFIG_BLOB_FILESYSTEM_DIRECTORY:"/data_dir/blob"
In a cluster, or when the server and scheduler are on different machines, you should use the shared file system (NFS/Samba/CIFS) blob engine:
INETSOFTCONFIG_KEYVALUE_TYPE:"mapdb"
INETSOFTCONFIG_KEYVALUE_MAPDB_DIRECTORY:"/data_dir/kv"
INETSOFTCONFIG_BLOB_TYPE:"filesystem"
INETSOFTCONFIG_BLOB_CACHEDIRECTORY:'/var/lib/inetsoft/blobCache'
INETSOFTCONFIG_BLOB_FILESYSTEM_DIRECTORY:"/shared_dir/blob"
You can configure storage in the inetsoft.yaml file instead of defining Docker variables as shown above, but this will require you to package additional JAR files or create a derived image. The corresponding settings for inetsoft.yaml are shown below.
keyValue:
  type: "mapdb"
  mapdb:
    directory: "/data_dir/kv"
blob:
  type: "local"
  filesystem:
    directory: "/data_dir/blob"
AWS
| This feature is available only in Enterprise Edition. |
AWS uses DynamoDB for key-value storage and S3 for blob storage. (The S3 blob engine can be used with any S3-compatible object storage, such as a self-hosted MinIO installation.) Variable definitions for docker-compose.yaml are shown below for AWS cloud-native implementations:
INETSOFTCONFIG_KEYVALUE_TYPE:"dynamodb"
INETSOFTCONFIG_KEYVALUE_DYNAMODB_REGION:us-east-1
INETSOFTCONFIG_KEYVALUE_DYNAMODB_ACCESSKEYID:your_access_key
INETSOFTCONFIG_KEYVALUE_DYNAMODB_SECRETACCESSKEY:your_secret_key
INETSOFTCONFIG_KEYVALUE_DYNAMODB_TABLE:inetsoft
INETSOFTCONFIG_KEYVALUE_DYNAMODB_PROVISIONEDREADTHROUGHPUT:300
INETSOFTCONFIG_KEYVALUE_DYNAMODB_PROVISIONEDWRITETHROUGHPUT:300
INETSOFTCONFIG_BLOB_TYPE:s3
INETSOFTCONFIG_BLOB_CACHEDIRECTORY:'/var/lib/inetsoft/blobCache'
INETSOFTCONFIG_BLOB_S3_REGION:us-east-1
INETSOFTCONFIG_BLOB_S3_ACCESSKEYID:your_access_key
INETSOFTCONFIG_BLOB_S3_SECRETACCESSKEY:your_secret_key
INETSOFTCONFIG_BLOB_S3_BUCKET:inetsoft
INETSOFTCONFIG_BLOB_S3_PATHSTYLEACCESS:true
You can configure storage in the inetsoft.yaml file instead of defining Docker variables as shown above, but this will require you to package additional JAR files or create a derived image. The corresponding settings for inetsoft.yaml are shown below.
keyValue:
  type: dynamodb
  dynamodb:
    region: us-east-1
    accessKeyId: your_access_key
    secretAccessKey: your_secret_key
    table: inetsoft
    provisionedReadThroughput: 300
    provisionedWriteThroughput: 300
blob:
  type: s3
  cacheDirectory: "/cachedir/blob"
  s3:
    region: us-east-1
    accessKeyId: your_access_key
    secretAccessKey: your_secret_key
    bucket: inetsoft
Azure
| This feature is available only in Enterprise Edition. |
Azure uses CosmosDB for key-value storage and Azure Blob for blob storage. Variable definitions for docker-compose.yaml are shown below for Azure cloud-native implementations:
INETSOFTCONFIG_KEYVALUE_TYPE:"cosmosdb"
INETSOFTCONFIG_KEYVALUE_COSMOSDB_ACCOUNTHOST:"https://localhost:8081"
INETSOFTCONFIG_KEYVALUE_COSMOSDB_ACCOUNTKEY:"your_account_key"
INETSOFTCONFIG_KEYVALUE_COSMOSDB_DATABASE:"inetsoft"
INETSOFTCONFIG_KEYVALUE_COSMOSDB_CONTAINER:"inetsoft"
INETSOFTCONFIG_KEYVALUE_COSMOSDB_THROUGHPUT:400
INETSOFTCONFIG_BLOB_TYPE:"azure"
INETSOFTCONFIG_BLOB_CACHEDIRECTORY:'/var/lib/inetsoft/blobCache'
INETSOFTCONFIG_BLOB_AZURE_CONNECTIONSTRING:"your_connection_string"
INETSOFTCONFIG_BLOB_AZURE_CONTAINER:"inetsoft"
You can configure storage in the inetsoft.yaml file instead of defining Docker variables as shown above, but this will require you to package additional JAR files or create a derived image. The corresponding settings for inetsoft.yaml are shown below.
keyValue:
  type: "cosmosdb"
  cosmosdb:
    accountHost: "https://localhost:8081"
    accountKey: "your_account_key"
    database: "inetsoft"
    container: "inetsoft"
    throughput: 400
blob:
  type: "azure"
  cacheDirectory: "/cache_dir/blob"
  azure:
    connectionString: "your_connection_string"
container: "inetsoft"| This feature is available only in Enterprise Edition. |
Google uses Firestore for key-value storage and GCS for blob storage. Variable definitions for docker-compose.yaml are shown below for Google cloud-native implementations:
INETSOFTCONFIG_KEYVALUE_TYPE:"firestore"
INETSOFTCONFIG_KEYVALUE_FILESTORE_SERVICEACCOUNTFILE:"/path/to/credentials.json"
INETSOFTCONFIG_KEYVALUE_FIRESTORE_COLLECTION:inetsoft
INETSOFTCONFIG_BLOB_TYPE:"gcs"
INETSOFTCONFIG_BLOB_CACHEDIRECTORY:'/var/lib/inetsoft/blobCache'
INETSOFTCONFIG_BLOB_GCS_SERVICEACCOUNTFILE:"/path/to/credentials.json"
INETSOFTCONFIG_BLOB_GCS_BUCKET:inetsoft
You can configure storage in the inetsoft.yaml file instead of defining Docker variables as shown above, but this will require you to package additional JAR files or create a derived image. The corresponding settings for inetsoft.yaml are shown below.
keyValue:
  type: firestore
  firestore:
    serviceAccountFile: "/path/to/credentials.json"
    collection: inetsoft
blob:
  type: gcs
  cacheDirectory: "/cache_dir/blob"
  gcs:
    serviceAccountFile: "/path/to/credentials.json"
    bucket: inetsoft
Relational Database (JDBC)
Variable definitions for docker-compose.yaml are shown below for JDBC database key-value storage:
INETSOFTCONFIG_KEYVALUE_TYPE:"database"
INETSOFTCONFIG_KEYVALUE_DATABASE_TYPE:"H2"
INETSOFTCONFIG_KEYVALUE_DATABASE_JDBCURL:"jdbc:h2:/data_dir/kv/kv;
MODE=Derby;AUTO_SERVER=TRUE;AUTO_SERVER_PORT=8192;AUTO_RECONNECT=TRUE"
INETSOFTCONFIG_KEYVALUE_DATABASE_DRIVERCLASSNAME:"org.h2.Driver"
INETSOFTCONFIG_KEYVALUE_DATABASE_DRIVERCLASSPATH:["/path/to/database/driver.jar"]
INETSOFTCONFIG_KEYVALUE_DATABASE_REQUIRESLOGIN:true
INETSOFTCONFIG_KEYVALUE_DATABASE_USERNAME:"inetsoft_admin"
INETSOFTCONFIG_KEYVALUE_DATABASE_PASSWORD:"\\masterWer7z5uT6zrmE3tVlPc9rZlW31XeWDA="
INETSOFTCONFIG_KEYVALUE_DATABASE_TRANSACTIONISOLATIONLEVEL:"READ_UNCOMMITTED"
You can configure storage in the inetsoft.yaml file instead of defining Docker variables as shown above, but this will require you to package additional JAR files or create a derived image. The corresponding settings for inetsoft.yaml are shown below.
keyValue:
  type: "database"
  database:
    type: "H2"
    jdbcUrl: "jdbc:h2:/data_dir/kv/kv;MODE=Derby;AUTO_SERVER=TRUE;AUTO_SERVER_PORT=8192;AUTO_RECONNECT=TRUE"
    driverClassName: "org.h2.Driver"
    driverClasspath: ["/path/to/database/driver.jar"]
    requiresLogin: true
    username: "inetsoft_admin"
    password: "\\masterWer7z5uT6zrmE3tVlPc9rLXDZAkZlW31XeWDA="
    transactionIsolationLevel: "READ_UNCOMMITTED"
MongoDB
Variable definitions for docker-compose.yaml are shown below for MongoDB key-value storage:
INETSOFTCONFIG_KEYVALUE_TYPE:"mongo"
INETSOFTCONFIG_KEYVALUE_MONGO_HOSTS: - 'localhost:27017'
INETSOFTCONFIG_KEYVALUE_MONGO_DATABASE:test
INETSOFTCONFIG_KEYVALUE_MONGO_COLLECTION:inetsoft
You can configure storage in the inetsoft.yaml file instead of defining Docker variables as shown above, but this will require you to package additional JAR files or create a derived image. The corresponding settings for inetsoft.yaml are shown below.
keyValue:
  type: "mongo"
  mongo:
    hosts: - 'localhost:27017'
    database: test
    collection: inetsoft
Back Up Stored Assets
| To selectively export assets to use in another server environment, see Import and Export Assets. |
| In Enterprise Edition, when multi-tenancy is enabled (see Enable Multi-Tenancy), this feature is available to Site Administrators only. |
You can back-up stored assets as a Zip archive. Follow the steps below:
-
Press the ‘Settings’ button
at the top of Enterprise Manager. -
Select the General page in the left panel, and select the Storage page in the right panel.
-
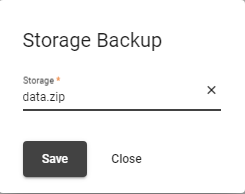
To immediately back up assets, follow the steps below:
-
Press the Back Up Now button. This opens the ‘Storage Backup’ dialog box.
-
In the ‘Storage’ field, specify the backup file name, e.g.,
data.zip. -
Press Save. This saves the new Zip archive (with an added date and time code, such as data0121211709.zip) in the configured file directory (default: /var/lib/inetsoft/files), which is set from docker-compose.yaml with the
INETSOFTCONFIG_EXTERNALSTORAGE_FILESYSTEM_DIRECTORYtag.
-
-
To schedule assets to be automatically backed up at a regular interval, follow the steps below:
-
Press the Schedule Backup button. This opens the Tasks tab for the built-in
__asset file backup__task.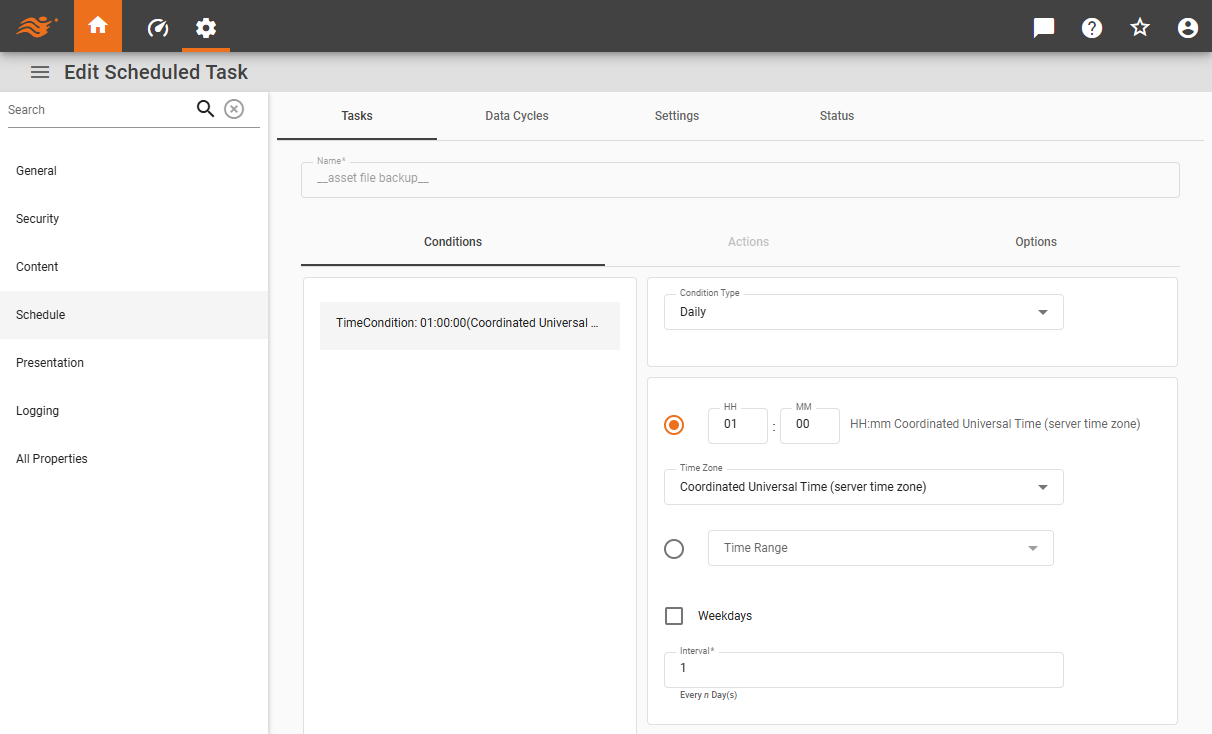
-
Specify the desired interval under the Conditions tab and press the Save button at the bottom of the page. See Scheduler Conditions for more information about specifying a time interval.
The Zip archive is saved into the backup directory of the configured file directory (default: /var/lib/inetsoft/files) with the filename
data-<timestamp>.zip(e.g., /var/lib/inetsoft/files/backup/data-20250623212535.zip). The file directory can be set from docker-compose.yaml with theINETSOFTCONFIG_EXTERNALSTORAGE_FILESYSTEM_DIRECTORYtag. -
The number of backup copies to retain is controlled by the property asset.backup.count (default=3). See All Properties for information on how to set properties. Note that large backup count may consume significant storage space and should be monitored regularly.